September 12, 2020

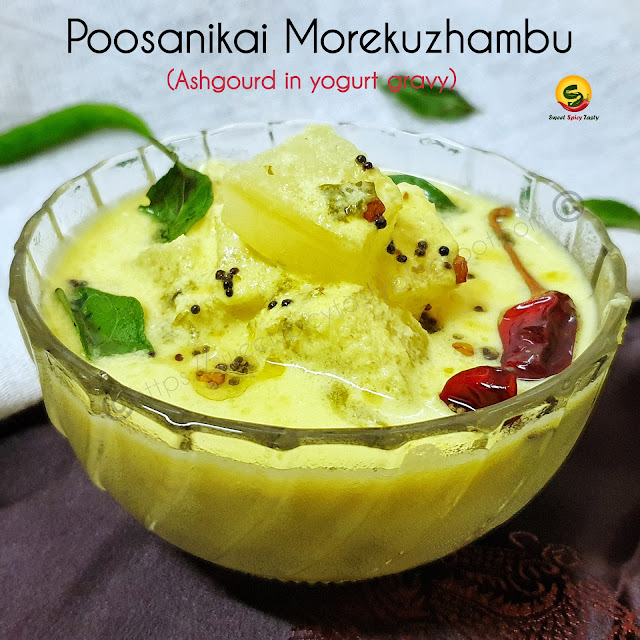
Poosanikaai Morekuzhambu | Ash gourd in yogurt gravy


Share with friends and family 11 comments:

 Morkuzhambu /Mor kulambu / Mor kolambu is a flavorful curry made out of yogurt /dahi and freshly ground coconut masala.  This South indian delicacy  is very rich in calcium and vitamin C . We use fresh coconut in this recipe and just 1 tsp of oil which is used as part of tempering.  Technically this can be called as an oil free recipe.  If you may like even non fat yogurt or very low fat yogurt can be used to prepare mor kolambu.

No South Indian feast is complete without serving Morekuzhambu.  In Tamil Nadu we say Morekuzhambu while in kerala it is called as Mor curry / pulissery / kaalan , Andhra it is known as Majjiga Pulusu and Majjige Huli in Karnataka. This curry is served with hot rice and often paired with potato roast .

Morkuzhambu /Mor kulambu / Mor kolambu is a flavorful curry made out of yogurt /dahi and freshly ground coconut masala.  This South indian delicacy  is very rich in calcium and vitamin C . Poosnikaai morekuzhambu , poosani mor kuzhambu , elavan mor kootu , elavan mor kootaan , mor kolambu, more kozhambu, how to make tamil nadu style majjige huli , majjiga pulusu

Even if the names are different the method of preparation is more or less the same  except for a few minor changes in terms of the ingredients used to grind . Traditionally native vegetables like Ash gourd/poosnikai /elavan / kumbalkai , ladies finger /vendakkai , Arbi/seppankizhangu /taro root , Mangalore cucumber go into the Morkuzhambu . Now a days people like to experiment with flavors and use capsicum, tomatoes , potatoes also in the mor kolambu but I prefer to stick to the traditional vegetables as it retains the authenticity and flavor of the curry when paired with a spicy curry .  You may try my version of vendakkai (bhindi) morkuzhambu which I have already have on my blog.

The subtle flavor of yogurt curry when paired with a spicy stir fried vegetable like potato roast, arbi (seppankizhangu) roast or paruppu usili enhances the taste and is indeed a treat to our palate.

Preparation Time - 10 mins
Cooking Time - 30 mins
Serves - 3 to 4
Complexity - easy 

Morkuzhambu /Mor kulambu / Mor kolambu is a flavorful curry made out of yogurt /dahi and freshly ground coconut masala.  This South indian delicacy  is very rich in calcium and vitamin C . Poosnikaai morekuzhambu , poosani mor kuzhambu , elavan mor kootu , elavan mor kootaan , mor kolambu, more kozhambu, how to make tamil nadu style majjige huli , majjiga pulusu


Ingredients 

250 gms ashgourd/elavan /pumpkin/poosnikai
250ml thick yogurt 
100 ml water 
2 tsp oil
1 tsp mustard 
1/2 tsp methi /fenugreek seeds
2 to 3 dry red chillies 
fresh curry leaves 
pinch of turmeric 
Pinch of asafoetida 
salt

To grind
 6 to 7 tbsp  fresh grated coconut 
1/2 tsp jeera/cumin 
3 to 4 green chillies 
1 tsp channa dhall /bengal gram
2 tsp dhaniya /corriander seeds
Small piece ginger 

Method 

Soak all the ingredients under the "to grind" section in water for 10 to 15 mins and grind into a fine paste .

Peel the skin of the pumpkin and cut into 1 inch cubes . In a thick vessel , add the chopped pumpkin cubes , pinch of salt and some water and  cook until the pumpkin is 3/4th cooked. They shouldn't over cook and turn soggy . The crunch in the pumpkin must be maintained. 


Whisk the yogurt until is creamy and smooth. 

Add in the ground spice paste to the whisked yogurt along with salt and turmeric powder and mix well with water mentioned . Donot add too much water , else the mor kuzhambu will be runny and will split on boiling.  Check the video below to know the right consistency. 

Add this yogurt mixture to the boiled pumpkin pieces and continue to cook on medium flame until the mixture starts frothing up . 


Remember to turn it off at this stage..continuing to cook further will end up in splitting the yogurt..we donot want that to happen. 

Prepare a tempering of mustard seeds , methi  Curry leaves and dry chillies in hot oil and pour it over the mor kuzhambu.  The consistency of the mor kuzhambu is demonstrated in the below video.


Most important tip : do not close the mor kuzhambu with a lid until it has cooled down  completely.  The reason is,if we close when it is still hot , the water droplets formed due to steam tend to spoil the taste and texture of the mor kuzhambu. 


September 09, 2020

Lip smacking chutneys - Saatvik & Vegan


Share with friends and family No comments:

 Chutneys are a quint essential part of the breakfast menu . No breakfast is complete without the accompaniment of a delicious chutney.  

There are so many variants in making chutney and no two chutney will taste the same . Each recipe is unique in its own way .

Each morning we need to think of what chutney to prepare for the breakfast and it indeed gets on the nerves sometimes to rack our brains to prepare and present something which is tasty and different at the same time.

So to help you all with this issue , I am making this post with a collection of some delicious chutneys which you can prepare in rotation for 7 days a week :-) 

Do try these and give me your feedback on how your family liked these .. 

Check the recipe links given below the image


Individual recipe links 

Yam / Suran Chutney ( sennai kizhangu thogayal ) -  Video recipe

September 07, 2020

Herbal drink | Kadha | Kashayam


Share with friends and family 14 comments:

 In Tamil there is a saying "Unnave Marundhu aagum" meaning "Food can be the best medicine " and I totally agree to it . Each ingredient in our pantry has its own medicinal effect .

Our Masala dabba or Anjarai Petti is a mini medicine box in itself . Our elders used each of these ingredients so meticulously and more so they used them according to seasons and climatic conditions so that the family remained healthy and disease free.

To quote some ; fenugreek , buttermilk /curd , lemon, jaggery based dishes were made more frequently during summer months to keep the body cool and hydrated while recipes using ginger, pepper , curry leaves , ajwain were made during winter and monsoons which is when seasonal sickness like flu , cold cough etc would creep in. 

Some ingredients like jeera , asafoetida,turmeric,ghee ,dhaniya/corriander seeds which have general health benefits were used as a part of day to day cooking .

Apart from these,herbal concoctions known as kaadha,kashaya, kashayam used to be consumed incase people fell sick with minor ailments like cold ,cough,loose motions,stomach disorders ,mild fever etc . These were known as Nanima k nuske or Paati Vaidhiyam and were very effective if consumed correctly. 

Yester year generations or our ancestors tried to treat and heal the body naturally instead of providing external medical supplements.  Ancient scriptures have enough evidence to prove how Indians were pioneers in the field of medical study like Ayurveda , Siddha etc .


I have already blogged two different types of kaadha/ kashayam; one using fresh ingredients and another one using a herbal spice powder which can be prepared and stored. Click on the images below for the detailed recipes of Kashayam and Herbal tea .
 .

Thanks to Aruna of Vasu's veg kitchen who suggested we all share some Herbal Home remedies or Paati Vaidhiyam as part of this week's Foodie Monday Bloghop event theme . She has a very simple but effective Ginger and Lemon green tea to boost immunity and aide weight loss.

As this is a season of monsoon, there is every likelihood that we may get drenched and come down with some mild viral fever or body aches, in that case try to have this warm herbal concoction 2 to 3 times a day to get relief . 

Today we shall see another very simple concoction using just 3 ingredients which are easily available on our kitchen shelves.  Detailed recipe below

Dry ginger powder (sonth/chukku) - very good analgesic and antioxidant .

Turmeric powder /Haldi - antiseptic, anti inflammatory, anti viral as well as anti bacterial 

Pepper powder  - Aids digestion, respiratory relief, fights cold and also enhances the effect of other herbs.

**pls do seek medical advice if you experience any other symptoms.  These are just home remedies to get better along with medication

Preparation Time - 2 mins
Boiling Time - 3 mins
Complexity - simple 


Ingredients 

1/2 tsp dry ginger powder
2 pinches turmeric powder
1 pinch pepper powder 
1 glass water (200ml)

 Method 

  • Add all the above ingredients to water and boil it well for 2 to 3 mins.
  • Strain this decoction and drink it warm atleast  2 to 3 times a day to get relief. Prepare it fresh as far as possible instead of reheating. 
  • You may add some honey , jaggery or palm candy (panam kalakandu) if you find the concoction pungent . 
  • Donot use sugar to sweeten this drink.

Linking it to week # 263 Herbal & Health of FMBH 


September 06, 2020

Boondi Raita - Satvik recipe


Share with friends and family 6 comments:

 Raita is an accompaniment made using whisked yogurt /dahi with some added spices like cumin powder, red chilli powder , salt  and finely chopped or grated vegetables like onions, cucumbers, tomato, radish, carrot or boondi as in this recipe today .

What is Boondi ?

Boondis are tiny deep fried balls made using chick peas flour/ besan/ kadalai maav .

Can we make Boondi at home ? 

Yes . Boondi can be made at home easily but it needs a little practice to get perfect small balls . If you would like to make boondis at home, check the boondi recipe on my blog here .

Where can I get boondi to make this raita ?

Boondis are available in most shops which sell Indian snacks. You can use the plain boondi or the khara boondi (spicy variety) to prepare the raita .

With what can I serve boondi raita ?

Boondi raita is a perfect accompaniment for any type of pulao, biryanis and spicy stuffed parathas. 

What are the other types of raita ?

Raita Varieties on my blog which you can try


Preparation Time - 5 mins
Cooking Time - Nil 
Complexity - easy 

Ingredients 

200gms thick yogurt /dahi 
50gms (2 fist fulls) boondi - plain or khara boondi 
1/2 tsp red chilli powder (skip if using khara boondi) 
1/2 tsp jeera/cumin powder 
1/2 tsp kala namak (black salt) /chat masala 
1/2 tsp sugar
Pinch of salt 
Finely chopped fresh corriander 

Method

  • Whisk the yogurt well until it is creamy .The yogurt should not be sour.So pls ensure you are using fresh and chilled yogurt .
  • Soak the boondi in warm water to remove the stale smell of oil if using store bought boondi.  For home made boondi you can skip this step .
  • Add the salt, sugar , cumin powder , red chilli  powder and black salt to the yogurt and mix it well.
  • Squeeze out the water from the boondis and add it to the yogurt mixture. 
  • If using home made boondis, add the crisp boondis directly to the yogurt and mix it . 
  • The boondi will absorb the yogurt and swell up by absorbing all the flavors.  Keep it chilled until serving.  
  • Garnish with some fresh corriander and a few crisp and crunchy boondis just before serving. 

Notes

  1. I have used home made khara boondis and hence did not add red chilli powder. 
  2. Boondis already have salt in them, so adjust the quantity of salt accordingly else it will be too salty.
  3. You can use either home made yogurt or store bought but it should not be sour or old . Use fresh dahi always. 

September 04, 2020

Nendran Chips | Kerala Banana Chips | Yellow Banana wafers


Share with friends and family 6 comments:

When life gives you lemons you make lemonade is a popular verse, likewise when your vegetable vendor gives you fresh tender Nendrankaai /Kerala Banana then you have to make crispy crunchy chips .

Nendran is a variety of banana which is native to Kerala and has a very unique flavor and taste. The raw variety is called as Nendran Kaai and the ripe/fruit variety is known as Nendran Pazham/Ethaka Pazham.


The raw (kaai) variety has a green outer skin and is hard to touch while the ripe (pazham) has a yellow outer skin and it can be peeled easily like a normal ripe banana.


The Pazham (fruit) is an integral part of breakfast in Kerala and is generally steamed and served along with puttu and kadala curry 
.Nendran Pazham is also used to make many types of sweets and kheer .

Apart from making chips using the nendran kaai the peeled skin is also put to use by making a stir fry with it . I haven't tried this stir fry but am planning to try it the next time I lay my hands on this delicious banana variety. 

The speciality of this variety of banana is that it gets a natural yellow color when fried in oil even without the addition of haldi/turmeric powder. 
If we want to have a slightly bright yellow colored chips as we get in the shops we can add some turmeric to salt water mixture which we shall be using to add to the fried chips . 

You will get to savor the exact taste and flavor of these kerala banana chips  only if you fry them in coconut oil , so donot compromise on that step.In case you don't have an access to edible coconut oil, you can fry them in regular cooking oil .


Preparation Time : 10 mins
Frying Time :4 to 5 mins per banana
Complexity  - medium

Ingredients 
4 to 5 nendran bananas
200 ml edible coconut oil / regular cooking oil
1 tsp salt
1/2 tsp haldi /turmeric 

Method

Peel the skin of the bananas and soak them in water .This soaking is mandatory as it removes the stickiness from the banana and also prevents it from turning black due to oxidation.  If the bananas as large in size , then cut them into halves and soak it. 


Dissolve the salt and turmeric in some water and keep it ready. We will sprinkle a tsp of this salt water into the oil while frying the chips.By doing this the salt gets absorbed evenly into the slices of chips and we need not add salt separately 


Apply oil to the blades of your slicer and adjust the level of thickness. The slices of this chips are slightly thick. Applying oil makes it easy to slice the bananas . Bananas have natural fibre and stickiness which makes it slightly difficult to slice..when the slicer blades are greased the slices fall easily .Also ensure the slicer has a sharp blade .


Keep the oil for heating and in the meanwhile take the banana and slice them . If you are comfortable you can directly slice them into the hot oil by holding the slicer over the hot oil. Slicing directly into hot oil requires practice , so if you are a beginner , best is to slice them separately and then slip into the hot oil one by one . Slice 1 banana at a time . If you slice all the bananas before hand they will turn black.


Once the oil is heated well, drop the banana slices one by one , give it a quick stir and reduce the flame to medium.  


After about a minute , you will observe that the chips are half done , now reduce the flame to minimum and take a tsp of salt water and spread in the oil . Be careful here as the oil will tend to splutter . You can see a lot of bubbles and hear crackling sound when oil and water come into contact. This sound will start fading away slowly and the sound also will reduce. 


Now turn them flame to medium high and stir the chips occasionally and gradually the bubbles will disappear and so will the hissing sound fade away . This is an indication that the chips are done. If you take a chip and drop it on a plate you can hear a nice crisp sound . This is the test to check if chips are fried well . Frying it more will make it turn brown.


Drain the chips carefully and transfer it to an airtight container and store it away from moisture.  Delicious kerala style banana chips ready .


 Check my Youtube video on how to make chips from regular raw banana and donot forget to like and subscribe to my channel.


September 01, 2020

Choco Orange Cake - 300th post :-)


Share with friends and family 24 comments:

Whoa today happens to be my 300th post and what best to suit the occasion than sharing my favorite Choco Orange Mug Cake . I would like to thank each and everyone who has been a part of my journey in this world of blogging.

A special thanks to my hubby Vj and Kalyani for having constantly motivated and boosted me for 3 long years to get back to blogging when I had taken a break due to personal reasons. If not for them, I wouldn't have been able to restart. 

I am happy to have been introduced to so many wonderful bloggers through these two lovely groups (FMBH and Shh cooking secretly) and it is so nice to keep interacting with all on a regular basis and  feels more like an extended family.

Orange and Chocolate are a match made in heaven and we i.e. hubby and me love this bitter and tangy combination a lot .

This month for our Shhh cooking secretly challenge Mayuri ji of Mayuri's Jikoni suggested Chocolate as the main theme and who can say No to such a classic theme . Mayuri ji's latest recipe Chocolate Truffles is on my to do list .Those cute truffles are an absolute treat to the eyes and am sure they are as delectable as they look . 

I was paired with Seema who blogs on Mildly Indian which is a treasure of classic recipes and there are some really unique recipes like the Sugarcane juice Poha Pongal (Karumbu chaar Aval pongal) which I would like to try . She gave me Baking soda and sugar as my secret ingredients while I gave her milk powder and dryfruits with which she has dished out Cocoa Nibs & Lime bliss balls  which look absolutely delicious. 

 Now coming to the recipe, though this is ideally mug cake, I tried to make it in cups because I just wanted to try something fancy and different :-) Who says mug cakes can't be baked in cups ? 

I am not a pro baker so I took the easy route of making it in the microwave and satisfy my craving for a nice chocolate cake which I was missing from my favorite bakery . So for all those who are skeptical about baking , go ahead and try this easy peasy cake in microwave and satisfy your cravings. 

Preparation Time - 10 mins
Baking Time - 90 seconds 
Complexity - simple 


Ingredients 

1/2 cup maida / APF
1/2 cup chilled orange juice 
3 tbsp oil ( sunflower/ rice bran oil works well)
1/3 cup powdered sugar 
1 tsp vanilla essence
2tbsp cocoa powder 
1/4  tsp baking soda
1/2 tsp baking powder
Pinch of salt
1/2 chocolate bar 

**donot use eyeball measurements. Use measuring cups and spoons and follow the recipe exactly if you want to get the perfect cake .
Method 

  • Take 3 microwave safe porcelain cups or ramekins and grease them with some butter and keep it in fridge until use .
  • Take 2 mixing bowls, one for wet ingredients and other for dry ingredients .
  • In one bowl add the chilled orange juice, oil , powdered sugar and vanilla essence . Mix it well until the sugar dissolves completely.  The chilled orange juice helps to emulsify the oil .
  • Take the dry ingredients maida, cocoa powder, salt, baking soda, baking powder in a seive/chalni and sieve it into another dry bowl.
  • Now slowly add the dry ingredients into the wet ingredients and simultaneously keep mixing using the cut and fold method  till the mixture appears lump free and of a dropping  consistency.  Donot beat or mix it too hard .
  • Now bring out the greased cups and pour the cake mixture until half the cup , place a few chocolate bits in center of the cake mix and cover it with some more cake mixture . Fill only 3/4th of the cup  leaving space for the cake to raise.
  • Place the cups in the microwave and set it for 90sec . Take it out and let it cool for a few minutes before you can savor it. 
  • The chocolate bits would have melted inside and you can get a nice gooey feel when you cut into the cake . 

Notes

I have used bournville chocolate bits but you can use any brand of chocolate or even compound chocolate works good .

The orange juice can be replaced with chilled water if you don't like the chocolate and orange combination. 

Linking it to Shhhh cooking secretly challenge - Chocolate theme for August 2020