January 29, 2022

Veggie Cheese Toast / Vegetable Cheese Toast- stove top (tawa) version


Share with friends and family
8 comments:

 Veggie cheese toast is a quick snack that can be prepared in less than 20mins and served as breakfast,  after school snacks or even as party starters . 

The grated cheese on top is a sure shot child pleaser and the best way to attract children and feed them their share of vegetables disguised under the cheese 🧀.  


I have used less cheese but you can use the cheese depending on your liking and taste . I basically don't like too much cheese while hubby loves cheese, so his share of toast had a liberal topping of cheese while mine was very very less. We had this yummy toast sandwich with piping hot tomato rasam and it was a complete meal by itself. 

Veggie cheese toast pairs well with Lemon corriander soup as well . The level of crispness of the toast is also purely your choice.  If you like a crisp toast, then toast it for some extra time on the tawa on medium flame ensuring that you don't burn the base .


Preparation Time - 10 mins 
Cooking Time - 15 mins
Complexity - easy 
Serves - 2 to 3 

Ingredients

8 slices of bread of your choice (sandwich/multigrain/brown bread) 
3 to 4 cubes of processed cheese / mozzarella cheese grated. 
2 small carrots peeled and grated 
Handful of fresh /frozen peas 
Handful of frozen corn 
1/2 capsicum finely chopped
1 tomato finely chopped 
1 green chilli finely chopped 
Mixed herbs for seasoning 
1 tsp oil 
Pinch of turmeric 
Pinch of red chilli powder
Pinch of sugar 
Fresh corriander chopped 
Salt as needed 
Butter as needed 

Method 


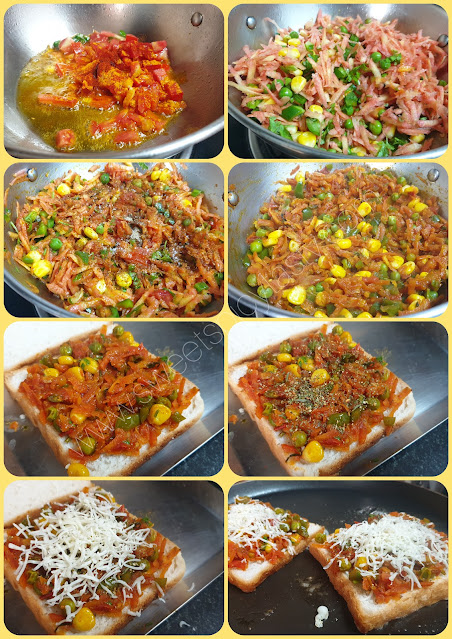
  • In a pan , heat the oil and fry the green chillies followed by the tomatoes.  Add turmeric and red chilli powder and cook until the tomatoes turn mushy. 
  • Add the grated carrots, peas,capscium and corn, saute ,sprinkle some water and cook covered for 3 to 4 mins until the carrots are well cooked and forms a nice and juicy stuffing. 
  • Add a pinch of sugar ,freshly chopped corriander and mix it well . Let the stuffing cool for a few minutes. 
  • Take one bread slice and spread the stuffing on it,sprinkle some mixed herbs and grated the cheese on top as much as like .
  • Place this slice of bread on a hot tawa with a little butter and cover with a lit till the cheese melts.  Open the lid and continue to toast on low flame till the bread becomes crisp and crunchy. 
  • Remove it from the tawa and place it on a cooling rack and then cut it into slices and serve with soup , rasam or even piping hot tea or coffee.
  • Repeat the same for the other slices of bread . You may also saute some onions along with the tomatoes for an added taste .

Other sandwich varieties on my blog 

Vegetable Cheese Grill Sandwich 

Bombay Toast Sandwich 

Chutney Cheese Sandwich 

Cheesy Bread Bites


pinned me ??


January 26, 2022

Pineapple Kesari | Pineapple Sheera - 400th Post


Share with friends and family
5 comments:

 Am so very excited and glad to publish my 400th recipe today and so elated as it co incides with the 73rd Republic Day of My Country, India .

Any special occasion is incomplete without a sweet and here is another yummy and lipsmacking sweet from my mom's kitty - Pineapple Sheera. Also known as pineapple kesari Baath or pineapple kesari, it's a delicacy from the state of Karnataka and is often served in weddings for Breakfast or evening snacks along with Khara Bhaath .

I thank every single person who has helped me in my blogging journey in whatever way possible . My Family and friends have always been very supportive of my work and have encouraged me at all times and made sure I push my boundaries more and more .

Amma would make the best Sheera/Kesari in the world and we can never forget that taste. She never liked using artificial  color or essence to the sheera and was always particular about that. 

Pineapple sheera was her all time hit .She always used little turmeric powder for the color and only fresh juicy pineapples would go into the kesari ,no essence or canned pineapples either .

The small juicy bits of pineapple with every spoonful of kesari is a delight and best enjoyed when the sheera is served warm with the right amount of ghee . 

As I always say,to get the perfect grainy and tasty sheera,the key is in roasting the rava/sooji/semolina to perfection on a medium flame in right amount of ghee . 

Preparation Time - 10 mins

Cooking Time - 20 mins

Serves - 2 to 3

Complexity - medium 

Ingredients 

1 cup rava 
2 cups water 
10 tbsp ghee 
1/2 cup freshly chopped pineapple 
1 cup sugar
Few saffron strands
Pinch of turmeric 
Few cashewnuts 

Method 


Method

  • Cook the pineapple with 1/4 cup water , 2 tbsp sugar and few saffron strands until the pineapples turn soft.  This step will ensure that the kesari doesn't turn tart with the use of fresh cut pineapples. Let this cool for a while. 
  • Place a sauce pan with the 2 cups of water for boiling. 
  • Heat about 3 tbsp of ghee in a kadai and fry the cashews until golden brown followed by the rava .
  • Keep roasting the rava until you get a fragrant aroma and the ladle feels light to handle while roasting. 
  • Pour 2 cups of boiling water along with a pinch of turmeric and quickly stir to avoid lumps . Cook until all the water is absorbed into the rava .
  • Add the cooked pineapple, 2 tbsp ghee and mix it well. 
  • Now go ahead and add the sugar and mix it nicely.  The kesari/sheera will appear liquid again as sugar melts,but continue cooking on medium flame until the sheera starts thickening again.
  • Add the remaining ghee in batches and keep stirring till the sheera leaves the sides of the pan and appears to be shiny ,glossy and smooth. 
  • Delicious pineapple sheera is ready to be served warm .
  • The shelf life of pineapple sheera is ab2 days when kept in fridge.  I don't like to keep it for a long time and consume as the tartness from the pineapple tends to impart an odd after taste after 1 or 2 days.


January 24, 2022

Avarekaalu Mixture | Hyacinth Bean Crispies


Share with friends and family
5 comments:

 Avarekaalu Mixture is a speciality of Karnataka prepared by deep frying fresh hyacinth beans /avarekaalu . This tea time snack is very  very addictive and pairs well with piping hot filter coffee or Masala Tea .  

Fresh Avarekaalu is a delicacy and people's favorite in karnataka and is widely used in many recipes during the winter season.  I have tasted this yummy mixture in many occasions and from then it has been on my mind to try it at home .

Avarekaalu Akki roti , Avarekaalu Uppit are 2 of my favorites made from fresh hyacinth beans which are a must have in the season atleast couple of times .

This time around I got some really fresh and tender hyacinth beans and the weather was also just perfect to prepare and munch on.

There is no particular or hard and fast recipe to prepare this mixture, its purely eye ball measures and ingredients of your choice.  

Only one thing we need to take care is to soak the fresh avarekaalu for about 3 to 4 hrs in water and peel the outer skin before making the mixture. This is called Hithkidha Avarekaalu .


How to prepare Hithkidha Avarekaalu /Hithkidha Avarebele ? 

Soak the freshly peeled avarekaalu from the pods in a wide bowl containing water for 4 t 5 hours. Drain the water and press the beans between your fingers lightly and viola,the skin just comes off . Discard the skin and spread the peeled beans on a wide tray or on a cotton muslin cloth for the moisture to be absorbed before making the mixture. 


Preparation Time - 4 to 5 hrs

Frying time - 20 mins

Complexity - medium 

Ingredients 

1.5 cups hithkidha avarebele
1/4 cup groundnuts
3 to 4 tbsp roasted gram /hurigadle/pottu kadlai
1/2 cup thick poha /avlakki/aval 
1 cup raw corn flakes /makai poha 
Fresh curry leaves 
1/2 tsp turmeric
1 tsp red chilli powder
1/2 tsp powdered sugar 
Salt as needed
Pinch of asafoetida 
Oil to deep fry

Method 


  • Heat oil a deep kadai /wok .
  • First add the hithikdha avarebele and fry until it turns crisp and moisture free. Initially while frying ,it will remain at the bottom of the kadai and as the frying continues the avarebele will start floating on top . Once all the avarebele start floating on top,the oil will stop hissing and sizzling.  This indicates that the avarebele are fried well ..drain the slowly onto a colander .
  • Next fry the peanuts until crisp and golden brown followed by the roasted gram and curry leaves .
  • Fry the makai poha till they turn crisp and fluffy. 
  • Lastly fry the avlakki and drain it out .
  • In a wide mixing bowl,gently toss all these fried ingredients along with turmeric, chilli powder, salt,asafoetida, powdered sugar .
  • Delicious avarebele mixture is ready to be enjoyed !

Some more mixture varieties on my blog 

Cornflakes chiwda

Poha Chiwda

Sabudana Faraaali Chiwda

Diwali Spl Mixture (Madras Mixture)


Pinned me yet ? 


January 10, 2022

Methi Thepla | Fresh fenugreek flat bread


Share with friends and family
7 comments:

A typical gujurati breakfast on a winter morning will comprise of piping hot thin methi theplas served with spicy mango pickle, curd and aromatic steaming hot masala chaai .

I am sure this description is making you drool right away ! I had already posted a recipe of Kasuri Methi theplas which are made from sun dried fenugreek leaves during off season when fresh fenugreek isn't available. Today we shall see how to make the tastiest and perfect methi theplas using fresh fenugreek leaves .

Methi theplas make a very frequent appearance in my home during winters.We love to have hot hot theplas for dinner alongside some simple gravy or even plain dal but the best combo for theplas is potato curry if you are having it for dinner or packing it for a picnic lunch .

Separating the tender methi leaves from the stem is the only time taking part which we need to do very patiently.  If the stem is tender and thin,then I chop that also finely along with the leaves but make sure you discard the stem of they are too thick . Thick stems will make it difficult while rolling out the theplas and the theplas will tear which we don't want.  


Preparation Time : 10 -15 mins
Resting Time : 15 mins
Cooking Time : 2 mins per thepla
Makes : 13-14 theplas
Complexity  : Medium

Ingredients
2 cups whole wheat flour
2 tbsp curd
2 tbsp besan / gram flour
1/2 tsp ajwain/carom seeds 
1 tsp haldi / turmeric
1 tsp red chilli powder
1 cup packed - finely chopped fresh methi 
Salt as needed
Oil to fry the theplas

Method


  • In a wide mixing bowl add in the haldi powder , red chilli powder ,ajwain and salt to the chopped methi and mix it well with your fingers to release the flavor and essence of methi .
  • Add  wheat flour,gramflour, 1 tablespoon oil,curd to the methi and knead a soft but pliable dough by adding water at intervals . 
  • Methi when mixed with salt and spices will release some water ,so be careful while you add water to knead the dough. Just sprinkle water little by little and knead.
  • Coat it with some oil and knead again and keep covered with a tight lid or a muslin cloth and set aside for 15 mins. 

  • Pinch out small balls from the dough , dust it with some dry wheat flour and roll it into thin rotis using a rolling pin.
  • Heat a tawa or griddle and put the rolled out thepla on the hot tawa .
  • Cook on one side with a little oil and flip over.  Do it on low flame. 
  • Drizzle some more oil and cook the under side until it is well cooked.
  • Use oil little generously if you want to keep the theplas for 3 or 4 days . The oil will ensure the theplas won't get spoilt. 
  • Take it off the pan and store it in a dry container or wrap in aluminum foil .

Some more lipsmacking delicacies using Fresh Methi 

Methi na Gota (pakoras)

Cabbage Methi Pakoras 

Methi Puri 

Methi Dal 

Aloo Methi Sabji


Donot forget to pin me up :-) 


January 09, 2022

Kos (Cabbage) Kootu | South indian style cabbage lentil curry


Share with friends and family
14 comments:

 Winter is the best time to enjoy and relish fresh vegetables.  These days though almost all vegetables are available year round ,there is always something special about buying and cooking winter special veggies .  Cabbage and carrots are my most fav winter vegetables. 

My favorite for lunch time would be the yummy mildly spiced Cabbage kootu which mom would serve with hot rice ,ghee and roasted papad .

As a child,I would love to visit the vegetable market with my mom to enjoy the beautiful display of crisp fresh winter produce namely radishes, cabbages,cauliflower,  spinach (palak), fresh methi (Fenugreek) ,capsciums,carrots , broccoli etc . The vendors would have stacked them so perfectly that one would not feel like disturbing the stack .

Gajar would be bought unfailingly to make garma garam gajar halwa and methi ,cabbage ,cauliflower would also join the band wagon to get transformed into yummy methi theplas , gobhi parathas , pakoras etc .

This month in our food group Shhh cooking secretly, we had decided on Healthy Cooking as the theme . I was paired with Anu Kollon of Ente Thattukada and we exchanged our secret ingredients to dish out our healthy recipes . Anu has dished out green peas egg stir fry which I am sure will be a hit with egg lovers and I chose to make this humble and protein packed Cabbage Kootu which is a family favorite at my place.  Hubby loves to have paruppu podi rice and cabbage kootu while I love to have kootu rice and papads with some pickle or cool Vellarikaai Pachadi in summer .


Preparation Time - 15 mins
Cooking Time - 20 mins
Serves - 2 to 3 
Complexity - easy 

Ingredients 
2 cups chopped cabbage 
1/2 cup frozen or fresh peas 
1/2 cup moong dhall/paasi paruppu 
4 - 5 tbsp fresh grated coconut
1tsp jeera 
1/2 tsp pepper corns 
3 to 4 dry red chillies 
1 tsp coconut oil 
1 tsp mustard seeds 
Pinch of turmeric
Salt as needed 
pinch of asafoetida 
Few fresh curry leaves 

Method 

  • Wash the moong dhall thoroughly and pressure cook with 2 cups water and pinch of turmeric until soft and mushy .
  • Boil the cabbage and peas in a deep pan with water and some salt .
  • Grind the coconut, red chillies,  jeera,pepper into a fine paste .
  • Add this ground paste to the cooked cabbage and bring to a rolling boil then add the cooked moong dhall to this cabbage and mix well . Adjust salt if needed 
  • Add 1/2 cup water and bring to a rolling boil while you keep stirring the kootu else it will get burnt easily because of coconut paste .
  • Prepare a tempering of mustard seeds and curry leaves in coconut oil and pour over the kootu . Mix the tempering and serve hot with rice. 
  • Goes well with rotis too .


Have you pinned me ?