Showing posts with label Festival Special-Diwali. Show all posts

July 05, 2022

Patal Poha Chivda / पातळ पोहा चिवडा - vegan snack (low fat)


Share with friends and family 10 comments:

 Chiwda is a traditional Maharashtrian snack made during Diwali alongwith the various other snacks. 

Patal Poha chivda is prepared using thin paper variety rice flakes and very easy to make. Hardly uses a few spoons of oil ,making it a healthy choice to indulge.  A perfect snack to compliment a hot glass of coffee or tea . You can make this anytime during the year and store it in an airtight container.  Stays good for almost 10 days. 

Patal poha chivda is made by dry roasting the poha and is seasoned with mild spices and garnished with lots of roasted groundnuts, roasted gram and even cashew nuts .

Having grown up with a lot of Maharashtrian friends around this snack was a regular feature at home and even now I make it frequently but somehow it never made it to the blog .

This time when Poonam suggested Maharashtrian cuisine for our Shhh cooking secretly group,  I planned to make this chiwda with the secret ingredients Green chilli and roasted gram given to me by Aruna and she prepared Khamang kakdi - healthy cucumber salad using the secret ingredients peanut and mustard that I gave her . Poonam's Shakkarpaare is my next in list for 4pm snack. 

Some traditional Maharashtrian snacks from my blog for you all to enjoy 

Cornflakes Chiwda 

Poha Chiwda

Sabudana Chiwda

Thikhat Shankarpaali

Kothimbir Wadi 

Sabudana Wada


Preparation Time - 10 mins
Cooking Time - 10 mins
Complexity - easy 
Serves - 3 to 4

Ingredients 

3 cups thin rice flakes /patla poha
1/2 cup groundnuts 
1/4 roasted gram (chutney dal)
2 to 3 green chillies finely chopped
1/2 tsp turmeric
2 tsp powdered sugar 
Handful fresh curry leaves 
2 tbsp oil 
Pinch of asafoetida
Salt as needed 

Method

  • Firstly sieve the poha through a sieve.This step is optional ,you may do this if you find many small powdery  rice flakes in your packet.
  • Heat a thick bottomed pan and dry roast the poha/rice flakes until they turn crispy . If you crush it with your fingers the poha must crumble easily . At this stage ,transfer the roasted poha to a plate .set aside 
  • In the same pan,heat the oil and fry the ground nuts followed by roasted gram,green chillies and curry leaves one after another until they turn crisp. 
  • Add the asafoetida, turmeric powder ,salt and the roasted poha . Toss it gently with a wooden ladle and mix all the ingredients well . Do this on low flame. Turn off the flame and add the powdered sugar in the end and  mix it all gently .
  • Let the chivda cool down for a while ,then transfer it to an airtight container and store away from moisture .


March 17, 2022

Vegetable Bonda | Mix Veg Bonda | Tarkari Bonda - Vegan Snack


Share with friends and family 7 comments:

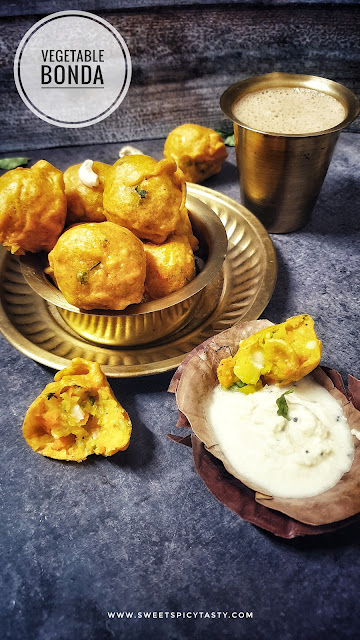
 Vegetable Bonda or mix veg bonda is a very popular tea time snack in Southern India. Just as Batata Vada is a loved snack in Maharashtra, similarly Mix veg bonda is a sought after snack just as popular as Vazhakkai Bajji in south india especially in Tamil Nadu .

As the sun begins to set and the evening starts to feel young ,the small food carts  along the streets start preparing to handle the evening rush by dishing out piping hot vegetable bondas and serve them with a slightly runny coconut chutney . People love to enjoy the hot and spicy bondas with some tea as they catch up some good time with their near and dear ones .

Not only is it a famous as a street food,but it is also served at weddings too . A typical Tambrahm wedding would definitely serve these tasty bondas along with tasty flavored Sevai (string hoppers) and some rich and royal sweet dish on the evening prior to the wedding ,while the groom's family is welcomed by the bride's family .

When served for weddings, normally onion and garlic are omitted but on other days you can add them to the vegetable mixture to make it all the more tasty and delicious. 


Preparation Time - 30 to 40 mins
Frying time - 20 to 30 mins
Makes - 15 to 20 bondas 
Complexity - medium 

Ingredients 

For the filling 

5 medium sized potatoes 
3 small carrots finely chopped 
1/2 cup boiled green peas 
3 to 4 green chillies finely chopped 
10 to 12 cashews roughly broken
1 tsp ginger grated or finely chopped 
1/2 tsp turmeric 
Salt as needed 
Pinch of asafoetida 
Lots of chopped corriander
Handful of curry leaves chopped
1 small onion finely chopped (optional)
2 small cloves of garlic finely crushed /chopped (optional)

For the batter
1.5  cups besan /gram flour 
2 tbsp rice flour 
1 tsp red chilli powder
Pinch of asafoetida 
Salt as needed 

Oil to deep fry 

Method 


Preparing the Filling. 

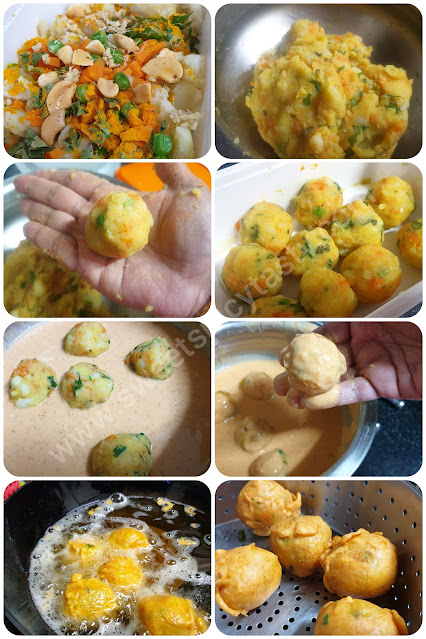
  • Pressure cook the potatoes until soft . Let it cool before peeling the skin.  Boil the chopped carrots in an open pan until soft and well cooked. 
  • In a wide mixing bowl, mash the boiled potatoes roughly, add to it chopped green chilli, boiled carrots, peas, ginger, cashews, curry leaves,asafoetida, corriander, salt and turmeric and mix it well with your hands to form a smooth and nice filling . Adjust salt if needed . If you are using garlic or onion add them at this stage and mix it along with other ingredients. 
  • Pinch out lemon sized balls from the filling and make smooth round balls and keep aside .

Preparing the Batter

  • Place the oil in a deep wok / kadai for heating. 
  • In another mixing bowl,add the gram flour, rice flour, salt ,red chilli powder, asafoetida and make a batter of dropping consistency by adding water gradually . 
  • Incase ,you happen to add more water by mistake,add a little more gramflour to thicken the batter to get to the right consistency. 

Frying the Bondas 

  • Take vegetable mixture/filling dumpling and drop them into the batter carefully .
  • Coat each of the dumpling well with the gram flour batter and carefully drop it into the hot oil.
  • If you have a medium sized kadai, drop only 4 to 5 bondas at a time and never over crowd the frying pan. 
  • Slowly splash oil on the bondas and gently flip it over at regular intervals. 
  • Fry until the oil stops sizzling and hissing and the bondas appear crisp and golden brown.
  • Carefully drain it on an absorbent paper and serve hot with coconut chutney and filter coffee. 


Donot forget to pin me !!


March 02, 2022

Vazhakkai (Artikaaya) Bajji | Kela Bajjiya | Raw Banana fritters - Restaurant style


Share with friends and family 18 comments:

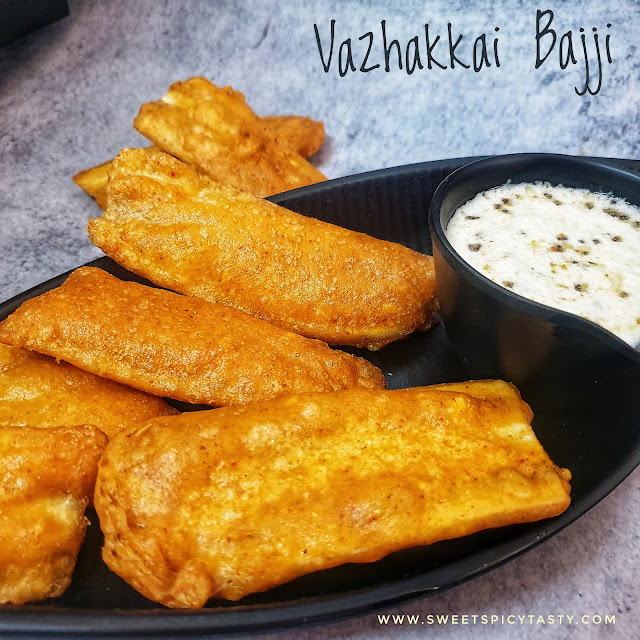
Bajji is what we call in Tamizh for Bhajiya or Pakoras.  As much as we relish bajjiyas like Aloo Bajjiya , Mirchi Bajjiya ,Bread Bajjiya ,there is a very special place for Vazhakkai Bajji a.k.a Raw Banana or kela bajji. Artikaaya Bajji or Baalekaai Bajji are the names used in Telugu and Kannada for this lipsmacking and traditional tea time snack. 

Vazhakkai Bajji tastes heavenly with coconut chutney and strong filter coffee. It is very easy to prepare bajji at home if we have gram flour (besan) and rice flour handy . No extra spices except red chilli powder ,salt and asafoetida. 

Undoubtedly, my Amma and paati would make amazing bajjis at home but I have very fond memories of enjoying  these vazhakkai bajjis at a small yet very famous eatery in King circle ,Bombay.  Anand Bhavan is a very famous hotel which serves amazing South indian items on the menu. Even to this day ,the restaurant serves in steel plates and very simple and humble seating arrangement and presentation with taste par excellence . 

There used to be 3 to 4 pieces of kela bajji served on a small steel plate with tasty coconut chutney served on the side or to be precise the bajjiyas will served over a bed of coconut chutney .  Those days during my childhood eating out was a pleasure as it was  not  common as today ,also swiggy and zomato were non existent . These small things meant a lot of pleasure in my childhood. 


This month in our Facebook group of food bloggers, Aruna suggested we share recipe of restaurant style food ,but made at home . It indeed is a wonderful theme to replicate our favorite recipe from our favorite restaurant at the comfort of our home.  For a bajji loving family that we are ,I plan to try Aruna's Stuffed chilli bajji as I have some delicious Bajji Chillies in my fridge .bajji chillies are a special variety of chillies which hardly have any heat in them and is best for deep frying .
I had many recipes on my mind, but I finally zeroed down  on this yummy and crispy vazhakkai bajjis as the weather was little chilly and all at home were craving for something  deep fried and spicy. 
I was paired with Seema of Mildly Indian for the theme and she has dished out a delicious  Madras Curry / Vegan Cauliflower curry which is a famous menu in the restaurants of Australia. 


Preparation Time - 15 mins
Frying Time - 20 to 25 mins
Complexity - medium 
Serves - 3 to 4


Ingredients 

2 medium sized raw banana / Artikaya/kacha kela /vazhakkai 
1 cup gramflour/besan/kadalai maav
2tbsp rice flour 
1.5tsp red chilli powder
Pinch of asafoetida 
Salt as needed 
Oil to deep fry 

Method


  • Sift the gram flour,  salt, rice flour, chilli powder into a wide mixing bowl .
  • Add asafoetida and 1/2 cup water and make a thick batter of dropping consistency. Adjust salt and spice level if needed . Whisk /beat the batter to well to induce aeration.  This step makes the batter light and fluffy or you can add 1/2 tsp cooking soda . 
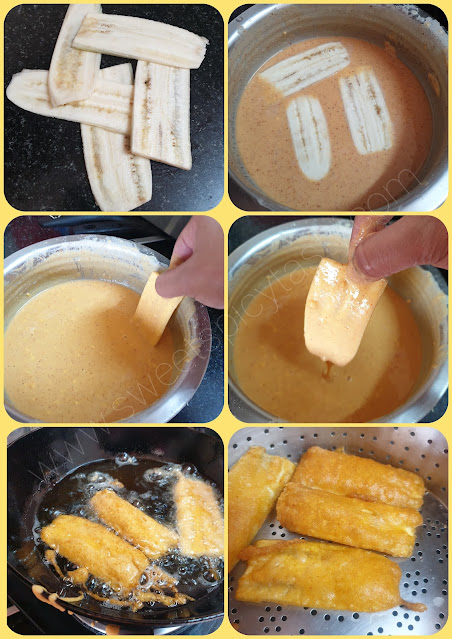
  • Peel the skin of the raw bananas and slice them into medium thick long  slices (refer pic 1 in above image) using a knife or slicer. Soak it in cold water to prevent it from turning black. 
  • Heat the oil in a deep thick bottom kadai/frying pan.
  • Take 3 or 4 slices of raw banana from the water and drain excess water on a kitchen  towel .
  • Dip the slices in the gram flour batter and drop it into the hot oil . 
  • Turn the flame to medium and fry until the bajjiyas turn deep golden brown in color and the oil stops to sizzle .
  • Drain in a colander or on kitchen  tissue and serve hot with chutney or sambar .

Tips 
  • If you are unable to cut into long slices ,you can make round slices too .
  • Donot overcrowd the kadai with too many bajjiyas as they won't get fried properly. 
  • When you drop the bajjiyas into the oil the flame must be high,but gradually reduce it to medium else the raw banana slice and inner side of batter will remain u cooked .

Pin me , will you ?


February 12, 2022

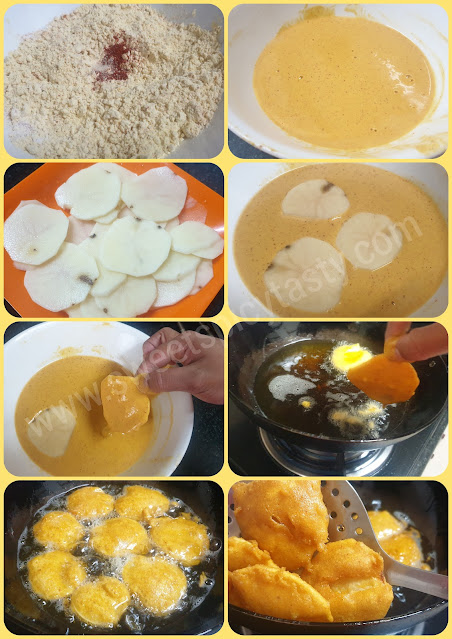
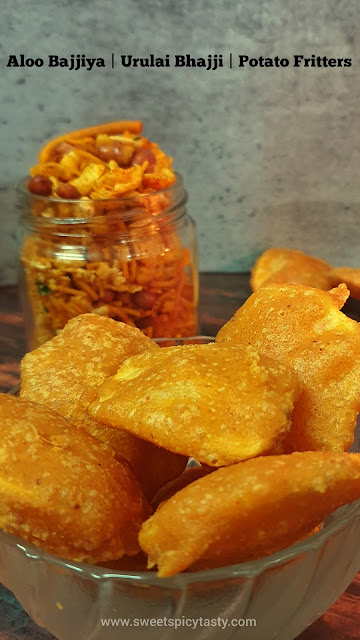
Urulai Bajji | Aloo Bhajjiya | Aloo Pakoras(Potato Fritters)


Share with friends and family 10 comments:

 Bajji , Bajjiya or Pakoras have an emotional connect with us Indians.As much as we love and relish snacks from various cuisines, these gram flour based traditional bajjiyas have a special place in our lives. 

Every region across India enjoys these bajjiyas all round the there . We just need a small reason to prepare bajjiyas and enjoy with hot chaai .

There is also a very funny anecdote that " when it rains the veggies are ready to coat themselves in gramflour and dive into hot oil" ,that is how much we love these fritters /bajjiyas.

Bajjis are  prepared in most Tambrahm homes on the eve of Diwali . DIWALI morning starts with a spoon of Diwali Lehiyam followed by piping hot Idli Sambar , Bajji and Coconut Chutney . This is more like a Diwali Day ritual and no one likes to skip on this delicious fare :-) 


There may be minor differences in the way the fritters are prepared but the base remains the same , gramflour batter , cut vegetables and oil for deep frying .

Potatoes ,raw banana,onions and special type of chilli known as Bajji Mirchi or Bajji Molaga are the preferred and sought after vegetables used for making bajjiya.  We can also make bajji using spinach leaves , brinjal and carrots too .

Today we will relish some piping hot ,crispy and spicy Aloo Bajjiya or Urulaikizhangu Bhajji as it is called in Tamil. 

Another interesting part is bajji and sojji (bhajiya and sheera ) were mandatory snacks served alongside filter coffee by the bride's family during the bride seeing event in Tamil homes.  The bride's culinary skills were judged by these two items served as it was believed that the bride has prepared them to serve her future family . Now.,things have changed and all these just remain funny anecdotes for us to remnisice and smile . 


Preparation Time - 20 mins 

Frying Time - 15 to 20 mins

Complexity - medium 

Serves - 2 to 3

Ingredients 

2 medium sized potatoes 
1/2 cup gram flour /besan /kadalai maav
2 tbsp rice flour 
1 tsp red chilli powder 
1/2 tsp haldi powder
Salt as needed 
Pinch of asafoetida 
Pinch of baking soda (optional)
Oil for deep frying 

Method

  • Peel the potatoes ,wash and soak them in cold water for 5 mins. This helps remove the starch from the potatoes and tastes good while coating the besan and frying .
  • In a wide mixing bowl sift the gram flour, rice flour ,chilli powder ,asafoetida and salt.  Add water little by little and make a batter of dropping consistency ,keep aside.  If using ,we will add soda just before we are ready to fry the bajjiyas.
  • Using a slicer or knife, cut the potatoes into medium slices and keep the soaked in water for 5 mins .drain the water and spread the potato slices on a kitchen towel or thick tissue to remove excess water .
  • Place a kadai with enough oil for deep frying and heat it up . At the same time add soda (if using) to the batter and mix it well . Leaving the batter for a long time after adding soda will soak up more oil while frying, so ensure you don't rest the batter long after adding soda. 
  • Dip  each potato slice in the batter and drop into hot oil . Donot crowd the kadai .you can  add about 4 or 5 slices of potato depending on the size of your kadai. 
  • Fry on medium flame and occassionally toss the bajjiyas using a ladle . Once the hissing or bubbling of oil stops ,you can carefully drain and remove from the oil . Repeat the same for all slices of potato .
  • Serve hot with green chutney, coconut chutney or even tomato sauce and some piping hot filter coffee or masala chai .

You may also want to try out the other most famous and loved Vazhakkai Bajji / Kela Bajjiya .

Ready to pin me ??? 


November 28, 2021

Salt & Pepper Cashews


Share with friends and family 6 comments:

Salt and pepper flavored cashewnuts are an exotic snack which can be served at all parties as part of the starters or appetisers . These mildly flavored cashewnuts are perfect for gifting during the holiday season as a token of love . 
You can easily make a whole  batch in very less time and pack them in advance along with your holiday gifts for family and friends .


Perfectly roasted cashews seasoned with salt and freshly ground black pepper powder are very addictive .  The cashews are crunchy and spicy making it perfect for the taste buds when enjoyed with your favorite cocktails, Mocktails or drinks.   

Not only for parties  ,these tasty flavored cashews can also be packed for your kids snack box or even your lunch to take care of mid morning  or late evening hunger pangs. 

There is no specific measurement for making this delicious snack.  You can adjust the salt and spice level depending on your liking and trust me one can never go wrong with this recipe. 


Preparation Time - 2 mins
Cooking Time - 5 mins
Complexity - easy 

Ingredients 
1 cup  unsalted cashews 
1 tsp oil 
Pinch of salt 
1 tsp coarsely ground fresh pepper  

Method 


  • Heat the oil in a pan and roast the cashews evenly until they turn crisp and golden brown.
  • Sprinkle salt and pepper as per your taste and mix it well while the cashews are still warm. 
  • Let it cool on a wide plate and then pack them in a dry and moisture free container .


Have you pinned me ? 


November 03, 2021

Diwali Marundhu | Diwali Legiyam (Lehiyam)


Share with friends and family 5 comments:

 Diwali Marundhu or Diwali Lehiyam is a must have on the day of Diwali in our home before we eat any goodies . This practice ,I am sure is followed in many homes in Tamil Nadu.  

After having oil bath ,known as Ganga Snanam on the morning of Diwali,first thing we are given is this lehiyam to eat before relishing the other sweets and savories.

Diwali marundhu , deepavali marundhu , deepavali lehiyam , legiyam , diwali lehiyam , dipawali marundhu,  diwali legiyam,ganga snanam , diwali ganga snanam


Marundhu in Tamil means Medicine and since it is specifically made during Diwali it has been termed as Diwali Marundhu. It is prepared using various natural herbs and sweetened with jaggery . One can call it as home made Chyawanprash. Not only during Diwali, you can easily make this herbal choornam anytime at home and keep it ready . Very helpful in treating mild symptoms of cough,cold or sore throat.  

As per my understanding the practice of having
this Marundhu first thing on Diwali Day is probably because we get up as early as 4am , take an oil bath and since October/Nov is winter time ,this herbal medicine will keep us safe from catching  a cold or fever due to the chill weather 

Traditionally there are close to 10 to 12 ingredients that go into the making off Diwali Lehiyam ,but today I am giving you a quick and easy recipe with easily available ingredients in the pantry and can be made in less than 15 mins without compromising on the original taste. You can call this an heirloom recipe as it was taught to my mom by my paternal grandmom .


Preparation Time - 10 min
Cooking time - 10 min 
Complexity - easy 

Ingredients 

2 tbsp dhaniya 
1 tsp ajwain /omam
2 tsp pepper corns 
3 tsp dry ginger powder 
3 to 4 cardamoms 
2 to 3 cloves 
1 tsp  ghee 
1 tsp gingelly oil /til oil 
1/2 cup grated jaggery 

** you can also roast a small stick of yashtimadhu/athimadhuram/mulethi if you have at home. 

Method 


  • Dry roast the dhaniya, pepper and ajwain on medium heat until it is warm to touch..keep aside. 
  • Roast the cardamom and cloves and keep aside. 
  • Once the ingredients are cool ,blend into a fine powder along with dry ginger powder .
  • Melt the jaggery in 1/4 cup water and once it begins to appear frothy,add the ground spice mix and mix it nicely.  The flame has to be low .
  • Now add the ghee and gingely oil and continue to cook for another min . The marundhu will appear glossy and resemble halwa texture . Donot stir for a long time else it will be become hard like a candy.
  • Turn it off and transfer to a dry container and store it. 

After preparing this lehiyam, we keep it in the Pooja mandir of our home along with shikakai,  til oil , new clothes and offer a small Pooja next morning and use the oil for Ganga Snanam.

Diwali marundhu , deepavali marundhu , deepavali lehiyam , legiyam , diwali lehiyam , dipawali marundhu,  diwali legiyam,ganga snanam , diwali ganga snanam


Ukkarai | Okkarai - Diwali Special Sweet


Share with friends and family 5 comments:

 Ukkarai is a traditional sweet prepared for Diwali without fail in certain parts of Tamil Nadu and Kerala . It is a customary tradition for Tambrahms of Tirunelveli, Madurai side to make this Ukkarai for Deepavali . The  Chettinaad style Ukkarai is different from this version as that recipe uses only moong dhall in the preparation .

I was introduced to this sweet only after my marriage and till then I had neither tasted nor even heard of Ukkarai as it was never made in my mom's house . 

Ukkarai , Tirunelveli Okkarai , Diwali Special Ukkarai , Kadalai paruppu Ukkarai ,Chettinaad Ukkarai , what is ukkarai , ukarai ,okarai , okkara ,ukkara ,

Ukkarai is actually a vegan recipe as freshly pressed gingelly (til) oil was used to make this in olden times ,but now a days as many do not relish the flavor of sesame /til oil in sweets, hence ghee is used which doesn't make it vegan friendly. If you are vegan,you can use coconut oil or sesame oil and make Okkarai.

The name really intrigued me and I thought it must be a very complicated sweet to make and was waiting to see how it is prepared .When MIL shared the recipe, I was surprised that it was very easy to make and really doesn't require any special skill of making jaggery syrup or cooking nuances. 

Each family has a slightly different proportion of dal used for making Ukkarai . Some use 50/50 proportion of moong dhall and channa dhall while some use just moong dhall and some just channa dhall .I did experiment with all these combinations but at the end we were all happy with just the Channa dhall Ukkarai in terms of taste as well as texture .

Some families make this Ukkarai even for Avani Avittam and I found this to be very close to Hayagreeva Maddi except that Ukkarai is a little dry and coarse . 


Donot forget to make Diwali Lehiyam along with Ukkarai . Recipe for Diwali Legiyam/ Marundhu here. 


Soaking Time - 3 hrs 
Preparation Time - 15 mins
Cooking Time - 45 mins
Complexity - Medium 

Ingredients 

1 cup channa dhall / kadalai paruppu
1 cup grated/powdered jaggery 
1 tsp elaichi powder 
2 tbsp ghee /gingelly (til) oil/coconut oil
Few cashews 

Vegan friendly- Replace ghee in the recipe with coconut/sesame(gingell)oil.

Method 


  • Wash and soak the channa dhall in sufficient water for 3 hrs .
  • Drain the water and grind to a fine paste without adding water.  Incase there is difficulty in grinding, you can sprinkle some water and grind. 
  • Grease a plate with some ghee and spread this ground batter on it and steam it for 15 mins . Use a knife or tooth pick to check if it is steamed well . When you prick it through the steamed dough,the knife/tooth pick should come out clean. Let it cool .
  • Break the steamed dough roughly with your hands and pulse it in a blender until it turns into a coarse crumbly mixture.  Keep aside. 
  • Melt the jaggery with half cup water and filter it incase you find any impurities else let it boil further on medium heat until it reaches the soft ball consistency (meaning- when you drop a few drops of jaggery syrup in water, it should hold shape and not spread)  {{ 2nd row 1st picture above }}
  • At this stage add the crumbled dal mixture with cardamom powder and quickly mix it in with the syrup .keep on stirring and breaking the lumps simultaneously.  
  • Add some ghee and continue to stir it for another 5 to 10 mins . The mixture may look lumpy and soft initially, but as you keep stirring it will begin to appear grainy and course . Give it some setting and cooling time before serving. 
  • Roast some cashews in ghee and mix it well with the ukkarai.

Pin it up for future 


November 01, 2021

Sev | सेव - Diwali Snack


Share with friends and family 10 comments:

 Sev and Ghatiya are two quintessential traditional snack made during Diwali in North India . 

Sev is a versatile savory snack made from besan /gram flour.  It can be served as is during tea time, added to Chivdas or used on various chats  like BhelpuriMasala PapadSev Puri for garnish.  I prefer making this thin sev at home and keep a batch ready most of the days so that it is easy when I plan to make chaat for dinner or evening snack.

In Tamil Nadu,we make Omapudi which is same as this sev but flavored with the essence of Ajwain/ Omam/Carom water . 

Requires just the basic ingredients from the pantry and the sev press of murukku maker with the correct mould to press the dough out of the sev press.   If you like you may flavor it with pudina extract , spinach extract or even garlic extract to get the desired flavor sev .

The only tricky part is kneading the dough to the perfect consistency so that it easily slips out of the mould and you can shape the sev very comfortably.  

I donot use cooking soda as many recipes call for it to get the crunchiness ,but my sev turns out crunchy as I use hot melted butter and a tsp of rice flour while kneading the dough.  You can skip butter if you are Following Vegan diet and use hot oil instead


Ingredients
2 cups of gram flour/besan/kadalamaav
2 tbsp rice flour
Salt as needed
1 tsp red chilli powder
1tsp haldi powder 
Asafoetida a pinch
2 tablespoon butter or 2 tbsp hot oil 
Oil to fry


Method


  • In a wide mixing bowl, add the flours, salt, asafoetida, red chilli powder and mix it well.
  • Now add the melted butter or hot oil and rub it well into the flour to form a crumbly mixture .
  • Knead the dough by adding water slowly . In case you feel the dough needs more water , you can sprinkle water to complete kneading.
  • The dough has to be soft and pliable . Too hard a dough will make it difficult to press from the sev maker mould. 
  • Heat oil in a kadai and same time grease the sev press and plate well with oil.
  • Take a small portion of the dough and put into the mould and carefully press it over the hot oil .
  •  Flip it over after 2 mins and fry for just 1 more min. Take it off the oil as soon as the hissing sound of the oil stops. Drain it on an absorbent paper or in a colander . 
  • Prepare sev from all the dough and keep the dough covered with a moist cloth while you are making the sev.
  • Crush the sev/omapudi with your hands and store in an airtight container. 
  •  Enjoy with a cup of hot tea or coffee!! 

Have you pinned me ??


October 30, 2021

Thikkat Shankarpali | Spicy Shankarpaali | तिखट जीरा शंकरपाली


Share with friends and family 13 comments:

 Shankarpali , Shakkarpare is a very special snack made during Diwali in most households in India . Known by many names according to region, this is a must have in Maharashtra and Gujarat .  There is  sweet  and  savory version of this yummy and crunchy snack.

Traditionally shankarpali is made using maida / APF ,but these days whole wheat flour is also used owing to health reasons . I for one have grown up eating the spicy Shankarpali made using maida and atleast during Diwali I make this  unfailingly using maida . 

My paati a.k.a grand mom would always keep this stocked round the year and she would say no one can fail with this recipe.  She was an expert in making all types of sweets and savories.

To prepare Thikkat / Spicy Shankarpaali is actually a breeze and the measurements are totally eye ball / random . Unlike other sweets or savories we need not worry about any particular consistency, perfect roasting etc.  

Just 5 basic ingredients viz ; maida ,salt, red chilli powder,  turmeric powder ,cumin seeds and oil to fry from our usual kitchen pantry and we are ready to make this crunchy munchy shankarpaali . This is also known as Thukkadi or Khaara Diamond cuts in the south .

The sweet shakkarpare is very tasty and flaky with subtle sweetness making it delectable and gentle on our palate . I am yet to make the sweet version and you can watch out this space for the recipe when I upload it soon.

Some special and Traditional Diwali Savories for you to impress and surprise your family 

South Indian Mixture 

Cornflakes Chiwda 

Poha Chiwda 

Sabudana Chiwda 

Thikha Ghatiya 

Omapudi / Sev 

Ribbon Pakoda 

Khara Boondi


Preparation Time - 15 mins
Frying Time - 8 mins per batch 
Serves - 3 to 4 
Complexity - Simple 

Ingredients 
1.5  cups maida / APF 
2 tsp red chilli powder 
1 tsp turmeric powder 
1 tsp cumin seeds /jeera 
Salt as needed 
2 tbsp hot oil 
Oil to deep fry 

Method 

  • In a wide mixing bowl ,add the maida ,red chilli,turmeric, salt and jeera and roughly mix with your fingers .
  • Pour 2 tbsp of hot oil over this dry ingredients and rub it well with both your hands to form a crumbly mixture . This is very important to get crunchy and crisp shankarpaali.
  • Add water little by little and knead to a smooth but tight dough.
  • Keep the dough covered to rest for 5 to 10 mins .
  • Pinch out a big lemon sized dough ,dust your working platform with little maida and roll out the dough into a medium thick roti .
  • Take a knife or pizza cutter and mark cuts to form diamonds or small squares .
  • Take these cut pieces and keep them on a plate while you heat the oil. 
  • Once the oil is heated properly reduce to medium and drop these pieces into hot oil carefully and fry them with occasional flipping until it turns crisp and golden brown. The oil must stop sizzling before you can remove it .
  • Drain it carefully and let it rest for a while before you transfer to a container. 
  • The shankar pali may look soft initially after frying but it will get crisp in about 20 mins.
  • Transfer to an airtight box and keep covered. 

Pin me to your board !! 


November 06, 2020

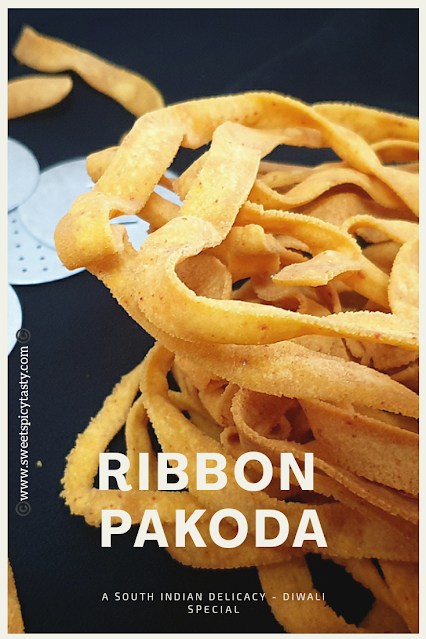
Ribbon Pakoda | Ottu Pakoda | Naada - Diwali special snack


Share with friends and family 14 comments:

 Diwali is just a few days away and all of you must be getting geared up in your own way to celebrate this bright and joyous festival with family .

When we talk of Diwali , it is obvious that we all will prepare our family's favorite sweets and snacks . Also, most of us love to experiment with new snacks and varieties. 

If you are someone like me who tries some new snack every Diwali , then you must go ahead and try Ribbon Pakoda -a tasty snack from Tamil Nadu .  Other names for this crunchy snack is Ottu Pakoda , Naada , Ribbon,  Pakkodam.

Ottu pakoda ,ribbon pakoda , naada pakoda , pakodam , ribbon , दिवाली special , south indian ribbon pakoda , pakodam

This recipe is special to me in many ways but  most importantly this is my Grandmother's recipe and it never fails me . It took me a lot of trials to achieve the perfection and to reach  a stage close as my grandmom's.  Still, we all miss her taste and her love .

My family has fond memories of my paati a.k.a grandmom who would dish out all these munchies with so much love , care and affection and would serve it all who come home with a cup of hot filter coffee. 

 Especially, if she was visiting us or we visiting her , she would make it a point to keep all my favorite snacks ready and treat me to all these goodies .  At any given point in time she would be stocked up with these tea time nibbles. 

Making of ribbon pakoda is not new in any Tamil home, infact it is a traditional and an age old recipe handed over by generations . So , needless to say the proportions to make the dough will vary from home to home . Today I shall share with you my grandmom's signature recipe.

Why is it called Ribbon Pakoda ? 

Well , the dough is passed through a Murukku Press using a slotted plate/mould and when squeezed in hot oil , the outcome resembles beautifully twisted ribbons 🎀. Hence, the name ribbon pakodam

What are the ingredients used to prepare Ribbon/Ottu Pakoda?

The basic ingredients remain the same which is gramflour, rice flour, red chilli powder , salt & unsalted butter . Some of them use hot oil in place of butter, this can be the perfect option for Vegans

What is a murukku maker / murukku press ? 

Murukku in Tamil means "Twisted" . Murukku maker is like a noodle press with a dough holder, dough press and various plates with different designs to choose from to get the desired shape of twisted crispies when squeezed in hot oil.

Sharing an image below of a traditional murukku maker with different plates. 

There are different styles and varities of murukku makers available in the market now . One can choose what ever is comfortable and convenient for easy use.


Preparation Time - 15 mins
Frying time - 30 to 40 mins 
Makes - 3 to 4 big flat murukkus
Complexity - medium 

Video demonstration 

Ingredients 

3 cups besan/gram flour 
2 cups rice flour /arisi maav
1.5 tsp red chilli powder 
Pinch of asafoetida  (skip for GF)
Salt as needed
3 tbsp soft unsalted butter  (or) hot oil 

Ottu pakoda ,ribbon pakoda , naada pakoda , pakodam , ribbon , दिवाली special , south indian ribbon pakoda , pakodam


Method 

  • In a wide mixing bowl, add the besan , rice flour, salt , red chilli powder , Asafoetida and mix it nicely with a spoon or your hand.
  • Now add the butter and rub it well into the flour to form a crumbly mixture. If using hot oil for vegan version, then pour the oil over the flour mixture and slowly mix it to get crumbly texture ..adjust butter or oil.if you feel.the four is too dry.
  • Add water little by little and knead a soft but pliable dough . 
  • Grease the murukku maker with oil inside . Take a small  portion of the dough and pass it through the mould in hot oil and fry on both sides till they turn crisp and golden brown.
  • Drain it and store in an airtight container.

Tips

  • The oil has to be heated well and then reduce it to medium while frying. 
  • The sizzling has to stop completely before you can drain it out .
  • The dough may appear sticky due to the texture of gramflour, as long as you are able to press the murukku maker effortlessly then the consistency is perfect. 
  • Incase you find it too hard to press the dough through the murukku apparatus ,sprinkle a little water and loosen the dough by kneading again. 
  • The ribbon may appear soft soon after removing from oil but with time it will become crisp . Donot close the container lid soon after removing from hot oil .

Pin 📌  it up for future 

Ottu pakoda ,ribbon pakoda , naada pakoda , pakodam , ribbon , दिवाली special , south indian ribbon pakoda , pakodam


October 27, 2020

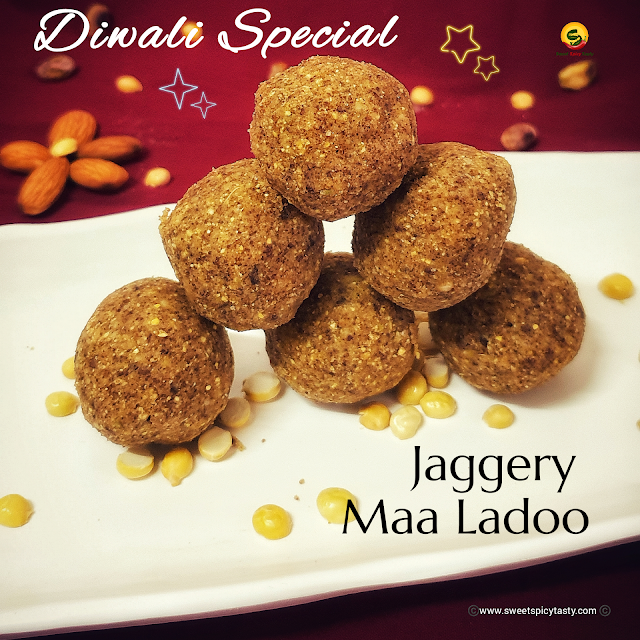
Jaggery Maa Ladoo - Healthy Roasted gramflour balls


Share with friends and family 14 comments:

 Diwali is round the corner , and slowly we will now start planning our festive snacks to be prepared which is a yearly ritual in most homes all over India . I love this Festival of Lights and all the happiness it brings along . 

Jaggery Maa ladoo can be prepared in just 15 mins and there is no extensive labor,vellam pota maa ladoo , jaggery maaladdu , vellam ladoo , vellam laddu, jaggery laddu , roasted gram ladoo , dryfruit ladoo with jaggery , jaggery dry fruits ladoo

Diwali is the most celebrated festival and there is a lot of positivity, good vibes, joy and cheer everywhere.  People go about shopping for new clothes , fairy lights , rangoli powders , different types of Mud lamps which are designed and painted beautifully by the local potters and artisans .The homes are all decked up with lights, flowers , beautiful drawn rangolis and a joyous occasion for friends and family to meet and greet one another..Sweets and savories are exchanged and in totality people love to celebrate Diwali .


This month in our Shhh Secret Cooking Challenge Poonam of Annapurna decided to celebrate with Diwali theme so that we have a collection of some amazing delectable snacks and sweets to plan our Diwali Snack list . If you are a fan of karanji or ghujjiya like me then head to Poonam's blog for winter special Matar Karanji .

What is Diwali without sweets ? I wanted to present some healthy sweet without using too much of sugar and luckily Narmadha of Nams Corner with whom I am paired this month was kind enough to give me 2 versatile ingredients pista and cardamom which are used in any sweet when I told her I plan on making some sweet .Narmadha has prepared a crunchy and crispy Besan murukku with the secret ingredients  besan/gramflour and butter I gave her . 

As I mentioned  , I was on the lookout for a healthy and nutritious sweet , a casual talk with Kalyani on some general topics suddenly took a turn and ended up in discussing how her grandmother would dish out Maa Ladoo , a delicious sweet using jaggery .  Next what , I immediately decided to try that with slight variations and the recipe for the theme was ready. 

Maa ladoo is generally made using Sugar and I have shared the recipe on my blog.  Click the image below for recipe .

Jaggery Maa ladoo can be prepared in just 15 mins and there is no extensive labor,vellam pota maa ladoo , jaggery maaladdu , vellam ladoo , vellam laddu, jaggery laddu , roasted gram ladoo , dryfruit ladoo with jaggery , jaggery dry fruits ladoo


Maa ladoo is a most favorite sweet in our home and it just vanishes soon after it is made . I prepare this unfailingly on Diwali and many a times just like that to satisfy our sudden sweet cravings.

This time along with the main ingredient; Roasted gram /pottukadalai , I added some badams and pista and used organic jaggery in place of sugar .Need I say ? It was as usual a super hit and there was a request for another batch .  

Jaggery Maa ladoo can be prepared in just 15 mins and there is no extensive labor involved in the making or pre preparation .The most happy part.. No Cooking at all


Pin it up for future

Jaggery Maa ladoo can be prepared in just 15 mins and there is no extensive labor,vellam pota maa ladoo , jaggery maaladdu , vellam ladoo , vellam laddu, jaggery laddu , roasted gram ladoo , dryfruit ladoo with jaggery , jaggery dry fruits ladoo

Preparation Time - 15 mins
Cooking Time - Nil
Makes - 10 to 12 ladoos 
Complexity - easy 

Ingredients 
1 cup roasted gram /pottu kadalai/hurigadle 
1/4 cup badams + pista (almonds + Pistachio)
1 cup powdered jaggery 
3/4 cup melted ghee /clarified butter 
3 to 4 green cardamom pods 

Method 


  • Lightly dry roast the roasted gram , pista and badam in a dry pan until they feel warm . This will help in increasing the shelf life . (**this step is optional )
  • Add these roasted ingredients and cardamoms to a blender and grind into a fine powder . Sieve these to a wide bowl to remove any grits if at all .
  • Add jaggery powder to this gramflour and mix it well with a spoon.
  • Pour in melted ghee on to this mixture and mix it well till the mixture feels moist and crumbly . The ghee has to be warm . When you pour the ghee the flour will slightly sizzle , this is the perfect temperature for ghee .
  • Grease your palms, take a handful of this mixture and shape into balls . You can add some more warm ghee if you feel the mixture is dry and not holding shape .  Store it in a dry container. 
  • Jaggery powder can also be added or reduced depending on the sweetness.  This time I used only 3/4th cup of jaggery as this batch of organic jaggery that I  used was very sweet and tasty. 

Do not miss to head to the recipe of spicy , crunchy Madrasi Mixture / South Indian mixture on my blog . This is the most sought after savory made for Diwali . Now a days it is easily available in the shops , but when made at home , it is healthy as well as hygienic.  


August 24, 2020

Dryfruit Kheer


Share with friends and family 12 comments:

 Kheer, Payasam , Payesh , Payasa are different names used in various parts of India to refer to a delicious, creamy and rich milk based dessert.

Be it a festival or any happy occasion like birthday, wedding , new birth in the family or any achievement, we Indians love to celebrate it with a sweet dish which is most often the kheer.

If you may wonder why kheer is so famous , it is because it primarily uses only 3 basic ingredients rice , sugar and milk and most often these 3 ingredients are part of every kitchen and can be made easily without any effort.  Of course we can add on extra flavors like cardamom, dry fruits, saffron, rose or Kewra essence etc which gives more taste and richness to the basic kheer.

There are so many varieties of kheer that are prepared across the length and breadth of India and if we start preparing each variant everyday I am sure even 365 days will be less.

This week we are having Milk Special on FMBH as our theme and with the Ganesh Chaturthi celebrations coinciding with our theme how can I miss making kheer for our beloved Gannu and here it is ..for him and for you all as well. 


This time for prasad I made this delicious dry fruit kheer and offered it to Lord Ganesha .I must really thank Swaty who suggested this theme for the coming week and my favorite kheer recipe gets blogged today . Though I make this kheer very frequently,it somehow never made it to the blog .  You must head over to Swaty's  blog ;"Food Trails" and check out her vast collection of recipes from cuisines world over.  Her food clicks are droolworthy and very nicely framed . I am excited to try her Shahi Paneer Kofta Curry which will be a super hit in my home as hubby is a die hard fan of paneer.

Traditionally, rice is cooked in milk and it takes a while for rice and milk to simmer and reach a thick consistency.  This time around I was a little behind schedule and did not have much time to go about with the slow cooking method, hence I have used pre cooked rice and simmered it in milk and the final result was just like the traditional method. So you definitely can go about and try this fail proof method for a delectable and creamy kheer .

Kheer is such a delicacy which tastes delicious when it is warm but some like it when served chilled . I prefer warm kheer or paysam personally. 

As I was preparing it for prasad , I cooked the rice separately and also used a fresh packet of milk . 

Some traditional, tasty and lipsmacking payasam/ kheer recipes on my blog for you to try

Preparation Time - 25 mins
Cooking Time - 30 mins
Complexity - easy 
Serves - 2 to 4


Ingredients 

500ml milk 
3 tablespoons cooked rice 
Assorted dry fruits chopped (badam , pista, cashews )
100 gms Sugar  (adjust as per your taste)
1tsp cardamom /elaichi powder
Few strands of saffron/kesar 

Method 
  • Boil the milk in a thick bottomed vessel . The vessel needs to have a thick bottom so that the milk doesn't stick to the bottom and starts burning.  
  • Take about 2 tablespoons of this warm milk and soak the saffron strands in it and set aside.  This will release all the flavors of saffron along with a nice yellow color. 
  • Once the milk reaches a boiling stage, add in the cooked rice and on a slow flame keep simmering the milk with regular stirring until the milk begins to thicken and reduce in quantity. 
  • Add the chopped dryfruits , saffron soaked milk , cardamom powder and sugar and continue stirring.
  • After adding sugar, the kheer will turn slightly watery as the sugar melts. Keep stirring on low flame and after about  8 to 10 mins the kheer would reach a nice creamy consistency. 
  • You can switch it off at the stage and let it settle down for a while. 
  • Over time on cooling the kheer will thicken further . So if you want it to be little diluted, you can add warm milk before serving and adjust the consistency as you may like it .
  • You can also add some rose or kewra essence if you like that flavor . I donot add any essence as the flavor of cardamom and saffron itself is very delectable. 
  • If you want to try the Vegan version of Dry fruit kheer then check the recipe here .

Linking this to week #261 milkyway theme on foodie Monday bloghop