June 28, 2022

Paneer Tomato Grilled Sandwiches


Share with friends and family
5 comments:

 Paneer Tomato grilled sandwiches are a perfect choice for packing in kids' lunch box or even for adults when you want to carry something filling at the same time  not messy to eat on the desk .

You can also serve this as an after school snack or even makes for a perfect light dinner when paired with some warm Italian style Tomato soup . (Recipe source - Priya Iyer's blog)

Paneer takes care of the protein quotient for the day and the tomatoes keep the sandwiches moist and don't let it get too dry and stuffy.  Adding some mozzarella chees gives a nice gooey and melt in mouth texture. 


I love to work with different fillings that go into the sandwich and this is yet another successful attempt as my family loved the flavor and the crisp grilled bread. 

For the spice, I have used only red chilli powder and 1 small green chilli chopped.  Some boiled corn was added for the crunch and tomatoes used were firm and deseeded to prevent the sandwiches from getting soggy .

Some sandwich varieties from my blog that you must definitely try 

Classic Veg Cheese Grill Sandwich 

Peanut Butter Cheese Sandwich 

Paneer Cheese Corn Grill Sandwich 

Chutney Cheese Sandwich 

Mumbai Special Toast Sandwich 


Preparation Time - 10 mins
Grilling Time - 3 to 4 mins per sandwich 
Complexity - simple 
Makes 3 sandwiches 

Ingredients 

6 slices of bread 
100 gms paneer 
2 medium firm tomatoes
3/4th cup boiled sweet corn
1 tsp Chilli powder /chilli flakes
Salt as needed 
Fresh corriander chopped 
1 green chilli
Grated mozzarella cheese as needed 
Butter to apply on bread 

Method 


  • Firstly grate the paneer, crush 3 tbsp of corn kernels with green chilli in a blender and de seed the tomatoes and dice into small cubes. 
  • In a mixing bowl mix the Tomatoes, crushed corn , paneer, boiled corn ,chilli powder ,salt, chopped corriander and mix it all well . Let it rest for 5 to 10mins . Our filling is ready .
  • Donot let the filling sit for extra time because the tomatoes will release water when mixed with salt and the filling will become soggy .we don't want that 
  • Heat the grilling pan,  apply butter on one side of the bread , place some filling on it ,spread grated mozzarella cheese as per your wish ..close using the other slice of bread . 
  • Apply some butter to the grilling pan and grill the sandwich on both sides until crisp and golden brown .
  • Cut the sandwich into wedges and enjoy .
  • If packing for lunch, then place foil paper in the inside of the lunch box ,place the cut sandwiches once they have cooled down .this will prevent the sandwiches from getting soggy .

Pin up for later 


June 25, 2022

Corn Capsicum Quesedilla


Share with friends and family
3 comments:

Corn capsicum Quesedillas are perfect to serve as quick after school snack or for an early dinner.  The gooey cheese and the crunch from the sweet corn and capsicums make every bite delectable. 

Make sure that these Quesedillas are served hot as soon as you prepare so that the filling and the tortillas don't loose the crispness and the texture

Mexican flavors are very close to our Indian spices and flavoring agents, so ideally you don't even need to hunt for special ingredients to make these melt in mouth Corn Quesedillas. 

There are ready made tortillas available in the market these days which can be used to make these Quesedillas or even the Indian Flat bread (Fulkas) can also be used as the base for making. 

You  can experiment with various flavors when preparing the filling and try to make it as healthy as you want. The amount of cheese can also be as per your preference. In today's corn capsicum Quesedilla I have kept the filling very simple and have used diced mozzarella cheese to get the gooey effect . 

Today's recipe makes use of ready made multigrain tortillas and for the filling I have used sweet corn , green bell pepper (capsicum) and red bell pepper. 

If you like Mexican flavors then you must try the following recipes from my blog

Mexican Bean Rice 

Bean Quesedillas 

Mango Salsa

Pineapple Salsa


Preparation time - 10 mins
Cooking Time - 3 mins per Quesedilla
Complexity - simple 
Makes - 4 Quesedillas
 

Ingredients 

4 multigrain/flour tortillas 
1 medium green bell pepper (capsicum)
1 medium red bell pepper
1/2 onion finely chopped (skip for jain /satvik
1.5 cups boiled corn
1.5 cup diced /grated mozzarella cheese 
Finely chopped corriander 
1 green chilli finely chopped
Chilli flakes as needed
Salt as needed 

Method 


  • Finely dice the green and red bell pepper into small cubes .
  • Take 1/2 cup boiled corn in a blender and crush it coarsely. 
  • In a wide mixing bowl, take the finely chopped capsicum ,red pepper, crushed corn ,boiled sweet corn and onions if using and give a quick mix.
  • Add in the chilli flakes ,salt,  corriander ,green chilli ,2 tbsp diced cheese and mix it nicely. The stuffing is now ready. 
  • Take one tortilla and lightly roast it on open flame or microwave it for 10 seconds. 
  • Place the tortilla on a flat surface ,place the filling on one half of the tortilla ,spread as much cheese as you want and fold it.
  • Place this tortilla on a hot tawa and roast it on both sides until it turns  crispy and the cheese melts inside . If using a convection oven or OTG ,preheat the oven to 400F and bake the tortillas for 3 mins .
  • Using a sharp knife or pizza cutter , cut the Quesedilla into wedges and serve it hot .
  • Repeat the same process for the remaining tortillas.

June 20, 2022

Neer Dosa | Neer Dose - vegan breakfast


Share with friends and family
5 comments:

 Neer dose or neer dosa is a very popular breakfast from Tulu Nadu in Karnataka and delicacy from Manglorean cuisine . 

Neer dosa literally means water dosa in Tulu/Kannada but that doesn't mean that it is made from water ,just that the batter to prepare the dosa is very watery hence its called Neer Dosa. The consistency of the batter is very similar to that of Rava Dosa meaning pouring consistency.

Best part of Neer Dosa is the simplicity in preparation as there is no fermentation needed like the usual dosas,meaning you can make dosas as soon as the batter is ready . 

Neer Dosa uses just 2 ingredients ;rice and water .Adding grated coconut is optional but tastes really good when added to the batter .

Neer dosas are very soft and spongy to eat and it remains the same even after a few hours of preparing, making it ideal to pack for lunch box or travel . 

Neer dosas are served with coconut chutney , sagoo , balehannu Rasayana and for non veg lovers it is paired with some spicy curry made from egg,chicken etc .


Soaking Time - 4 to 5 hrs 
Preparation Time - 15 mins
Complexity - simple 
Makes - 15 to 16 neer dosas 

Ingredients 

2 cups normal rice (except basmati)
1/2 cup grated coconut 
Salt as needed
Water to grind 

Video recipe 


Method 

  • Wash the rice well and soak it overnight or for minimum of 5 hrs .
  • After 5 to 6 hrs , transfer the soaked rice to a blender along with the coconut and grind it to a fine paste..donot add water to grind. The water in which you have soaked the rice is sufficient to grind the batter .
  • Transfer this batter to a wide vessel and add some more water and bring it to a pouring consistency. Check the video recipe below for exact consistency.  Add salt as needed.
  • Heat a non stick tawa or a seasoned cast iron .
  • Sprinkle some water on the tava and if it sizzles immediately the tawa is ready to make dosas .
  • Pour the batter from outside to inside like how we do for rava dosa . Donot spread the batter like regular dosas.
  • Close the dosa with a lid for 30 to 40 sec and then open it up .Slowly using a spatula remove the dosa and fold it up like a wedge and serve with chutney or any other side dish of your choice. 
  • Neer dosa gets cooked only on one side. You don't have to flip over and cook . 
  • Keep adjusting the heat of the tawa as you keep making the dosas.  If the tawa is too hot then the dosas won't get cooked evenly.  

Pin me up !!


June 13, 2022

Poori Bhaji Aamras - Summer Seasonal special


Share with friends and family
8 comments:

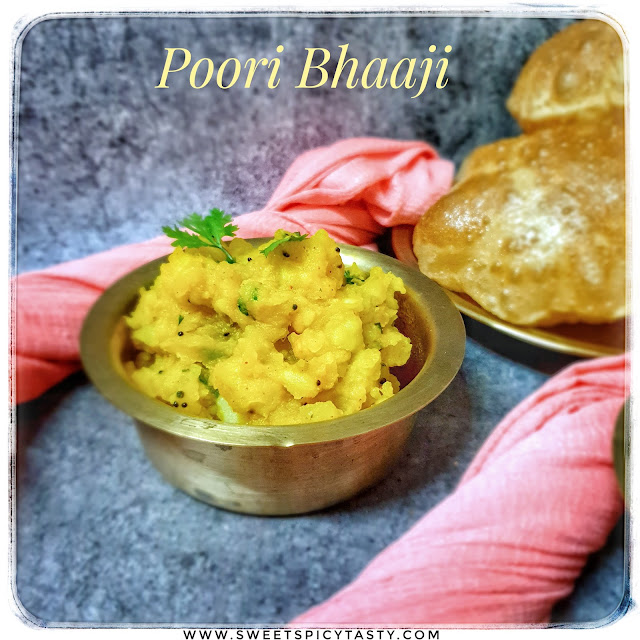
 Poori Aamras and Aloo Bhaji is almost everyone's favorite in Maharashtra and Gujarat. There will hardly be anyone who wouldn't like this combo.  During the mango season, this made in heaven match features in my home quite a few times  but surprisingly it never made to the blog .

My dad and me love this combo a lot and it really surprises my husband as to how we enjoy puris with aamras . He will always say enjoy puris with Bhaaji and relish the aamras separately.  To each one their taste..but all said and done puri aamras is a delectable match . 

The recipe for Aamras and Puri is already there on the blog while that off this simple yet tasty Aloo Bhaaji or Sabji will be shared today with you all . Every household has an heirloom recipe for making the aloo sabji depending on the family's liking . I am going to share a very very easy recipe which has been our favorite always. Preethi my blogger friend has a delicious recipe of Adraki Aloo which will also pair well these puris . The aamras has a little milk added while the aloo sabji is purely vegan . If you want to make the entire combo vegan friendly,you can skip the milk while preparing the aam ras .

This combo is so popular  and a hearthrob that people swarm like bees at restaurants to enjoy. Some popular restaurants in Bombay have carved a niche for serving this delectable mini thali during the Mango Season and have been featured in various food magazines and shows for their superior quality and popularity. 


Recipes for Poori & Aamras click below 


Preparation Time - 20 mins 
Cooking Time - 10 mins
Complexity - simple
Serves - 2 to 3 

Ingredients 

4 medium sized boiled potatoes 
2 small green chillies chopped
1/2 inch ginger finely chopped 
1 tsp mustard 
1/4 tsp udad dhall (optional)
1 tbsp oil
Pinch of turmeric 
1/4  tsp red chilli powder
Pinch of asafoetida 
1/2 tsp sugar
Salt as needed
Few curry leaves 
Finely chopped corriander 

Method 

  • Peel the skin of the potatoes and roughly crumble them.
  • Heat oil in a thick pan ,crackle the mustard seeds followed by udad dhall until the dal turns golden brown.
  • Fry the green chillies,  ginger , curry leaves and asafoetida. 
  • Add the crumbled potatoes, corriander leaves, turmeric ,red chilli powder ,salt and mix it well .
  • Sprinkle some water and cook covered for 2 to 3 mins till all the flavors blend well . Turn off the stove ,add the sugar,chopped corriander and mix it gently .
  • Serve hot with hot hot puris and Aamras .
  • You can also serve some thick coconut chutney also as an accompaniment. 

Pin me !!


June 06, 2022

Pineapple Raita | Annanas Raita | how to make Pineapple raita at home ?


Share with friends and family
7 comments:

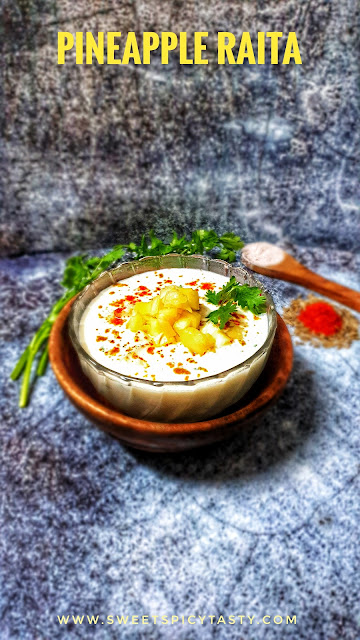
 Pineapples when combined with thick whisked yogurt makes a perfect accompaniment for any Indian Main course . 

The sweet and tangy flavors from the pineapple raita pair well with a spicy biryani or pulao and strikes a superb balance of taste and enhances the eating experience. 

Pineapples are a power house of nutrients and very healthy . Rich in vit C ,antioxidants and a very good anti inflammatory property due to the presence of Bromelaine, a very powerful enzyme that helps fight inflammation in the body .

Pineapple juice is very effective in treating the sinuses and eases symptoms of cold and allergies.  Bromelain in addition to help alleviate pain of osteoarthritis also helps in maintaining heart health by keeping the cholesterol levels under check .

If we want to keep up with a healthy lifestyle then fresh pineapples must be included as a part of our diet plan regularly.   Pineapple Punch Pineapple Salsa , Cuban Pineapple Salad (courtesy- sizzling tastebuds by Kalyani )are perfect choices for all age groups and can be easily made with available ingredients in our pantry . More so, these recipes are no cook recipes, hence even a beginner or a teenager can also easily rustle them up .

To make pineapple raita we can either use canned or fresh pineapples . If using canned pineapples then drain out the sugar syrup completely before chopping the pineapples .

When using fresh pineapples, please ensure the fruit is sweet and not sour.  Sour or tart pineapples when mixed with yogurt /dahi ruin the taste of the raita .

Pineapple raita is best served chilled ,hence keep it refrigerated until serving. 


Preparation Time - 10 mins
Cooking Time - nil
Complexity - simple
Serves - 2 to 3

Ingredients 
1/2 cup finely chopped pineapple 
2 cups thick yogurt /dahi 
2 tsp powdered sugar 
1 tsp salt
1/4 tsp cumin powder /jeera powder
Pinch of red chilli powder
Pinch of kala namak / black salt 
Fresh corriander chopped

Method 


  • Whisk the yogurt well until smooth and silky .
  • Add the sugar ,salt ,chilli powder,  kalanamak ,roasted jeera powder to the yogurt .
  • Lastly add the pineapple, corriander and mix well . Adjust the sugar or salt if you feel the raita needs a little more flavor.
  • Keep refrigerated until serving.  Try and consume the raita fresh on the same day and not carry forward to the next day . 

Pin me up !!