Showing posts with label vegan breakfast. Show all posts

March 04, 2023

Karuppu Ulundhu Adai | Black lentil crepes (vegan)


Share with friends and family 16 comments:

 Karuppu ulundhu Adai is a very traditional breakfast made in Tamil Nadu . This is very filling and takes care of the carbs to protein ratio required  for a day.

Karuppu ulundhu is nothing but udad dhall (black lentil) with skin . The skin is actually the powerhouse of lot of nutrition.  Udad dhall /ulutham paruppu as we all know is very rich in proteins and also very good for bones. We must try and include these in our diet as much as possible . 

Unlike,regular dosa ,Karuppu Ulundhu Adai doesn't need fermentation and can be made immediately after grinding the batter . Since,  black lentils with husk are little tough we must soak them for a minimum of 6hrs before we can grind them . Pepper ,red chillies , asafoetida and  curry leaves are added for extra flavor and also for easy digestion. Tiny slivers of fresh coconut are added to the batter just before making the Adai..these tiny bits of coconut give a very nice crunch and a nice mouth feel as we bite into the Adai.

Karuppu Ulundhu Adai is also made during the Karthigai Deepam Festival celebrated in Tamil Nadu during the English Month of November/ December.  Karthigai Deepam is a festival of lights celebrated with lot of fervor and enthusiasm all over Tamil Nadu..the ladies decorate the house with earthen lamps in the evening and pray for the well being of their Brothers . 

We celebrated Protein Rich Vegetarian Breakfast theme in our Food bloggers group this month . Host for this event was the versatile blogger Renu who suggested this theme and I was paired with Anu Kollon . Anu gave me curry leaves and coconut as the secret ingredients and I shared the secret ingredients lemon juice and pepper powder using which she has made a creamy Avocado Sandwich.  If you are an avid food blogger and would like to join us then do visit our Facebook page Shh Cooking Secretly Challenge


Soaking Time - 6 to 8 hrs 

Preparation Time - 10 mins

Cooking Time - 2 to 3 mins per Adai

Complexity - Simple

Ingredients

1 cup regular rice . (No Basmati or any flavored rice) 
1/4 cup black lentil/chilke Wali udad/ karuppu ulundhu
3 to 4 red chillies
1 tsp pepper 
1/4 tsp jeera/cumin
Handful of curry leaves 
3 tbsp thinly sliced coconut slivers
Pinch of asafoetida 
Oil to roast the Adai
Salt as needed 

Method

  • Wash the rice and udad dhall multiple times till the water appears clear . Soak the rice and lentil along with red chillies ,jeera and pepper for 6 to 8 hrs or overnight..I prefer to soak it overnight so that it's easy to grind and make it for breakfast as soon as we get up in the morning. 
  • The batter should be slightly thicker than the usual dosa batter . 
  • Add finely chopped curry leaves, coconut slivers ,salt ,asafoetida to the batter and mix it well.
  • Heat a griddle/ tawa , pour a ladle full of batter and spread like dosa from inside out .let it be slightly thicker than dosa . Drizzle oil around the dosa and let it cook on medium flame ,slowly flip it over and let the underside roast well .
  • Take it off the tawa and serve hot with some fresh butter and jaggery powder.  You may also serve it with coconut chutney or Molagapudi but jaggery and butter are the classic combination. 

Pin me up


February 03, 2023

Matar Poha | Peas Poha - Vegan breakfast


Share with friends and family 11 comments:

 Poha (Flattened rice) is a versatile ingredient used for breakfast or a quick evening snack all over India. 

During winters fresh green peas are available in plenty and I use them in my cooking a lot.

Peas Poha is one such favorite breakfast at home where lot of fresh tender peas are used as a part of the recipe. Poha is seasoned and tempered with simple Indian spices that makes it very tasty and flavorful .


Choora Matar or Chooda Matar is a variant of Peas Poha that is very popular in Northern India especially UP and Bihar and is a purely No Onion No Garlic snack .

Matar Poha can be made with or without onions depending on your taste . If using onions, saute them after you splutter the mustard seeds and curry leaves until the onions turn soft and then add in the poha .

Some delicious Poha variants which can be easily prepared for breakfast / lunch boxes and also as Prasadam .


Puli Aval /Gojju Avalakki (Karnataka Special)
Gopalkaala / Dahi Poha (Janmashtami Special)


Preparation Time - 10mins
Cooking Time - 8 to 10mins
Complexity - Simple 
Serves  - 2 to 3

Ingredients 
2 cups medium thick Poha/Flattened rice 
2 to 3 green chillies 
1/2 cup boiled peas 
Small piece ginger finely chopped 
1 tsp mustard seeds
Pinch of asafoetida
Pinch of turmeric 
2 tsp lemon juice
Salt as needed 
Pinch of sugar
2 tbsp oil
Few curry leaves 

Method 

  • First and foremost ,sieve the poha and get rid of small dust and other unwanted particles.
  • Wash the Poha under running water in a colander and let it sit for 5 to 6 mins . This step is very important.  If there is too much water in the poha ,it will become a mushy mass and we don't want that .
  • Meanwhile, heat the oil in a thick kadai /wok.
  • Splutter the mustard seeds ,followed by curry leaves, ginger ,turmeric powder and asafoetida. 
  • Mix in the washed poha ,sprinkle salt and mix it well .
  • Add in the boiled peas, sprinkle some water and cook covered for 3 to 4 mins till the poha becomes soft and well cooked. 
  • Turn off ,open the lid, add sugar ,lemon juice and give it a quick mix ,serve hot with a garnish of freshly chopped corriander. 
  • You can sprinkle some namkeen farsan/crispies for an added crunch .

Pin me up 


Month of January we are going "Vegan" in our food bloggers' group Shhh Secretly Cooking Challenge . A wonderful theme suggested by Radha as January is also celebrated as a Vegan Month in some parts of the world .  My partner for this month is Preethi of Preethi's cuisine. Preethi gave me lemon juice and ginger as secret ingredients which was used in this flavorful aromatic Matar Poha while Preethi made a yummy  and healthy Tofu Bean Stir fry with sesame oil and rice flour being the secret ingredients I suggested to her. 
Radha has prepared a lipsmacking Jackfruit Kofta Curry which is a classic innovative recipe and that too purely plant based ..


January 24, 2023

Set Dosa | Set Dose (variation 2)


Share with friends and family 9 comments:

 Set dosa is one of the most loved breakfast in Karnataka.  Though the basic ingredients remain the same,there are some mild variations used by various restaurants that make them a speciality .

My mom had learnt a recipe from one restaurant cook and I have been following that primarily all these years to make Set Dosas at home . To check out my Mom's variant click here

Recently, my cousin Kalyani who blogs at Sizzling Tastebuds posted a Millet Set Dosa which prompted me to look up her recipe of The Regular Set Dosa and I found that it was slightly different from my recipe and  I went ahead and made Set Dosas with her proportion and needless to say everyone at home liked it. They were just spongy and so soft that it was a melt in mouth experience. I have followed her recipe to the 'T' and no changes at all . 

I served these cotton soft set dosas with Aloo Sagoo and Coconut Chutney the way it is served in most restaurants here in Bangalore . Chutney Pudi is of course our family favorite and we cannot imagine having our Dosas without Molagapudi.  Click on the recipe names above for detailed method of preparation. 

Ingredients 

2 cups idli rice 
1 cup whole udad dhall (udad dal gota)
1/4 cup beaten rice /Poha 
1/4 sabudana /jawwarsi 
 2 tsp channa dal
1 tsp methi seeds 
salt to taste 

Method 

  • Wash the idli rice and udad dal 3 or 4 times until the water is clear .
  • Sift the beaten rice once and wash it thoroughly under the colander .
  • Soak the idli rice , udad dhall, beaten rice, Sabudana ,methi seeds in sufficient water for 3 to 4 hours .
  • After the soaking Time,  grind the ingredients in a wet grinder or blender until you get a smooth batter . Batter must have the consistency of Dosa batter, neither too thick nor too runny . I prefer the wet grinder as the yield is more compared to  the blender method .
  • Add salt, beat it well once with your hands . The warmth from our hands induces good aeration and helps the batter to ferment well.
  • Allow the batter to ferment in a warm place for 8 to 10 hrs .

  • To prepare the dosas ,heat the tawa , drop a ladle of the batter and donot spread too much. The set  Dosa has to be slightly thick .
  • The moment you pour the batter on the hot tawa ,you can see lot of pores /holes developing on it.This means your batter is perfect. Just drizzle a few drops of oil and cook covered for 1min.
  • Slowly flip over and cook on the other side for just 10 sec . 
  • If the batter is well fermented, then absolutely no oil is required to cook the dosa.
  • Serve hot with accompaniment of your choice.

Pin me up


December 03, 2022

Zucchini Paratha


Share with friends and family 3 comments:

 Winter is in the air ; the chill and pleasant weather calls for  nice soul satisfying hot meals from the pan to the plate . We at home,prefer piping hot parathas or rotis for dinner .

Parathas are filling and healthy as you can include almost as many veggies you wish either by kneading it along with the dough or even by stuffing it into the rolled bread .

Doodhi Parathas are a family favorite during winter, so this time when I had some fresh Zucchini in my fridge I thought of making some delicious parathas with them. I have used green zuchini ,but you can also use the yellow zuchini which are widely available in the market .

Zucchinis belong to the squash family and are used in a variety of recipes across cuisines . Unlike cucumber ,zucchini needs to be cooked before eating.  Zucchini may either be shredded, grated , sliced or even used as cubes depending on the recipe that it is being used in .

For the paratha,I have peeled the zucchini and then grated it finely and kneaded along with the wheat flour with various spices and flavorings. 

If you want to try some healthy,delicious and tasty parathas, please click on the recipe links below 


Preparation Time - 20 mins
Cooking Time - 2 mins per Paratha 
Complexity - medium 
Makes 10 to 12 parathas
 

Ingredients 

1.5 cups whole wheat flour 
2 cups grated zucchini
1 tsp red chilli  powder 
1/2 tsp haldi powder 
1 tsp jeera powder 
2 tbsp finely chopped corriander
Salt as needed
Oil to roast the paratha 

Method 


  • Squeeze out the excess water from grated zucchini and add it a mixing bowl along with the spices (red chilli powder , haldi powder , jeera powder and salt) . Mix it well with your fingers .
  • Add the wheat flour and the corriander and knead into a smooth and firm dough without cracks .Apply some oil over the dough and keep covered for 10 mins. 
  • Pinch out big lemon sized balls from the dough and roll them into a medium thick roti .
  • Heat a tawa or griddle and place the rolled out paratha on the tawa .
  • Flip it over when you see small bubbles and brown spots on the under side .
  • Apply some oil around the paratha and roast it until its well done.
  • Take it off the tawa and serve hot with some chilled curd or raita of your choice. 

Pin it up


September 25, 2022

Little Millet Poha - Samai Poha (Vegan breakfast)


Share with friends and family 7 comments:

 Millets are a very good alternative to rice due to their low glycemic index (GI) value which helps in control of insulin and absorption of carbohydrates into the blood stream making it ideal for people with Diabetes.  

Millets also help in weight loss as they are rich in proteins and fibre.

There are lot of millets available like Jowar, Bajra, Ragi ,Little millet, Kodo millet , Barnyard Millet etc . You can very conveniently replace the usage of rice with millet and work towards a healthy lifestyle. 

I am slowly trying to transition into using millets in my daily diet and I am certainly seeing a lot of difference.  Sudden hunger pangs,  mid morning cravings have reduced a lot and millets keep me full for a long time. 

Little Millet is known as Samo Chawal/Kutki  (Hindi), Samai Arisi (Tamil),  Saame (Kannada) , Samaalu (Telugu) .

Little millet is very rich in Magnesium,  Vit B components and also in phosphorous and zinc which help in building energy in the body. 

Making little millet poha is very easy, almost same as making the Poha using Flattened rice.  You can flavor and season it with the spices of your choice.  

Little millet flakes are available in most leading super markets and shops .Also there are many exclusive outlets selling millet based products from where we can procure them easily . 


Preparation Time - 10 mins
Cooking Time - 10 mins
Complexity - easy
Serves - 2 to 3

Ingredients 

1.5 cups little millet poha /flakes 
2 tbsp oil
Handful of peanuts 
Handful of frozen peas (thawed )
1tsp cumin /jeera
2 green chillies chopped 
Few curry leaves 
Salt as needed 
2 tsp lemon  juice
Pinch of turmeric 

Method 


  • Wash the little millet flakes under running water and let it rest in a colander for 10 15 mins . The millet flakes absorb the water and turn soft. 
  • Heat the oil in a kadai, fry the peanuts followed by cumin ,green chillies, curry leaves.
  • Throw in some salt and turmeric followed by the soaked little millet flakes and also the green peas .
  • Toss it well ,cover and cook for 3 to 4 mins . Lastly mix the lemon juice and garnish with fresh corriander and serve hot.

Pin it up


August 02, 2022

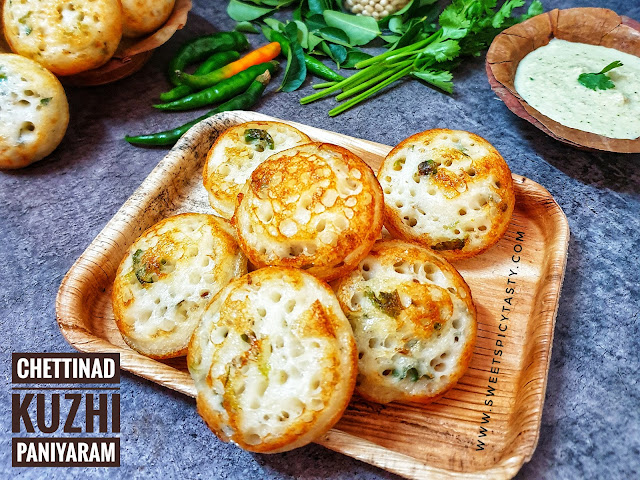
Chettinaad Kuzhipaniyaram - savory snack


Share with friends and family 10 comments:

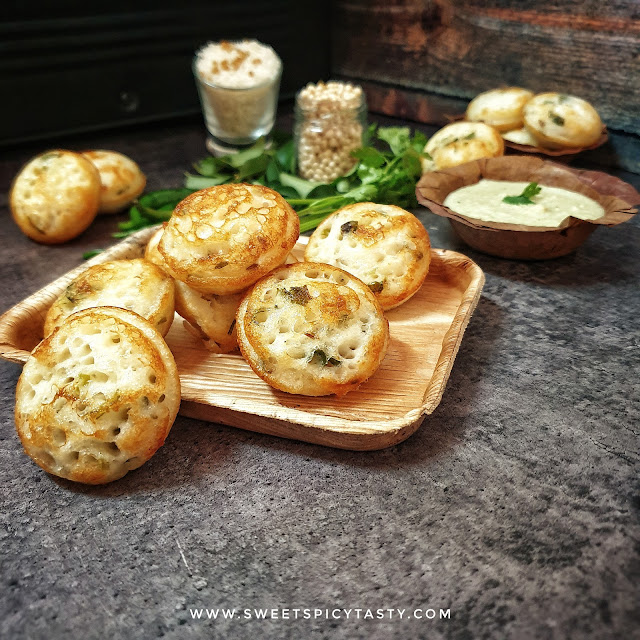
 Kuzhipaniyaram is a very tasty and delightful savory snack which takes a very important place either for breakfast or evening snacks  in Tamil Nadu.

Kuzhi in Tamil means cavity/depression and paniyaram means snack in general . So Kuzhi paniyaram means a snack with a depression..sounds funny right ? Basically kuzhi refers to the cavity in the mould of the pan which is used to prepare this snack. 

Kuzhipaniyaram is made in a special vessel called as paniyarakal . It is the same pan which is used to make Sweet Appams ,paddu or gunthaponganalu .

I have already shared the other variant of Paniyaram made from regular Idli batter ,but this chettinaad Kuzhipaniyaram is a special recipe where the batter is ground solely for the purpose of making paniyarams.

Some classic recipes using the Paniyaram Kal / Aebelskeiwer Pan 

Jackfruit Nei Appam

Watermelon Nei Appam

Paddu/Gunthaponganalu

Kunukku Paniyaram

Chettinaad is a region in the Sivagangai district in Tamil Nadu (Southern India) . Chettinaad is known for amazing cotton sarees,Athangudi tiles and lipsmacking food with bold flavor profile especially non veg .

Chettinaad cuisine is known for its pungent and spicy flavor and variety of food ranging from main course , snacks to sweets and savories . As much as they are famous for non veg ,there are a lot of vegetarian options as well .

 Kuzhi paniyaram is served with coconut chutney and /or thakali(Tomato) chutney and some piping hot filter coffee. 

Kuzhipaniyaram also known as uppu appam should not be confused with the other chettinaad special known as Vellayappam .

Vellayappam is a totally different recipe and it has been very well explained by my co blogger Radha on her blog who is my partner this month for the Shh secretly cooking challenge ..we are celebrating Chettinaad cuisine suggested by Kalyani of Sizzling Tastebuds. Kalyani has shared a classic recipe Kaigari Mandi which is very delicious and a perfect accompaniment for main course or idli/dosas .


Soaking Time - 6 to 7 hrs
Fermentation Time - 8 hrs
Preparation Time - 30 mins
Cooking Time - 20 mins
Serves - 5 to 6

Ingredients 

1 cup raw rice (strictly no basmati rice)
1 cup idli rice 
1/4 cup whole udad dal (udad gota)
1 tsp fenugreek seeds 
Salt as needed 

For tempering 
1 tsp mustard seeds
2 to 3 green chillies finely  chopped 
Handful of curry leaves
2 tbsp grated coconut
1/4 cup oil
Fresh chopped corriander 
1/2 onion finely chopped (optional - I haven't used )

Method

  • Wash multiple times until the water is clear. Soak the rice and lentils with fenugreek in water for 5 to 6 hrs.
  • Grind the soaked rice and lentils in a blender or grinder to a fine smooth paste .Batter should be of idli batter consistency not a very runny batter . Let the batter ferment overnight or for 8 hrs . 
  • Before making the kuzhi paniyarams , we need to prepare a tempering that will be added to the batter. 
  • To prepare the tempering, heat about 2 tbsp oil in a pan and splutter the mustard seeds, followed by the green chillies,  curry leaves and fry the onions if using until they turn pink and soft . Lastly add in the coconut and give a quick stir .Add this tempering along with finely chopped corriander to the batter and mix well . 
  • Heat the paniyaram pan and add a few drops of oil in each cavity . 


  • Once the pan is well heated ,add the batter to each cavity and remember to fill only 3/4th of the cavity . The batter on cooking will raise and it needs space to swell . So if you fill it to the brim,the batter will overflow making it a mess .
  • The paniyarams will develop lot of pores as they are cooking, these pores are perfect indicator of a well fermented batter . Once the batter appears cooked on top ,carefully flip it over and cook the underside until it turns brown and crisp .Cooking has to be on medium flame throughout. 
  • Remove the appams /paniyarams from the pan and serve hot with chutney of your choice. 

Pin me up


July 09, 2022

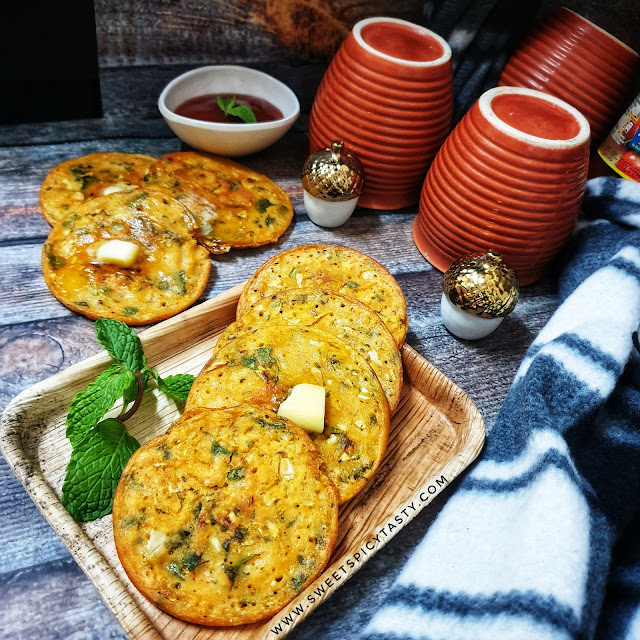
Brussel Sprouts Spinach Cheela (Vegan Breakfast)


Share with friends and family 5 comments:

 Cheela or Besan ka cheela is a popular brekfast  in North India made from gramflour known as Besan . There are many variants in making cheela ,can be plain with just basic spices used for flavoring or we can add in some finely chopped veggies and make it a healthier version .

Cheela makes for a very filling breakfast and also a perfect lunch box option.  Gramflour is certainly a magic ingredient which makes the recipe absolutely delicious and tasty . This morning it was raining and chilly making us want to indulge in something that would pep us up for the day and we dint want to have anything deep fried ,so that's how this healthy breakfast was made .


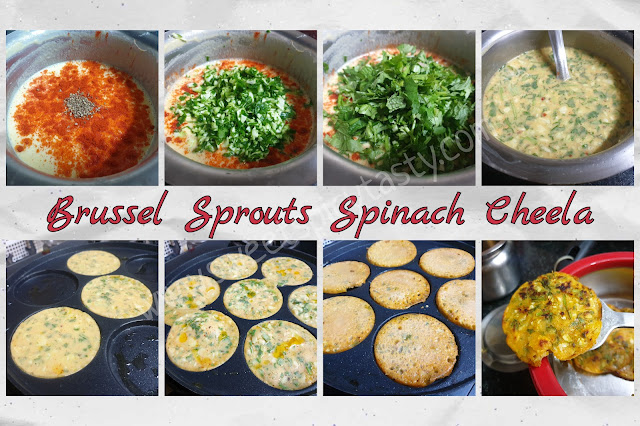
I generally make Tomato Omlettes which are a very popular Street food in Bombay, today this cheela was kind off fusion recipe where I used finely chopped Brussel Sprouts and spinach in the recipe. I used my mini  uttapam pan to make bite sized cheelas just for fun and fancy sake but you can always use the regular dosa pan to make them . If you don't have Brussel sprouts you can also used finely chopped cabbage mixed to the batter.

Brussel sprouts belong to the cabbage family and very popular in western countries.  Brussel sprouts are a good source of vit C and vit K . Exercise medical caution if you are on any kind of medication or blood thinners before using Brussel sprouts . Also,they have a slightly strong odor and turn rubbery when over cooked ,hence donot overcook and keep and eye while cooking 


Preparation Time - 15 mins
Cooking Time - 20 mins
Complexity - simple
Serves - 3 to 4

Ingredients 
2 cups gramflour/besan
2.5 cups water 
2 tsp red chilli powder 
1 tsp crushed ajwain /carom seeds
1 finely chopped green chilli 
1/2 cup Brussel sprouts finely chopped 
1/4 cup spinach finely chopped 
Handful of corriander and mint finely chopped 
Salt as needed
Finely grated ginger 
Pinch of asafoetida 
Oil to roast the cheelas

Method


  • In a wide mixing bowl prepare a lump free batter using the gramflour. 
  • Add the red chilli powder, salt, asafoetida,ginger, crushed carom seeds, chopped Brussel Sprouts, spinach and the mint + corriander and mix well.
  • Adjust salt and spices if needed and let the batter rest for 15 mins . The batter should be of pouring consistency like that of dosa batter. 
  • Heat the pan and pour the batter from center and slightly spread it outside.  Keep it slightly thick and don't spread it too thin. 
  • Drizzle oil around the cheela and let it cook on medium flame . Gramflour takes a while to cook,so don't rush into flipping it over .
  • Once the top side appears dry,carefully flip it over and cook the underside .
  • Take it off the pan and serve it with tomato ketchup or green chutney.  You can also grate some cheese or slather some butter when serving it to kids.  

Pin me 


June 20, 2022

Neer Dosa | Neer Dose - vegan breakfast


Share with friends and family 5 comments:

 Neer dose or neer dosa is a very popular breakfast from Tulu Nadu in Karnataka and delicacy from Manglorean cuisine . 

Neer dosa literally means water dosa in Tulu/Kannada but that doesn't mean that it is made from water ,just that the batter to prepare the dosa is very watery hence its called Neer Dosa. The consistency of the batter is very similar to that of Rava Dosa meaning pouring consistency.

Best part of Neer Dosa is the simplicity in preparation as there is no fermentation needed like the usual dosas,meaning you can make dosas as soon as the batter is ready . 

Neer Dosa uses just 2 ingredients ;rice and water .Adding grated coconut is optional but tastes really good when added to the batter .

Neer dosas are very soft and spongy to eat and it remains the same even after a few hours of preparing, making it ideal to pack for lunch box or travel . 

Neer dosas are served with coconut chutney , sagoo , balehannu Rasayana and for non veg lovers it is paired with some spicy curry made from egg,chicken etc .


Soaking Time - 4 to 5 hrs 
Preparation Time - 15 mins
Complexity - simple 
Makes - 15 to 16 neer dosas 

Ingredients 

2 cups normal rice (except basmati)
1/2 cup grated coconut 
Salt as needed
Water to grind 

Video recipe 


Method 

  • Wash the rice well and soak it overnight or for minimum of 5 hrs .
  • After 5 to 6 hrs , transfer the soaked rice to a blender along with the coconut and grind it to a fine paste..donot add water to grind. The water in which you have soaked the rice is sufficient to grind the batter .
  • Transfer this batter to a wide vessel and add some more water and bring it to a pouring consistency. Check the video recipe below for exact consistency.  Add salt as needed.
  • Heat a non stick tawa or a seasoned cast iron .
  • Sprinkle some water on the tava and if it sizzles immediately the tawa is ready to make dosas .
  • Pour the batter from outside to inside like how we do for rava dosa . Donot spread the batter like regular dosas.
  • Close the dosa with a lid for 30 to 40 sec and then open it up .Slowly using a spatula remove the dosa and fold it up like a wedge and serve with chutney or any other side dish of your choice. 
  • Neer dosa gets cooked only on one side. You don't have to flip over and cook . 
  • Keep adjusting the heat of the tawa as you keep making the dosas.  If the tawa is too hot then the dosas won't get cooked evenly.  

Pin me up !!


November 08, 2021

Kothmir Paratha | Corriander Flat Bread


Share with friends and family 5 comments:

 After all the festive binge eating we all settled for a simple yet wholesome meal for dinner . Instead of making the usual dal roti and sabji ,I prepared some flavor packed aromatic kothmir parathas and served with some thick curd and freshly ground green chutney. 

I make kothmir paratha quite often whenever I get a fresh bunch of corriander from the vegetable vendor. I donot use a chopper or blender to cut the corriander ..I prefer to roughly chop the corriander and then mix it with spices using my fingers ,this way the flavor is released well when kneaded with the wheat flour . You may add some ajwain/carom seeds to the dough ,but I prefer to keep it plain .

Parathas are the best way to feed and sneak in vegetables which are generally avoided by kids as well as elders . Pumpkin Paratha by Narmadha is a perfect treat for the Fall Season when pumpkins are available in plenty. 

Some such healthy parathas for you all to try from my blog .


Preparation Time - 10 mins
Resting Time - 10 mins
Cooking Time - 2 mins per paratha 
Complexity - medium 
Makes 8 to 10 parathas 

Ingredients
1 cup whole wheat flour
3/4 cup tightly packed roughly chopped kothmir/corriander leaves
2 tsp red chilli powder
1/2 tsp turmeric
salt
Water to knead

Method
  • Sift the flour with turmeric,salt,red chilli powder and salt.
  • Now ,add the chopped corriander and knead into a smooth soft dough. Mix the corriander with your fingers nicely by sprinkling water little by little so that the flavor seeps into the dough 
  • Add water little by little while kneading and make a soft pliable dough . Smear some oil all over the dough and cover it. 
  • Keep aside for about 10 to 15 mins.
  • Pinch out lemon sized balls and roll into rotis.
  • Heat a griddle,and cook the rotis on both sides,using a little oil. [OR]
  • Oil Free Version : Cook on both sides until brown spots appear and the rotis are cooked.
  • You can also puff the  rotis on open flame like fulkas if you want a softer version .
  • Soft Tasty Yummy parathas ready. Serve with any kind of gravy,pickle,green chutney or thick yogurt/curd.

Donot forget to pin me up !!!


September 27, 2021

Bread Upma - Quick Breakfast (Bachelor's cooking)


Share with friends and family 7 comments:

Bread Upma is a quick recipe that can be put together in very less time ,to be precise just 10 to 15 mins and you will have a sumptuous and filling snack ready . 

Bread upma is the best way to use up left over bread or on days when you have no patience to cook up an elaborate breakfast,this is a perfect savior.  I would call bread upma as a bachelor friendly recipe, since this doesn't require any fancy equipment, special cooking  or cutting skills.  


As a school going kid, this used to be my favorite lunch box item after sandwiches. I am a die hard fan of bread and can eat bread for breakfast, lunch and dinner.  

You can add some veggies to this upma if you are packing it up for kids' tiffin  box . I generally add some boiled potatoes, carrots and beans to make the breakfast filling and sumptuous. 

I prefer to use a day old bread because it is easy to crumble it and there is not much moisture left in the bread that will make the upma soggy.


Preparation Time - 5 mins
Cooking Time - 15 mins
Complexity  - easy 
Serves - 2 to 3 

Ingredients 

8 to 10 slices of bread
2 green chillies
Few curry leaves 
2 tomatoes chopped
1/2 tsp turmeric 
Pinch of sugar
Salt as needed 
2 to 3 tbsp oil 
1/2 tsp mustard seeds 

Method 


  • Crumble the bread  or roughly tear up the bread slices and keep ready. 
  • Heat oil in a deep pan and splutter the mustard seeds ,curry leaves and green chillies. 
  • Add in the tomatoes little salt and turmeric powder and saute it. Cook until the tomatoes turn mushy . 
  • Add in the crumbled bread to the tomato mixture , mix it well till the bread is coated well with the tomatoes. 
  • Sprinkle some water and cook covered for 2 to 3 mins .
  • Garnish with fresh corriander and serve hot .

Pin it up 


August 16, 2021

Tomato Poha | Tomato flavored flattened rice flakes


Share with friends and family 10 comments:

Tomato Poha is yet another versatile breakfast item and can be made quickly  with all the basic ingredients in our pantry. As much as we all love the Kanda Batata Poha or Batata Poha , Tomato Poha is an ideal snack to be packed for school or office lunch box. The tomatoes give the poha a nice moist texture and also the tanginess is a perfect treat to the taste buds at lunch time . As this recipe doesnt use onion or garlic this can be made for breakfast or even served as prasadam during Pooja Days or Functions.

I first tasted tomato poha during one of my school picnics from my friend's tiffin box . One spoonful and I instantly fell in love with this delicious and tasty poha .  Thakali Poha was soft,moist and succulent and we did not need any accompaniment like dahi or chutney to go along.

That picnic was a memorable one because of all the fun we had at the theme park and  the most awaited picnic lunch time, which we as kids waited eagerly  .She loved my mom's signature Mini Podi Idlis while I loved her Poha ,so from then on it was an unsigned agreement between us friends that we would carry extra share of idlis and poha even on regular days for our school recess time .

 I make poha very frequently for our breakfast at home and Tomato Poha along with Puli Aval/Gojjuavlakki , Batata Poha and Choora Matar come in rotation and we at home love to have it hot hot just off the pan .  Next on my to do list is Kalyani's Indori Poha . This has been bookmarked for a very long time but I somehow have not been able to put all the pieces together, fingers crossed I hope to try it soon .

Coming to Tomato Poha / Thakali Aval, a few small tricks will get you the best poha and even a non poha lover will begin to love this sumptous and filling snack . Remember to use medium thick poha and wash it thoroughly . Give it sufficient resting time , this ensures the poha absorbs the water and remains moist . If you find the soaked poha too dry, sprinkle some water generously and mix it well with your fingers.


Preparation Time : 10 mins
Cooking Time : 15 mins
Serves  - 3 
Complexity - simple

Ingredients

7 fistfuls/handfuls of medium thick poha 
2 -3 green chillies
handful of groundnuts
2 medium sized tomatoes deseeded and chopped
few curry leaves
fresh corriander finely chopped
5-6 tbsp oil
1 tsp mustard seeds
1/2 tsp jeera
1 tsp haldi /turmeric powder
pinch of asafoetida (skip for GF)
lemon juice from 1/2 lemon
salt as needed
1 tsp sugar

Method

  • Wash the poha using a colander to remove any husk or dust particles. Spread the poha on a wide plate or bowl and let it rest for 10 mins.
  • Meanwhile, heat the oil and fry the groundnuts until crisp, followed by the mustard seeds, jeera, green chillies,curry leaves and asafeotida.
  • Add in the turmeric and saute the tomatoes until soft and mushy. Add salt as much needed .
  • Once the tomatoes have turned mushy, add the washed poha and toss it carefully and mix it well. Sprinkle handful of water and cook covered for 7 to 8 mins. This covered cooking ensures that the poha will remain soft and moist even when packed for long time .
  • Lastly add the lemon juice, sugar and fresh corriander mix it gently and serve it hot with a beverage of your choice.


Pin it up 


July 12, 2021

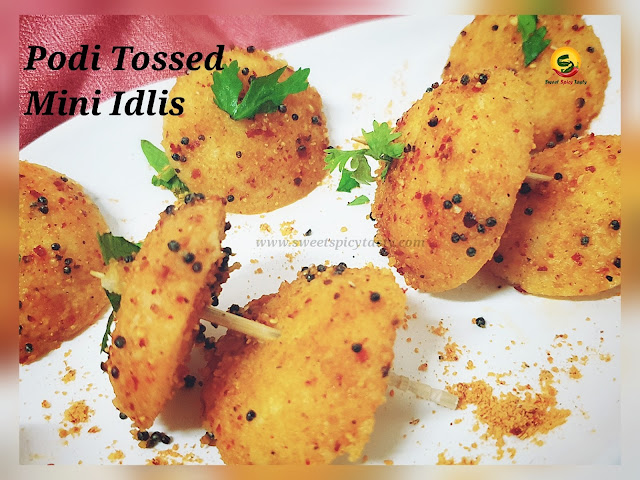
Podi Tossed Mini Idlis | How to make podi idli at home ?


Share with friends and family 14 comments:

 If you ask any Tamilian, what should be packed for food while traveling or picnicking, patt would be the answer,  Podi Idlis  and curd rice !!! 

Podi idlis are a classic breakfast or tea time snack made from spongy idlis by smearing it with molgapudi mixed in oil.podi idlis,how to make podi idli, mulagapudi peratina idli, button idlis,  podi button idli , podi tossed idlis


What is Podi Idli and why is it a preferred dish while traveling? 

Idlis are steamed hence light on stomach while travel ,also since chutney and sambar have short shelf life, the lady folks came up with an idea of smearing a  good amount of Idli Molagapudi mixed in oil all over the idlis, this kept the idli moist as well as made it easy and tasty to eat as the masala would nicely penetrate into the idlis and the oil coating would prevent the idlis from getting spoilt. Podi idlis are an ideal snack option for picnics and camping as well .

Podi idlis are a classic breakfast or tea time snack made from spongy idlis by smearing it with molgapudi mixed in oil.podi idlis,how to make podi idli, mulagapudi peratina idli, button idlis,  podi button idli , podi tossed idlis

My dad had got a special mini idli plate for me from his trip to Madras a.k.a Chennai in the early 90s. The idli plate had cute 14 small moulds and we would get cute tiny button idlis . From then on I would pester my mom to frequently pack these mini idlis tossed in molagapudi for my school lunch too . It would be fun to stick the fork into the idlis one by one and take a full satiating bite .

We still have that idli plate and unfailingly make one batch of these cute beauties every time I steam idlis .

Now,with no traveling and staying locked up at home,  I just recreated the fun of having these delicious podi tossed mini idlis on a drizzly cool evening . It was a delight to have it with some piping hot filter coffee . If you dont have the mini idli plate , you can definitely enjoy this delicacy with regular idlis too .

If you love experimenting with idlis then you must try Sasmita's Beetroot Waffle Idlis which is really very unique and innovative. I am all set to try that soon and I am sure it will be a hit in my home as much as Idli Fry and Idli Upma 


Podi idlis are a classic breakfast or tea time snack made from spongy idlis by smearing it with molgapudi mixed in oil.podi idlis,how to make podi idli, mulagapudi peratina idli, button idlis,  podi button idli , podi tossed idlis

Preparation Time - 5 mins
Steaming Time - 10 mins
Complexity - easy 
Serves - 2 to 3 

Ingredients 
2 cups idli batter 
2 tbsp oil 
1/2 tsp mustard seeds 

Method 
  • Steam the idlis ,demould it and let it cool for a while. 
  • Once cooled, spread  some oil over the idlis along with the molagapudi/spice mix and toss it well so that the podi coats the idlis properly.
  • Heat the balance oil in a pan,splutter mustard seeds when hot.
  • Drop these idlis into the hot tempered oil and let it get roasted for 2 to 3 mins until it turns mildly crisp. 
  • Take it off the pan , garnish with fresh corriander and serve .

Pin it up without fail 

Podi idlis are a classic breakfast or tea time snack made from spongy idlis by smearing it with molgapudi mixed in oil.podi idlis,how to make podi idli, mulagapudi peratina idli, button idlis,  podi button idli , podi tossed idlis