Showing posts with label Festival Special- Ganesh Chaturthi. Show all posts

August 14, 2025

Classic Nei Appam


Share with friends and family 3 comments:

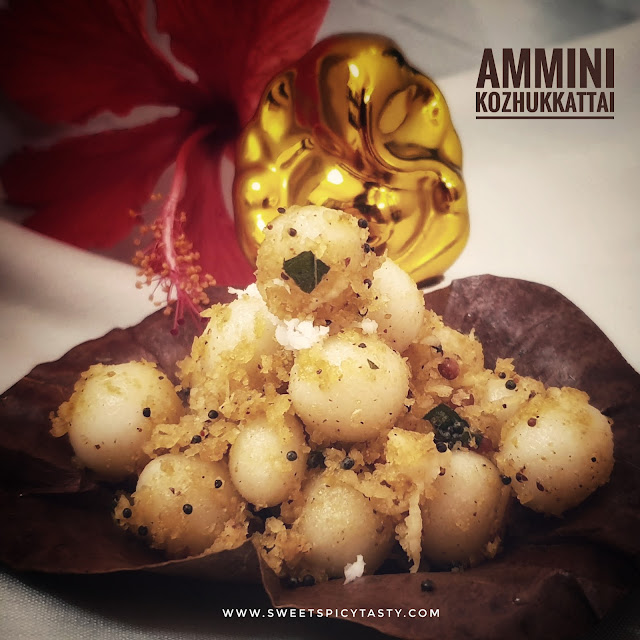
 Nei Appam is one of the most important Neivedhiyams / Prasadams made during Janmashtami,  Ganesh Chaturthi,  Karthigai,  Avani Avittam and lot more poojas or rituals like Ganapathi Homam, Bhagavathi Sevai etc .

Instant version can be made using rice flour,but this is a classic version by soaking and grinding rice along with cardamom, ripe bananas and jaggery.  Adding grated coconut or slivered coconut bits gives a nice taste and texture to the appam. 

I add a teaspoon of udad dhall while soaking the rice, this gives a nice texture and softness to the Neiappams . By adding the udad dhall , we can avoid the use of cooking soda . Udad dhall automatically gives the appam the softness and fluffy texture. 

We can using melted jaggery syrup while grinding the appam batter or if we are using good quality powdered jaggery without dust, then we can add it to the rice while grinding. 

Grinding jaggery with rice is an easier way to seamlessly blend the rice and jaggery without lumps .

For Krishna Jayanthi, it is said that if we are unable to make  elaborate prasadams for Krishnar , we can offer 

Navaneetham (Butter + sugar candy)

Nei appam

Aval Payasam (Poha Kheer)

Thayir Aval / Gopalkaala (Dahi Poha)

Paal / Milk.


Preparation Time : 10min
Soaking Time : 4 hrs
Cooking Time : 30min
Complexity : medium

Ingredients 

1 cup rice (no basmati/fragrant rice)
1 tsp udad dhall
3/4 cup jaggery (use 1 cup if you like it very sweet)
1 ripe banana
2 to  3 cardamoms

Procedure

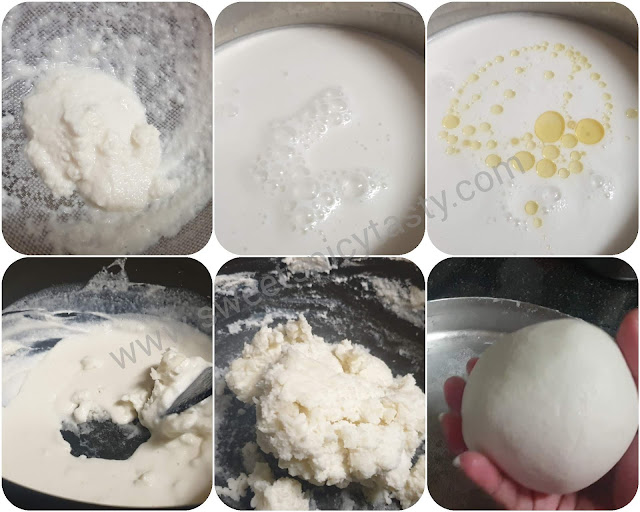
  • Wash and soak the rice and udad dhall for 3 to 4 hrs
  • Drain the water and add the soaked rice to the blender along with roughly chopped banana and cardamom seeds .
  • Grind it to a fine paste adding water in batches. 
  • If using organic jaggery powder ,add the jaggery powder to the blender and grind it to a smooth paste resembling Dosa batter .
  • If you are doubtful about the jaggery,melt it using half cup water and strain it .
  • Use this strained jaggery water for grinding the appam batter.
  • Transfer the batter to a mixing bowl ,add a tsp of grated coconut or slivered coconut bits if you like .
  • Beat it well with a whisk or spoon to incorporate air . The batter will feel light . Rest it for 30 to 40 mins
  • Heat the appam pan , pour ghee into the cavities .
  • Once the ghee has heated up,pour the appam batter into the cavities and cook on medium flame until the underside cooks well.
  • Flip it over gently and let the other side cook until crisp and brown.
  • Take it off from the appam pan and repeat the same steps for the entire batch of batter. 
  • Tasty and delicious Nei appam is ready. 
  • If you like you could also make Jackfruit Nei appam and Watermelon Nei appam  also .

Pinterest Link - https://pin.it/4r11xefoZ


September 15, 2023

Ganesh Chaturthi Special Prasadam (Vinayaka Chaturthi) - Ganesh Utsav / Ganeshotsav


Share with friends and family 7 comments:

 Ganesh Chaturthi or Vinayaka Chaturthi is the most sought after Hindu Festival . Everyone loves to celebrate Ganesh Chaturthi with pomp and glory .  Ganesh Chaturthi falls in the Holy month of Bhadrapada as per Indian Almanac which is around August - September as per Gregorian calender . This year we are celebrating Ganesh Chaturthi on 18th September 2023.


Mumbai is known for  Ganesh Chaturthi festival which lasts for 10 days  known as Ganesh Utsav or Ganeshotsav .We can hear everyone singing Ganapati Bappa Morya , Mangal moorthy Morya while they invite Ganpati Bappa Home.

Having grown up in Mumbai, I have my set of beautiful and divine memories of celebrating the Ganesh Utsav for 10 days.It is very difficult to bid adieu to Ganesha on Ananth Chaturthi.  The entire city of Mumbai puts up a very vibrant look and there is just positive vibes all over.  I always have my heart in Mumbai during Ganesh Utsav .Bangalore also celebrates Ganesh Utsava in its own way and there is a vibrant charm all over the city.

The atmosphere is so positive and vibrant during this festive season in every home . Everyone at home gets into planning of bringing the best Ganesha idol home by placing the order for the Murthy well in advance with the sculptor .The decor planning also starts much before with kids ,elders all getting into festive mood . The ladies of the house get into the planning of prasad and neivedya making and list out what bhog to be offered as long as we have Ganapati Bappa at our abode. I am detailing the list of prasadams we can offer to Lord Ganesha during the 10 day Festival . Click on the recipe names below for a detailed procedure to make.

South Indian Style Prasadam Menu 


Modakam/ Kozhukkattai 
Ammini Kozhukkattai 
Kondakadalai Sundal 
Pachai Arisi Idli (Raw rice Idli)
Ulundhu Vadai (Medhu Vadai)
Aval Payasam 
Panchamritham
Baalehannu Rasayana 


  ■■■■■■■■■■■■■■■■■■■■■■■■■

Maharashtrian Style Prasadam Menu


Ukidiche Modak 
Varan Bhaat
Basundi
Shrikhand
Puri - Batatachya Bhaji 
Kothimbir Vadi 
Khamang Kakdi
Dry fruits Kheer


After the 10 day festivity, it is very heart breaking to send off Lord Ganesha . This process is called as Visarjan wherein Lord Ganesha is immersed into the sea and we bid a farewell to him .While sending him off,we all wish and pray for his return next year and the mind begins to plan on how to welcome him home coming year .
Ganapati Bappa Morya ,Pudchya Varshi Lavkar Ya ..this is what is chanted while we bid him adieu,meaning  "oh lord Ganesha,pls come back soon next year" .

Pin me for later 


June 16, 2023

Rose Gulkand Shrikhand | Gulkand Shrikand | Gulab Shrikhand


Share with friends and family 5 comments:

 Rose Shrikand or Gulab shrikand is made using Gulkand and mild rose essence or rose syrup .

Gulkand is a delicious jam made from rose petals and sugar . Gulkand is an important ingredient while preparing masala paan (flavored betel leaf) or beeda as it is called in the South .

Shrikand is often served alongside the main course meal as an accompaniment to puris and hot parathas. Rose Shrikand is my next favorite after the classic flavors of Badam Elaichi Shrikand and Kesar Pista Shrikand .

Rose shrikand, gulab Shrikhand, Shrikhand, Shrikand, gulkandh Shrikhand, rose Gulkand Shrikand, kulkandh , gulqand srikand ,srikand

This gooey and sweet Gulkand along with mild rose essence is blend into the silky smooth hung curd to make the lipsmacking Gulkand Shrikand . Serve it along with some hot puris or parathas and you will relish the taste forever . 

The trick to making a silky smooth yogurt is getting hold of a perfect hung curd. 

If you get thick and creamy Greek yogurt,you can also use that to make Shrikand . I have editted my recipe (June 2025) below to include how to make the perfect hung curd using home set Dahi /yogurt . 

Rose shrikand, gulab Shrikhand, Shrikhand, Shrikand, gulkandh Shrikhand, rose Gulkand Shrikand, kulkandh , gulqand srikand ,srikand

If you love this flavor of rose / gulkand ,then you must definitely check these recipes out 

Gulkand Milkshake

Rose Kulfi

Rose Thandai

Rose Milk

Rose shrikand, gulab Shrikhand, Shrikhand, Shrikand, gulkandh Shrikhand, rose Gulkand Shrikand, kulkandh , gulqand srikand ,srikand

Pre Preparation time - 2 to 5 hrs 
Cooking Time - Nil 
Actual Preparation - 5 mins 
Serves - 2 to 3

Ingredients 

400ml thick yogurt or full fat dahi or curd

2 tsp rose syrup 

2 to 3 tablespoons gulkand 

2 to 3 tsp  powdered  sugar (optional)

Preparation of Hung curd

Take a wide mixing bowl and place a strainer over it lined with a muslin cloth/ cotton cloth and pour the curd into the cloth . 

I have used home made thick curd for an even consistency. You can also use the store bought dahi if you please . The yogurt should not be sour . So it is best to use freshly set curd made in last 24hrs .

I set the yogurt /dahi in full fat milk .Once the dahi was set ,I let it sit in the fridge for 24hrs to set properly . 

Bring the ends of the cloth together, squeeze it once and tie it very tightly . Place a heavy object over the tied cloth and leave the colander over the mixing bowl so that all the whey water will get collected in it . Keep squeezing the cloth occasionally to drain the excess water . 

Keep this set up inside the refrigerator so that the hung curd doesn't turn sour especially in summer .

After about 2 to 3 hrs , you can see all the whey collected in the bowl below and when you open the cloth all that is left is thick creamy mass which is hung curd . Squeeze it once again before removing it from the cloth to ensure there is no water content left.  When you touch the hung curd , it should appear thick and creamy without any excess water.  If you find it watery, leave it for somemore time in  the cloth with the weight on . 

Donot waste the collected whey, you can use it while kneading the dough for rotis or even to prepare buttermilk or Chaas

Preparation of Shrikhand

Rose shrikand, gulab Shrikhand, Shrikhand, Shrikand, gulkandh Shrikhand, rose Gulkand Shrikand, kulkandh , gulqand srikand ,srikand

  • Transfer the hung curd to a wide mixing bowl .Add in the gulkand , rose syrup. Powdered sugar may be added though it isn't necessary.    Gulkand as well as rose syrup will have sugar already added in them which is enough to give sweetness to the Shrikhand.
  • Mix well with a spoon until all the ingredients blend well . Keep it in the refrigerator for it to set well . 
  • Take it off the refrigerator just before serving and garnish with some chopped pistachios and some tutti fruity. 

Pin it up 


April 18, 2022

Balehannu Rasayana | Baalehannina Rasayana - Vegan Banana Salad


Share with friends and family 7 comments:

 Balehannu Rasayana is a delicacy from Karnataka and prepared for most festivals . 

Baalehannu is banana and rasayana means essence.  Very simple to make as there is no cooking involved and also not much of chopping and pre preparations. Rasayana is also known as Seehikarne or Seekarne .

If you haven't tried this delicious and flavorful vegan banana Salad, I suggest you must try this for sure and you will keep asking for more .

Rasayana is made for satyanarayana pooja , ganesh chaturthi or even during navaratri for prasadam.  A similar version called Kelyache shikran is made in Maharashtra using milk and bananas . Poonam's blog has the perfect recipe for Shikran . Click here for the recipe.

Balehannu Rasayana tastes very well with dosa , chapathi and neer dosa . Rasayana is made in 3 variants depending on how the family likes .

One variant makes use of coconut milk ,jaggery ,bananas and cardamom  powder and this is slightly liquid  in nature while the dry version used jaggery powder ,grated coconut and some cardamom powder mixed with chopped bananas. I have always liked the dry variant as I have very vivid childhood memories associated with this delicious recipe my Amma and periamma would make for me. I ate this for the very first time when my perima made it using Elaichi or Elakki bananas.  The natural cardamom flavor present in the bananas adds a lot of flavor to the Rasayana. 

The color of the rasayana depends on the color of jaggery being used . You can also sugar if you want but I prefer using jaggery as it is healthy and also adds a rustic flavor to the Rasayana. 


Preparation Time - 10 mins
Cooking Time - nil
Complexity - easy 
Serves - 3 to 4

Ingredients 

3 to 4 elaichi bananas or 2 regular bananas 
2 tbsp grated coconut
3 to 4 tsp jaggery powder 
Pinch of cardamom powder 

Prepare the rasayana just before serving as the bananas will turn back and lose the taste.  Also use firm and medium ripe bananas. Over ripe bananas are to be avoided

Method

  • Remove the banana skin and chop into medium round slices 
  • Toss the chopped banana slices with jaggery, cardamom powder and coconut and serve immediately.  DONOT REFRIGERATE.

Pin up


April 16, 2022

Aval Payasam | Poha Kheer - Rice Flakes pudding


Share with friends and family 6 comments:

 Aval Payasam is a quick Indian dessert that can be made easily using just milk and sugar . Known as Atukula Paysa in Telugu, avlakki payasa in kannada and Poha Kheer in Hindi. Thick variety rice flakes is best for making Aval Paysam . It is flavored with cardamom powder,  dry fruits and saffron which makes it rich and exotic.

Aval Payasam is made as prasadam for many festivals like Krishna Jayanthy,  Navaratri, Ganesha Chaturthi, Mahashivratri,Onam,Vishu ,Pournami etc.

Today is the auspicious Chitra Pournami which is celebrated widely in Tamil Nadu and has a very important significance and dedicated to Chitra gupta .It is believed that Lord Chitragupta  keeps records of our good and bad deeds and on this day people pray and ask for forgiveness.  People flock to holy river to take a dip which is symbolic of washing away sins . Milk based paysam is made on this day for offering and we can make this delicious Aval Paysam as prasadam. 

Likewise,  In North,there is a tradition to prepare  Doodh Kheer for Khojagiri Poonam also known as Sharad Purnima dedicated to Lord Mahalaxmi. Many homes make this delicious Poha kheer for celebration.

In South India, especially Karnataka and Tamil Nadu Rice is not eaten during fasting ,hence Aval/Poha or Wheat based items are preferred to be offered as Prasadam and eaten.  Aval Payasam/ Avalakki Payasa is one of the most preferred and delicious prasadam for Shivratri in Karnataka .


Preparation Time - 10 mins
Cooking Time - 15 mins
Complexity - simple
Serves - 3 to 4

Ingredients

1/4 cup thick poha /thick rice flakes
1/4 cup sugar 
1/4 cup water
3 cups boiled milk
Few strands saffron
1/4 tsp cardamom powder
2 tsp ghee 
Assorted dry fruits handful (pistachio,almonds and cashews)

Method 

  • Wash the poha/aval to remove any dust or other particles .
  • Keep it soaked for 5 mins 
  • In a cup soak the saffron strands  in 2 tbsp warm milk .
  • Dry roast the dry fruits in a pan and give it a quick pulse in the blender to make a coarse powder . 
  • Heat ghee in a pan and lightly fry the soaked poha until you get a good aroma .
  • Add 1/4 cup water and cook the poha till the water is absorbed .
  • Add the milk along with the saffron soaked milk and cook till the milk boils . Keep stirring to avoid the milk sticking to the bottom of the pan . 
  • Lastly add the cardamom powder and roasted dry fruits powder along with sugar and continue cooking till the sugar melts . The kheer will turn watery after adding sugar .
  • Continue to cook for another 4 to 5 mins till the milk thickens .Turn off the stove and poha kheer is ready to serve . 

Pin up


March 14, 2022

Ammini Kozhukkattai | Steamed rice flour dumplings


Share with friends and family 10 comments:

Ammini Kozhukkattai,  mani Kozhukkattai is a steamed preparation using rice flour or rice batter . It is offered to lord Ganesha on Ganesh Chaturthi or on Sankashti as prasad. 

These ammani Kozhukkattais look very cute and pretty as the dough is rolled into small and tiny balls and steamed later to be tempered and sauteed in a special spice mix .

Generally ,after making the Modakam / Kozhukkattai, the balance dough is used to make the Mani Kozhukkattai without wastage . Kids love to have these ammini Kozhukkattai as it is fun to pop the small balls into the mouth one after another. 

We can prepare the ammani Kozhukkattais either using rice flour or by soaking the rice and then grinding it to batter . This batter is then cooked to form a dough which is then rolled out and steamed .

I prefer soaking the rice and then making the Kozhukkattais as I feel it turns out to be very soft and is fail proof.  


Soaking Time - 3 hrs 
Preparation Time - 45 mins
Steaming Time - 7 to 8 mins
Complexity - medium

Ingredients 

For the outer cover 
1 cup rice (regular cooking rice except basmati )
2 cups water 
Pinch of salt 
1 tsp oil 

Tempering and flavoring 
1/2 tbsp oil
1/2 tsp mustard seeds 
Few fresh curryleaves 
1 chilli finely chopped
Pinch of asafoetida 
1 tbsp curry powder 
2 tbsp fresh grated coconut 

Pre Preparation for the Rice flour dough
Wash and soak the rice in sufficient water for  3 to 4 hrs . I have used sona masuri which is used for day today cooking ..avoid using any variety of par boiled rice as it is never used for making prasad/offering to God .

Method 

Preparation of Rice flour Dough


  • Transfer the soaked rice to a blender with 2 cups of water and grind to a very fine paste. 
  • The batter will be runny and that is how it has to be.  Incase you happen  to add extra water ,donot worry ,it can be handled while cooking the dough .
  • Strain this rice flour batter through a strainer to remove any rice grits that may have remained while grinding .
  • To the strained batter add a pinch of salt and oil and mix well.
  • Heat a heavy bottomed fry pan or vessel and transfer this batter to it . Reduce the flame to medium.
  • Go on stirring the batter and you will observe the batter begins to thicken and starts forming lumps.
  • Keep stirring and breaking the lumps until all the batter is well cooked and it appears lumpy. 
  • To see if the batter is cooked well ,touch with your fingers and the dough must not stick on the fingers.  If it sticks continue cooking for 1 more min. 
  • Turn off the stove and close the dough with a lid . The dough will further get cooked on this heat
  •  Once the dough is warm enough to handle ,transfer it to a large plate ,grease your palm with some ghee or oil and knead the dough for 5 to 6 mins until you get a soft ,crack free and smooth dough . 
  • Pinch out a portion of the dough and you should be able to roll into a smooth ball without cracks . This is the right consistency of the dough . If you are getting cracks while rolling ,the sprinkle a little hot water and continue to knead further till you get the desired consistency.  
  • Cover this with a damp cotton cloth until use.

Preparing the Ammini Kozhukkattai 


  • Pinch out small balls from the dough and roll it until it is smooth and without cracks . 
  • Place all the tiny rolled out balls in a steamer and steam for 7 to 8 mins .
  • Heat oil in a thick bottom kadai and splutter the mustard seeds , fry the green chillies ,curry leaves and add asafoetida. 
  • Tip in the steamed rice balls ,top it with the curry powder and give a quick toss until the curry powder coats the amminis / rice balls wel . Adjust salt if needed . Close and cook for 1 min. This will help the flavors to absorb nicely. 
  • Lastly garnish with fresh coconut , mix it and offer to lord Ganesha .


Pin me up 


October 22, 2021

Varan Bhaat | वरण भात - Maharashtrian Meal


Share with friends and family 5 comments:

Varan Bhaat is a common and staple nutritious meal in most homes in Maharashtra.  This simple and traditional meal holds a very important place even during festive occasions like Ganesh Chaturthi,  Gudi Padwa , Sankrant and also wedding feast.  

 Varan Bhaat is a typical and soulful food which can be easily prepared without any fancy ingredients but from basic pantry supply . 

Varan in Marathi means Lentil curry and Bhaat is Rice ,so loosely it translates to Lentil curry Rice .  The Varan is prepared separately with very mild spices and served alongside steamed rice and a dollop of ghee . Varan bhaat is a perfect meal  for kids or elderly people as there is any spice added . 

Traditionally Thuvar Dhall viz Split Pigeon peas is used for preparing the varan but these days people use other lentils like Moong dhall,masoor dhall etc . I prefer to stick to the traditional way of making by using Arhar Dhall / Thuvar dal.

Varan(Lentil curry) ,Bhaath(Rice),Thoop(Ghee) ,Batata Bhaaji (Potato curry) and Loncha (pickle) is a preferred combo on a regular day . Today for lunch I prepared this wholesome meal and relished it with some fryums . I wanted to fry some puris as well but with some last min hurdle ,I took a shorter route and skipped making puris .

When being served on festive occasions, the meal spread is very elaborate with a few extra items being added to the menu. (Some of the typical menu items are given below) 


Preparation Time - 10 mins
Cooking Time - 20 mins
Complexity - Simple 
Serves - 3 to 4 

Ingredients 
1 cup thuvar dhall /Arhar dal/ thuvaram paruppu
3 cups water 
1 small green chilli
Fresh curry leaves 
1 tbsp ghee
1/2 tsp cumin seeds 
Turmeric powder
Salt as needed
Fresh corriander 
Pinch of asafoetida 

Method


  • Wash the thuvr dhall 3 to 4 times . Add 3 cups of water ,turmeric powder and finely chopped green chilli ,salt and pressure cook for 4 to 5 whistles on medium flame .
  • Let the pressure release and then mash the cooked dhall with a whisk until it is mushy.
  • Prepare the tempering by heating the ghee in a pan and then splutter the jeera ,curry leaves and asafoetida.  Pour it over the cooked dhall. Mix and close the lid for 10 min for the flavors to infuse . Garnish with fresh corriander. 
  • Serve hot with rice ,ghee and pickle .

Pin it up


October 10, 2021

Badam Elaichi Shrikhand | बादाम इलायची श्रीखंड


Share with friends and family 5 comments:

 Shrikand needs no introduction. Traditional dessert made from hung curd in various flavors is a must have accompaniment during a festive meal in states of Maharashtra and Gujarat.  

Needless to say, having grown up in the cosmopolitan, buzzling city of Bombay, shrikand has always been a part of my life . Me and my dad love to have hot puris or fluffy fulkas with creamy shrikand . Mum on the other hand was not a great fan of shrikand and I must say hubby too doesn't relish sweets as much and shrikand is a big No for him .  So shrikand makes a rare appearance these days at my home . 

Kesar Pista Shrikand is already on the blog and now it is time for Badam Elaichi Shrikand . The chopped bits of almonds/badams hidden inside the shrikand are  great to bite into. I also add some cardamom seeds as is to shrikand along with fine cardamom powder . 

Shrikand is a royal treat to serve your guests or even make it as a prasad during Ganesh Chaturthi or Navaratri. 

Pre Preparation time - 2 to 5 hrs 

Cooking Time - Nil 

Actual Preparation - 5 mins 

Serves - 2 to 3


Ingredients 

400ml thick yogurt or dahi or curd

1/2 tsp cardamom powder 

1 - 2 whole cardamoms

4 to 5 strands saffron /kesar 

2 to 3 tablespoons chopped unsalted badam /almonds 

3 tbsp powdered  sugar 

Preparation of Hung curd

Take a wide mixing bowl and place a strainer over it lined with a muslin cloth/ cotton cloth and pour the curd into the cloth . I have used shop bought thick curd for an even consistency. 

Bring the ends of the cloth together, squeeze it once and tie it very tightly . Place a heavy object over the tied cloth and leave the colander over the mixing bowl so that all the whey water will get collected in it . Keep squeezing the cloth occasionally to drain the excess water . 


After about 2 to 3 hrs , you can see all the whey collected in the bowl below and when you open the cloth all that is left is thick creamy mass which is hung curd . Squeeze it once again before removing it from the cloth to ensure there is no water content left.  When you touch the hung curd , it should appear thick and creamy without any excess water.  If you find it watery, leave it for somemore time in  the cloth with the weight on . 

Donot waste the collected whey, you can use it while kneading the dough for rotis or even to prepare buttermilk or Chaas


Preparation of Shrikhand

  • Transfer the hung curd to a wide mixing bowl .Add in the powdered sugar , chopped almonds. Saffron strands ,cardamom powder and the cardamom seeds.
  • Mix well with a spoon until all the ingredients blend well . Keep it in the refrigerator for it to set well . 
  • Take it off the refrigerator just before serving. 


September 13, 2021

Kozhukkattai | Modakam | Modak


Share with friends and family 9 comments:

Lovingly as Ganesha is called "Modaka Priya" meaning a lover of Modakams , have you ever thought ,how this name stuck to him ? Well ,then read on to find out .... 

 Kozhukkattai or Modak are Lord Ganesha's favorite and we offer these incredibly delicious offering made from rice flour and jaggery on Ganesh Chaturthi and also during the monthly Sankashti Chaturthi.  

Kozhukkattai is also offered to Devi Varamahalaxmi during the Varalakshmi Viratham observed in the month of August. 

Kozhukkattai is Lord Ganesha's favorite .we offer these incredibly delicious offering made from rice flour &jaggery on Ganesh Chaturthi & sankashti, modaka priyan, thenga poorna kozhukkata, how to make kozhukkatai without rice flours,  easy kozhukkatai recipe, varamahalakshmi habba kadubu , modaka , ukadiche modak , why does ganesha love modaks , rice flour steamed dumplings, rice flour dumpling with jaggery stuffing

A small story ......

Baby Ganesha  used to love ladooos a lot and he would go on eating them but never felt satiated. Once Devi Parvati  was out of ladoos and that's when she  came up with this idea of stuffing coconut and jaggery in rice flour dumplings and serve it to Ganesha ,to see if his hunger is satisfied.  The moment Ganesha ate this Modakam,he developed an instant liking and also declared that he felt full after eating these Kozhukkattais. Hence , devi Parvati mentioned that any devotee who offers these kozhukattai or Modakams to Her son  Vinayaka they would be blessed abundantly and all their wishes would be fulfilled. 

 Isn't it a nice myth behind Modaka being an eternal favorite of Ganesha  and he being referred as Modaka Priya?

Since we spoke of ladoos also being Lord Vinayaka's favorite, panchakajjaya ladoo is a traditional prasadam from Udupi cuisine which is offered during the festive season . My friend Preethi has detailed the process of making these traditional panchakajjaya  ladoo seem like a child's play . 

Kozhukkattai is Lord Ganesha's favorite .we offer these incredibly delicious offering made from rice flour &jaggery on Ganesh Chaturthi & sankashti, modaka priyan, thenga poorna kozhukkata, how to make kozhukkatai without rice flours,  easy kozhukkatai recipe, varamahalakshmi habba kadubu , modaka , ukadiche modak , why does ganesha love modaks , rice flour steamed dumplings, rice flour dumpling with jaggery stuffing

Kozhukkattai or Kozhukkata ,as easy as it may sound ,the tricky part is making the outer cover from rice. Once we master the art of getting the dough right,then making the Kozhukkattai is a breeze .

 There are 3 main steps involved in making the Kozhukkattai 

  • Preparing the rice flour dough for the outer covering. 
  • Jaggery coconut mixture for stuffing in the modakam
  • Steaming the prepared modakam.

I have been following this recipe of making kozhukkatai for last 4 or 5 years and it has never failed me . This recipe was taught to me by Bageerathy Aunty who gave me the confidence that making modakam is not as hard as it may seem . 

Do follow this recipe to the T and you won't fail at all . Initially there might be some hiccups when you shape the modakm ,but as it is said practice makes one perfect, if you take the lord's name and keep preparing 3 or 4 times you can easily master this wonderful art of making kozhukkatai. 

 Kozhukkattai is Lord Ganesha's favorite .we offer these incredibly delicious offering made from rice flour &jaggery on Ganesh Chaturthi & sankashti, modaka priyan, thenga poorna kozhukkata, how to make kozhukkatai without rice flours,  easy kozhukkatai recipe, varamahalakshmi habba kadubu , modaka , ukadiche modak , why does ganesha love modaks , rice flour steamed dumplings, rice flour dumpling with jaggery stuffing

Soaking Time - 3 hrs 
Preparation Time - 45 mins
Steaming Time - 7 to 8 mins
Makes - 10 to 12 modaks

Ingredients 

For the outer cover 
1 cup rice 
2 cups water 
Pinch of salt 
1 tsp oil 

Pre Preparation for the Rice flour dough
Wash and soak the rice in sufficient water for  3 to 4 hrs .

For the stuffing 
1 cup fresh grated coconut 
3/4 cup powdered jaggery
1tsp cardamom powder /elaichi powder 

Method 

Jaggery Stuffing 

  • Melt the powdered jaggery in 1/4 cup water. 
  • Let it come to a rolling boil or until all the jaggery is dissolved .
  • To this, add the grated coconut ,elaichi powder and mix it well .
  •  Cook on slow flame until you get a nice glossy mixture .Turn off the stove and transfer this mixture to a plate and let it cool . 

Outer covering for Modakam

Kozhukkattai is Lord Ganesha's favorite .we offer these incredibly delicious offering made from rice flour &jaggery on Ganesh Chaturthi & sankashti, modaka priyan, thenga poorna kozhukkata, how to make kozhukkatai without rice flours,  easy kozhukkatai recipe, varamahalakshmi habba kadubu , modaka , ukadiche modak , why does ganesha love modaks , rice flour steamed dumplings, rice flour dumpling with jaggery stuffing


  • Transfer the soaked rice to a blender with 2 cups of water and grind to a very fine paste. 
  • The batter will be runny and that is how it has to be.  Incase you happen  to add extra water ,donot worry ,it can be handled while cooking the dough .
  • Strain this rice flour batter through a strainer to remove any rice grits that may have remained while grinding .
  • To the strained batter add a pinch of salt and oil and mix well.
  • Heat a heavy bottomed fry pan or vessel and transfer this batter to it . Reduce the flame to medium.
  • Go on stirring the batter and you will observe the batter begins to thicken and starts forming lumps.
  • Keep stirring and breaking the lumps until all the batter is well cooked and it appears lumpy. 
  • To see if the batter is cooked well ,touch with your fingers and the dough must not stick on the fingers.  If it sticks continue cooking for 1 more min. 
  • Turn off the stove and close the dough with a lid . The dough will further get cooked on this heat
  •  Once the dough is warm enough to handle ,transfer it to a large plate ,grease your palm with some ghee or oil and knead the dough for 5 to 6 mins until you get a soft ,crack free and smooth dough . 
  • Pinch out a portion of the dough and you should be able to roll into a smooth ball without cracks . This is the right consistency of the dough . If you are getting cracks while rolling ,the sprinkle a little hot water and continue to knead further till you get the desired consistency.  
  • Cover this with a damp cotton cloth until use.

Shaping the Modakam 

Kozhukkattai is Lord Ganesha's favorite .we offer these incredibly delicious offering made from rice flour &jaggery on Ganesh Chaturthi & sankashti, modaka priyan, thenga poorna kozhukkata, how to make kozhukkatai without rice flours,  easy kozhukkatai recipe, varamahalakshmi habba kadubu , modaka , ukadiche modak , why does ganesha love modaks , rice flour steamed dumplings, rice flour dumpling with jaggery stuffing


Kozhukkattai is Lord Ganesha's favorite .we offer these incredibly delicious offering made from rice flour &jaggery on Ganesh Chaturthi & sankashti, modaka priyan, thenga poorna kozhukkata, how to make kozhukkatai without rice flours,  easy kozhukkatai recipe, varamahalakshmi habba kadubu , modaka , ukadiche modak , why does ganesha love modaks , rice flour steamed dumplings, rice flour dumpling with jaggery stuffing

  • Grease your palms and  pinch out a small lemon sized portion of the dough.  Roll it into a smooth ,crackfree ball.
  • Make a dent in the center of the dough with your thumb .
  • Starting from the center ,start flattening the dough towards the outer circumference till you get a nice base to put in the stuffing. 
  • (This process is similar to how we roll and shape the wheat flour into a cup to stuff the filling for aloo paratha) 
  • Take a spoonful of the stuffing and place it in the center and then bring in all the sides of the outer cover to the top shaping it like a cone . 
  • If you are finding it difficult to shape it like a modak ,you can also shape it like a semi circle.  (Refer to the second image) 
  • Continue this process for the entire set of dough and filling and keep the modaks ready .
  • Prepare a steamer as we do for idlis and place these modaks inside the steamer and steam for 6 to 7 mins . You can see the jaggery syrup slightly oozing out and the outer cover will appear glossy . This is an indication that the modaks have been steamed to perfection. 
  • Donot over steam as the outer cover will become hard. 
  • Once the modaks have been steamed,let it cool down for a while before offering to the lord.

Pin it up for future 

Kozhukkattai is Lord Ganesha's favorite .we offer these incredibly delicious offering made from rice flour &jaggery on Ganesh Chaturthi & sankashti, modaka priyan, thenga poorna kozhukkata, how to make kozhukkatai without rice flours,  easy kozhukkatai recipe, varamahalakshmi habba kadubu , modaka , ukadiche modak , why does ganesha love modaks , rice flour steamed dumplings, rice flour dumpling with jaggery stuffing


August 12, 2021

Baked Nippatu (crispy crackers) - Mini Bites


Share with friends and family 10 comments:

 Nippatu is a traditional delicacy from Karnataka and is very similar to Thattai of Tamil Nadu. 

Nippats are mostly deep fried and prepared unfailingly for Ganesh Chaturthi and Diwali . I shall post the fried version of nippat sometime soon .

I say it is similar because there is a difference in the set of ingredients that go into the making of Nippat and Thattais . 

If you have lived in Bangalore even for a few days, you surely could not have missed enjoying some baked treats at the Iyengar Bakery outlets spread across the length and breadth of the city.

Nippatu is a perfect accompaniment for evening tea time snack . A traditional savory snack from karnataka,baked nippats have become popular now a days , baked nippat, mini nippat,baked mini nippatu, small nippatu , how to bake nippats, oil free nippat , no deep fry nippat ,karnataka special nippat

Iyengar Bakeries are known for their melt in mouth Khara Biscuits,  Veg Puffs, Dilpasand,khara buns and my all time favorite Baked Nippats . 

Baked Nippats are ideal for weight watchers since we skip the deep frying but my 2 cents is do not compromise on the quantity of butter and hot oil that needs to be added to the Nippat dough to achieve the perfect crunch and crackling effect .

The crispy and crunchy baked cracker is a burst of flavors with each bite.  Nippats are a perfect treat for evening snacks with tea or coffee . The ones we get at the bakeries are big in size ,but I have tried to make mini Nippats  for the ease of serving as well as eating . If you want to make the Nippats big in size just as we get in the Bakeries, then use a bigger cookie cutter to get the desired shape. 

Nippatu is a perfect accompaniment for evening tea time snack . A traditional savory snack from karnataka,baked nippats have become popular now a days , baked nippat, mini nippat,baked mini nippatu, small nippatu , how to bake nippats, oil free nippat , no deep fry nippat ,karnataka special nippat


Preparation Time - 10 mins
Resting Time - 10 mins
Baking Time - 20 -25 mins 
Makes - 18 to 20 nippatus
Complexity - medium 

Ingredients 

1cup maida / APF 
1.5 tbsp salted butter (room temperature)
2 tbsp cooking oil
2 tsp powdered sugar 
1/2 tsp baking powder 
2 green chillies 
Handful of fresh corriander
Few mint leaves (optional)
Few curry leaves 
2 tsp white sesame seeds /til / ellu (skip if allergic)
1/2 tsp cumin seeds/jeera
Salt if needed 
Pinch of asafoetida 

Method

Nippatu is a perfect accompaniment for evening tea time snack . A traditional savory snack from karnataka,baked nippats have become popular now a days , baked nippat, mini nippat,baked mini nippatu, small nippatu , how to bake nippats, oil free nippat , no deep fry nippat ,karnataka special nippat


  • In a small mixie jar , pulse the green chillies ,mint leaves, curry leaves and corriander to a coarse paste .Alternatively ,you can finely chopped all these if you donot want to pulse them . I like the light green yellow color of the nippats after baking ,hence I prefer to add the chilli paste.
  • Sieve the maida, baking powder, Asafoetida and powder sugar into a wide mixing bowl.
  • Add the softened butter,chilli paste,jeera and sesame seeds to the sifted flour and mix gently with your fingers to form a crumbly mixture. 
  • Heat the oil in a small pan until it gets really hot and the pour the oil over the crumbly mixture . The mixture will begin to sizzle . Use a fork and incorporate the hot oil into the flour . Donot use your fingers as the oil will be really hot . 
  • At this stage check for salt and if you feel salt is less,add as required and mix it well .
  • Gradually add water little by little and form a stiff dough.  Cover the dough and let it rest for 10 mins.
  • Meanwhile preheat the oven to 180 degree celsius .
  • Arrange a baking tray with parchment paper and keep ready .
  • Take a small portion of the nippat dough and roll it into a thick roti . Take a cookie cutter or a small lid and mark deep cuts . Prick each nippat with a fork and make holes .
  • Arrange these cut nippatus on the baking tray and put it in the oven at 180deg for 15 min .
  • The base of the Nippatu would have become nice and crisp, if it is not browned continue to bake for another 2 or 3 mins at 180 degrees again .
  • Remove the Nippats and let it cool until it reaches room temperature. They will become crisp and crunchy . 
  • Repeat the same step for all the dough that is remaining and carefully store the baked Nippats in an airtight container. 

Tips to remember 

  • I have used the convection mode of my microwave oven to bake these nippats .
  • If you are baking for the first time on your convection microwave oven ,pls read the user manual to make sure how your oven works .
  • You may use 1/2 cup maida and 1/2 cup whole wheat flour if you donot want to use maida .
  • Half way through baking keep an eye on the nippats so that it doesn't burn.  Heat settings at times differ from oven to oven.
Pin it up 

Nippatu is a perfect accompaniment for evening tea time snack . A traditional savory snack from karnataka,baked nippats have become popular now a days , baked nippat, mini nippat,baked mini nippatu, small nippatu , how to bake nippats, oil free nippat , no deep fry nippat ,karnataka special nippat


Nippatu is a perfect accompaniment for evening tea time snack . A traditional savory snack from karnataka,baked nippats have become popular now a days , baked nippat, mini nippat,baked mini nippatu, small nippatu , how to bake nippats, oil free nippat , no deep fry nippat ,karnataka special nippat


August 24, 2020

Dryfruit Kheer


Share with friends and family 12 comments:

 Kheer, Payasam , Payesh , Payasa are different names used in various parts of India to refer to a delicious, creamy and rich milk based dessert.

Be it a festival or any happy occasion like birthday, wedding , new birth in the family or any achievement, we Indians love to celebrate it with a sweet dish which is most often the kheer.

If you may wonder why kheer is so famous , it is because it primarily uses only 3 basic ingredients rice , sugar and milk and most often these 3 ingredients are part of every kitchen and can be made easily without any effort.  Of course we can add on extra flavors like cardamom, dry fruits, saffron, rose or Kewra essence etc which gives more taste and richness to the basic kheer.

There are so many varieties of kheer that are prepared across the length and breadth of India and if we start preparing each variant everyday I am sure even 365 days will be less.

This week we are having Milk Special on FMBH as our theme and with the Ganesh Chaturthi celebrations coinciding with our theme how can I miss making kheer for our beloved Gannu and here it is ..for him and for you all as well. 


This time for prasad I made this delicious dry fruit kheer and offered it to Lord Ganesha .I must really thank Swaty who suggested this theme for the coming week and my favorite kheer recipe gets blogged today . Though I make this kheer very frequently,it somehow never made it to the blog .  You must head over to Swaty's  blog ;"Food Trails" and check out her vast collection of recipes from cuisines world over.  Her food clicks are droolworthy and very nicely framed . I am excited to try her Shahi Paneer Kofta Curry which will be a super hit in my home as hubby is a die hard fan of paneer.

Traditionally, rice is cooked in milk and it takes a while for rice and milk to simmer and reach a thick consistency.  This time around I was a little behind schedule and did not have much time to go about with the slow cooking method, hence I have used pre cooked rice and simmered it in milk and the final result was just like the traditional method. So you definitely can go about and try this fail proof method for a delectable and creamy kheer .

Kheer is such a delicacy which tastes delicious when it is warm but some like it when served chilled . I prefer warm kheer or paysam personally. 

As I was preparing it for prasad , I cooked the rice separately and also used a fresh packet of milk . 

Some traditional, tasty and lipsmacking payasam/ kheer recipes on my blog for you to try

Preparation Time - 25 mins
Cooking Time - 30 mins
Complexity - easy 
Serves - 2 to 4


Ingredients 

500ml milk 
3 tablespoons cooked rice 
Assorted dry fruits chopped (badam , pista, cashews )
100 gms Sugar  (adjust as per your taste)
1tsp cardamom /elaichi powder
Few strands of saffron/kesar 

Method 
  • Boil the milk in a thick bottomed vessel . The vessel needs to have a thick bottom so that the milk doesn't stick to the bottom and starts burning.  
  • Take about 2 tablespoons of this warm milk and soak the saffron strands in it and set aside.  This will release all the flavors of saffron along with a nice yellow color. 
  • Once the milk reaches a boiling stage, add in the cooked rice and on a slow flame keep simmering the milk with regular stirring until the milk begins to thicken and reduce in quantity. 
  • Add the chopped dryfruits , saffron soaked milk , cardamom powder and sugar and continue stirring.
  • After adding sugar, the kheer will turn slightly watery as the sugar melts. Keep stirring on low flame and after about  8 to 10 mins the kheer would reach a nice creamy consistency. 
  • You can switch it off at the stage and let it settle down for a while. 
  • Over time on cooling the kheer will thicken further . So if you want it to be little diluted, you can add warm milk before serving and adjust the consistency as you may like it .
  • You can also add some rose or kewra essence if you like that flavor . I donot add any essence as the flavor of cardamom and saffron itself is very delectable. 
  • If you want to try the Vegan version of Dry fruit kheer then check the recipe here .

Linking this to week #261 milkyway theme on foodie Monday bloghop