Showing posts with label Lunch box. Show all posts

October 27, 2024

Vegetable Brinji | Brinji - Tamil Nadu Special


Share with friends and family 5 comments:

All this while, I was always under the impression that Biryani was colloquially called as Brinji in Tamil Nadu . Not sure, how I got that into my head ;well am thinking still ! 

Coming to my encounter with Brinji; recently on our way back from Chennai ,we had a lunch stop over at famous restaurant near Kanjivaram and that's where I first tasted this Brinji . I had ordered a mini thali which had 3 flavored rice along with some Poori and curry . One of the flavored rice looked like pulao,but it was garnished with bread crumbs . 

Intrigued by that presentation, I asked the waiter what's that and he replied "Akka adhu Brinji". That was my first taste of Brinji a.k.a Birinji .

Brinji, Tamil Nadu style veg Brinji , Birinji , jeera samba Brinji , Brinji saadham , how to make vegtable Brinji , one pot veg Brinji , Brinji is not Biryani , veg Biryani

Without wasting a moment ,I took a spoonful and I must tell you; I totally fell in love with the flavors . That's when my myth was broken and I realized that Brinji is not Biryani and also it is a vegetarian recipe and has no meat .

It was a riot of flavor explosion.  The essence from fennel;sombu as it is called in Tamil and slightly over powering flavor of ginger, garlic ,bay leaf mint along with the vegetables was a treat to the taste buds. 

What is Brinji ?

Brinji is  made using Jeera Samba rice which is a native rice used for Biryanis in TN . A melange of flavors from whole spices , fresh mint , ginger garlic paste along with fresh vegetables is what makes Brinji a delight .

The other main flavor enhancer is the use of coconut milk to cook the rice. The subtle sweetness from the coconut milk lends a wonderful balance of flavors to the palate with every mouthful .Served with a slightly watery onion raita and a veg kurma, the Brinji is a whole meal by itself and keeps us full .

I wanted to try this Brinji ever since I tasted it,but somehow it kept getting delayed, but today we wanted to eat something different for lunch and I immediately told hubby I am making Brinji that too with my own recipe trying to replicate what I ate remembering the taste . 

I am told that Brinji is a very common in the vegetarian menu during Christmas and New Year parties in Tamil Nadu . So for the upcoming year end parties, you could also make it for your office potluck or friends' get together .


Brinji, Tamil Nadu style veg Brinji , Birinji , jeera samba Brinji , Brinji saadham , how to make vegtable Brinji , one pot veg Brinji , Brinji is not Biryani , veg Biryani


Preparation Time - 30 mins
Cooking Time- 30 mins
Complexity - medium 
Serves - 3 to 4 

Ingredients 

1.5 cups Basmati rice 
1 cup coconut milk (canned or home made)
2 cups water 
1 carrot cut into long strips 
2 small potatoes cut into long strips
8 to 10 French beans cut into 1 " strips
1 medium onion cut length wise 
3 to 4 green chillies slit 
2 tbsp ginger garlic paste
2 bay leaves /tej patta/ birinji elai
3 to 4 cloves/lavang
1 inch stick cinnamon/dalchini/pattai
2 to 3 cardamom/elaichi /elakkai
1.5 tsp fennel /saunf /sombu
Handful of chopped mint leaves 
Handful of chopped corriander leaves 
Salt as needed
2 tbsp cooking oil
3 tbsp ghee 

Method 

  • Wash the basmati rice and soak it in water for 20 mins and then drain it .
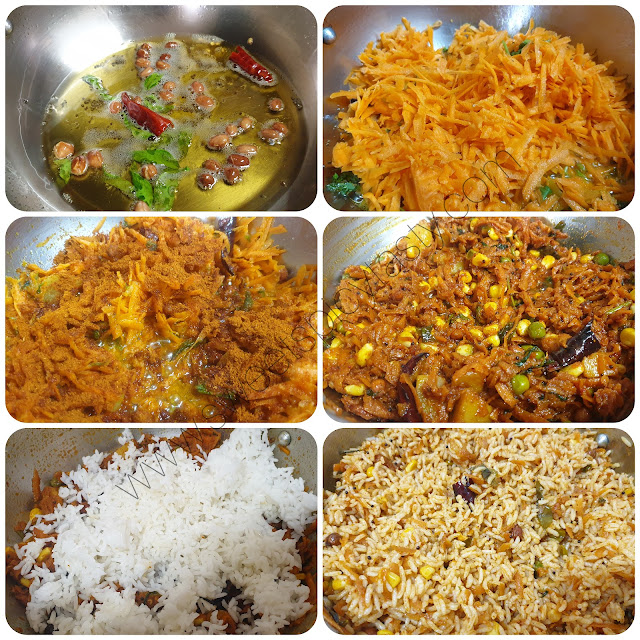
  • Heat the pressure cooker vessel with oil and ghee .
  • Crackle the fennel seeds and the whole spices until they turn aromatic. 
  • Saute the onions until transparent followed by the mint leaves , ginger garlic paste and vegetables.
  • Let the fat coat the vegetables and saute ginger garlic  until the raw flavor is lost . This will prevent the ginger garlic paste from burning and sticking to the pan's base .
  • Add required salt ,coconut milk and water . Bring  it to a boil .
  • Add the drained Basmati rice. Check for salt and adjust if needed.  Add the fresh corriander and close the cooker lid .
  • Pressure cook for 2 whistles on high flame and turn off. Let the pressure release naturally. 
  • Open it and wait for 5 mins before you can fluff it . Trying to fluff immediately will make it mushy .
  • Roast cashews in ghee and add it to the brinji . You may also add some fried or toasted bread crumbs for extra taste.  
  • Serve hot with onion raita and a gravy of your choice.  

ЁЯУН Pin me up 


Brinji, Tamil Nadu style veg Brinji , Birinji , jeera samba Brinji , Brinji saadham , how to make vegtable Brinji , one pot veg Brinji , Brinji is not Biryani , veg Biryani


June 06, 2023

Tomato Rice | Thakaali Saadham - Quick one pot vegan recipe


Share with friends and family 14 comments:

 Thakali Saadham / Tomato Rice is a simple and delicious recipe from South India . It makes for a Quick fix lunch or dinner option and also apt to pack for lunch boxes . 

It is not a traditional recipe, hence each household may have different recipes to dish out this yummy Thakali saadham .

The main ingredient for this recipe are juicy and slightly tangy tomatoes for the extra punch. I use just basic spices and not much whole masalas/ garam masala . I like the rice to soak in the taste and flavor of tomatoes and chillies . 

If you like you may add some fried cashews or boiled peas while preparing the tomato rice . I add them depending on my family's request . 

My hubby loves to have his tomato rice with either Pattani (Peas) Masala or Potato Curry and some chilled raita/pachadi . Papads or fryums are an excellent addition as well . 

If packing for lunch , make sure you cool the rice completely and then pack it . If you pack it very hot ,there is a chance the rice may go bad especially in summer.  

I often make thakali saadham for dinner as it is a quick fix and I wont see fussy faces at home . As always, I realised that this delicious tomato rice wasn't on my blog and as a matter of coincidence our gourmet food group theme for this month was "cook what you like " .. Viola !! I got an opportunity to publish this recipe.  My partner Rafeeda has dished out a baked Pasta recipe and if you are a pasta lover, you must try it for sure .

Preparation Time- 10 mins
Cooking Time - 20 mins
Complexity - simple
Serves  - 2 to 3

Ingredients 

2 cups rice (Basmati / Sona Masuri / any short grained rice ) 
3 to 4 medium sized tomatoes 
1 onion chopped (optional) [skip for jain and no onions no garlic recipe ] 
3 green chillies slit 
Few curry leaves 
Fresh corriander 
1 tsp mustard seeds 
1 tsp channa dal 
1 tsp udad dhal 
2 tsp corriander powder 
1/2 tsp jeera powder 
1/2 tsp chilli powder 
Pinch of turmeric powder 
Salt as  needed
2 tbsp cooking oil 
Pinch of sugar 

Method 

  • Wash the rice well and soak it for 10mins and then drain the water through a colander. 
  • Chop the tomatoes into medium sized chunks and finely chop the green chillies .
  • Heat the oil in a pressure cooker or pressure pan and crackle the mustard seeds followed by channa dal and udad dal until they turn crisp and golden brown . Saute onions if using until pick and translucent. 
  • Fry the green chillies,  curry leaves . Keep the flame on low and add the chopped tomatoes and  spice powders (haldi, red chilli powder, jeera powder and corriander powder ).
  • Saute the tomatoes well and sprinkle some water ..cook covered until the tomatoes turn mushy and soft . Continue cooking until the oil begins to separate.Add salt at this  stage along with some chopped corriander. 
  • Add water and bring to a boil . If using basmati rice use 1.5 cups water for 1 cup rice and if using sona masuri rice use 2 cups water for 1 cup rice.
  • Once the water begins to boil,add the drained rice,  Pinch of sugar and adjust salt if needed .
  • Close the pressure cooker and cook on medium flame for 2 whistles.  Let the pressure release naturally. 
  • Fluff it with a fork and add some ghee if not vegan and serve hot with raita ,papads and some gravy or curry . 


February 03, 2023

Matar Poha | Peas Poha - Vegan breakfast


Share with friends and family 11 comments:

 Poha (Flattened rice) is a versatile ingredient used for breakfast or a quick evening snack all over India. 

During winters fresh green peas are available in plenty and I use them in my cooking a lot.

Peas Poha is one such favorite breakfast at home where lot of fresh tender peas are used as a part of the recipe. Poha is seasoned and tempered with simple Indian spices that makes it very tasty and flavorful .


Choora Matar or Chooda Matar is a variant of Peas Poha that is very popular in Northern India especially UP and Bihar and is a purely No Onion No Garlic snack .

Matar Poha can be made with or without onions depending on your taste . If using onions, saute them after you splutter the mustard seeds and curry leaves until the onions turn soft and then add in the poha .

Some delicious Poha variants which can be easily prepared for breakfast / lunch boxes and also as Prasadam .


Puli Aval /Gojju Avalakki (Karnataka Special)
Gopalkaala / Dahi Poha (Janmashtami Special)


Preparation Time - 10mins
Cooking Time - 8 to 10mins
Complexity - Simple 
Serves  - 2 to 3

Ingredients 
2 cups medium thick Poha/Flattened rice 
2 to 3 green chillies 
1/2 cup boiled peas 
Small piece ginger finely chopped 
1 tsp mustard seeds
Pinch of asafoetida
Pinch of turmeric 
2 tsp lemon juice
Salt as needed 
Pinch of sugar
2 tbsp oil
Few curry leaves 

Method 

  • First and foremost ,sieve the poha and get rid of small dust and other unwanted particles.
  • Wash the Poha under running water in a colander and let it sit for 5 to 6 mins . This step is very important.  If there is too much water in the poha ,it will become a mushy mass and we don't want that .
  • Meanwhile, heat the oil in a thick kadai /wok.
  • Splutter the mustard seeds ,followed by curry leaves, ginger ,turmeric powder and asafoetida. 
  • Mix in the washed poha ,sprinkle salt and mix it well .
  • Add in the boiled peas, sprinkle some water and cook covered for 3 to 4 mins till the poha becomes soft and well cooked. 
  • Turn off ,open the lid, add sugar ,lemon juice and give it a quick mix ,serve hot with a garnish of freshly chopped corriander. 
  • You can sprinkle some namkeen farsan/crispies for an added crunch .

Pin me up 


Month of January we are going "Vegan" in our food bloggers' group Shhh Secretly Cooking Challenge . A wonderful theme suggested by Radha as January is also celebrated as a Vegan Month in some parts of the world .  My partner for this month is Preethi of Preethi's cuisine. Preethi gave me lemon juice and ginger as secret ingredients which was used in this flavorful aromatic Matar Poha while Preethi made a yummy  and healthy Tofu Bean Stir fry with sesame oil and rice flour being the secret ingredients I suggested to her. 
Radha has prepared a lipsmacking Jackfruit Kofta Curry which is a classic innovative recipe and that too purely plant based ..


August 02, 2022

Chettinaad Kuzhipaniyaram - savory snack


Share with friends and family 10 comments:

 Kuzhipaniyaram is a very tasty and delightful savory snack which takes a very important place either for breakfast or evening snacks  in Tamil Nadu.

Kuzhi in Tamil means cavity/depression and paniyaram means snack in general . So Kuzhi paniyaram means a snack with a depression..sounds funny right ? Basically kuzhi refers to the cavity in the mould of the pan which is used to prepare this snack. 

Kuzhipaniyaram is made in a special vessel called as paniyarakal . It is the same pan which is used to make Sweet Appams ,paddu or gunthaponganalu .

I have already shared the other variant of Paniyaram made from regular Idli batter ,but this chettinaad Kuzhipaniyaram is a special recipe where the batter is ground solely for the purpose of making paniyarams.

Some classic recipes using the Paniyaram Kal / Aebelskeiwer Pan 

Jackfruit Nei Appam

Watermelon Nei Appam

Paddu/Gunthaponganalu

Kunukku Paniyaram

Chettinaad is a region in the Sivagangai district in Tamil Nadu (Southern India) . Chettinaad is known for amazing cotton sarees,Athangudi tiles and lipsmacking food with bold flavor profile especially non veg .

Chettinaad cuisine is known for its pungent and spicy flavor and variety of food ranging from main course , snacks to sweets and savories . As much as they are famous for non veg ,there are a lot of vegetarian options as well .

 Kuzhi paniyaram is served with coconut chutney and /or thakali(Tomato) chutney and some piping hot filter coffee. 

Kuzhipaniyaram also known as uppu appam should not be confused with the other chettinaad special known as Vellayappam .

Vellayappam is a totally different recipe and it has been very well explained by my co blogger Radha on her blog who is my partner this month for the Shh secretly cooking challenge ..we are celebrating Chettinaad cuisine suggested by Kalyani of Sizzling Tastebuds. Kalyani has shared a classic recipe Kaigari Mandi which is very delicious and a perfect accompaniment for main course or idli/dosas .


Soaking Time - 6 to 7 hrs
Fermentation Time - 8 hrs
Preparation Time - 30 mins
Cooking Time - 20 mins
Serves - 5 to 6

Ingredients 

1 cup raw rice (strictly no basmati rice)
1 cup idli rice 
1/4 cup whole udad dal (udad gota)
1 tsp fenugreek seeds 
Salt as needed 

For tempering 
1 tsp mustard seeds
2 to 3 green chillies finely  chopped 
Handful of curry leaves
2 tbsp grated coconut
1/4 cup oil
Fresh chopped corriander 
1/2 onion finely chopped (optional - I haven't used )

Method

  • Wash multiple times until the water is clear. Soak the rice and lentils with fenugreek in water for 5 to 6 hrs.
  • Grind the soaked rice and lentils in a blender or grinder to a fine smooth paste .Batter should be of idli batter consistency not a very runny batter . Let the batter ferment overnight or for 8 hrs . 
  • Before making the kuzhi paniyarams , we need to prepare a tempering that will be added to the batter. 
  • To prepare the tempering, heat about 2 tbsp oil in a pan and splutter the mustard seeds, followed by the green chillies,  curry leaves and fry the onions if using until they turn pink and soft . Lastly add in the coconut and give a quick stir .Add this tempering along with finely chopped corriander to the batter and mix well . 
  • Heat the paniyaram pan and add a few drops of oil in each cavity . 


  • Once the pan is well heated ,add the batter to each cavity and remember to fill only 3/4th of the cavity . The batter on cooking will raise and it needs space to swell . So if you fill it to the brim,the batter will overflow making it a mess .
  • The paniyarams will develop lot of pores as they are cooking, these pores are perfect indicator of a well fermented batter . Once the batter appears cooked on top ,carefully flip it over and cook the underside until it turns brown and crisp .Cooking has to be on medium flame throughout. 
  • Remove the appams /paniyarams from the pan and serve hot with chutney of your choice. 

Pin me up


July 09, 2022

Brussel Sprouts Spinach Cheela (Vegan Breakfast)


Share with friends and family 5 comments:

 Cheela or Besan ka cheela is a popular brekfast  in North India made from gramflour known as Besan . There are many variants in making cheela ,can be plain with just basic spices used for flavoring or we can add in some finely chopped veggies and make it a healthier version .

Cheela makes for a very filling breakfast and also a perfect lunch box option.  Gramflour is certainly a magic ingredient which makes the recipe absolutely delicious and tasty . This morning it was raining and chilly making us want to indulge in something that would pep us up for the day and we dint want to have anything deep fried ,so that's how this healthy breakfast was made .


I generally make Tomato Omlettes which are a very popular Street food in Bombay, today this cheela was kind off fusion recipe where I used finely chopped Brussel Sprouts and spinach in the recipe. I used my mini  uttapam pan to make bite sized cheelas just for fun and fancy sake but you can always use the regular dosa pan to make them . If you don't have Brussel sprouts you can also used finely chopped cabbage mixed to the batter.

Brussel sprouts belong to the cabbage family and very popular in western countries.  Brussel sprouts are a good source of vit C and vit K . Exercise medical caution if you are on any kind of medication or blood thinners before using Brussel sprouts . Also,they have a slightly strong odor and turn rubbery when over cooked ,hence donot overcook and keep and eye while cooking 


Preparation Time - 15 mins
Cooking Time - 20 mins
Complexity - simple
Serves - 3 to 4

Ingredients 
2 cups gramflour/besan
2.5 cups water 
2 tsp red chilli powder 
1 tsp crushed ajwain /carom seeds
1 finely chopped green chilli 
1/2 cup Brussel sprouts finely chopped 
1/4 cup spinach finely chopped 
Handful of corriander and mint finely chopped 
Salt as needed
Finely grated ginger 
Pinch of asafoetida 
Oil to roast the cheelas

Method


  • In a wide mixing bowl prepare a lump free batter using the gramflour. 
  • Add the red chilli powder, salt, asafoetida,ginger, crushed carom seeds, chopped Brussel Sprouts, spinach and the mint + corriander and mix well.
  • Adjust salt and spices if needed and let the batter rest for 15 mins . The batter should be of pouring consistency like that of dosa batter. 
  • Heat the pan and pour the batter from center and slightly spread it outside.  Keep it slightly thick and don't spread it too thin. 
  • Drizzle oil around the cheela and let it cook on medium flame . Gramflour takes a while to cook,so don't rush into flipping it over .
  • Once the top side appears dry,carefully flip it over and cook the underside .
  • Take it off the pan and serve it with tomato ketchup or green chutney.  You can also grate some cheese or slather some butter when serving it to kids.  

Pin me 


June 28, 2022

Paneer Tomato Grilled Sandwiches


Share with friends and family 5 comments:

 Paneer Tomato grilled sandwiches are a perfect choice for packing in kids' lunch box or even for adults when you want to carry something filling at the same time  not messy to eat on the desk .

You can also serve this as an after school snack or even makes for a perfect light dinner when paired with some warm Italian style Tomato soup . (Recipe source - Priya Iyer's blog)

Paneer takes care of the protein quotient for the day and the tomatoes keep the sandwiches moist and don't let it get too dry and stuffy.  Adding some mozzarella chees gives a nice gooey and melt in mouth texture. 


I love to work with different fillings that go into the sandwich and this is yet another successful attempt as my family loved the flavor and the crisp grilled bread. 

For the spice, I have used only red chilli powder and 1 small green chilli chopped.  Some boiled corn was added for the crunch and tomatoes used were firm and deseeded to prevent the sandwiches from getting soggy .

Some sandwich varieties from my blog that you must definitely try 

Classic Veg Cheese Grill Sandwich 

Peanut Butter Cheese Sandwich 

Paneer Cheese Corn Grill Sandwich 

Chutney Cheese Sandwich 

Mumbai Special Toast Sandwich 


Preparation Time - 10 mins
Grilling Time - 3 to 4 mins per sandwich 
Complexity - simple 
Makes 3 sandwiches 

Ingredients 

6 slices of bread 
100 gms paneer 
2 medium firm tomatoes
3/4th cup boiled sweet corn
1 tsp Chilli powder /chilli flakes
Salt as needed 
Fresh corriander chopped 
1 green chilli
Grated mozzarella cheese as needed 
Butter to apply on bread 

Method 


  • Firstly grate the paneer, crush 3 tbsp of corn kernels with green chilli in a blender and de seed the tomatoes and dice into small cubes. 
  • In a mixing bowl mix the Tomatoes, crushed corn , paneer, boiled corn ,chilli powder ,salt, chopped corriander and mix it all well . Let it rest for 5 to 10mins . Our filling is ready .
  • Donot let the filling sit for extra time because the tomatoes will release water when mixed with salt and the filling will become soggy .we don't want that 
  • Heat the grilling pan,  apply butter on one side of the bread , place some filling on it ,spread grated mozzarella cheese as per your wish ..close using the other slice of bread . 
  • Apply some butter to the grilling pan and grill the sandwich on both sides until crisp and golden brown .
  • Cut the sandwich into wedges and enjoy .
  • If packing for lunch, then place foil paper in the inside of the lunch box ,place the cut sandwiches once they have cooled down .this will prevent the sandwiches from getting soggy .

Pin up for later 


June 20, 2022

Neer Dosa | Neer Dose - vegan breakfast


Share with friends and family 5 comments:

 Neer dose or neer dosa is a very popular breakfast from Tulu Nadu in Karnataka and delicacy from Manglorean cuisine . 

Neer dosa literally means water dosa in Tulu/Kannada but that doesn't mean that it is made from water ,just that the batter to prepare the dosa is very watery hence its called Neer Dosa. The consistency of the batter is very similar to that of Rava Dosa meaning pouring consistency.

Best part of Neer Dosa is the simplicity in preparation as there is no fermentation needed like the usual dosas,meaning you can make dosas as soon as the batter is ready . 

Neer Dosa uses just 2 ingredients ;rice and water .Adding grated coconut is optional but tastes really good when added to the batter .

Neer dosas are very soft and spongy to eat and it remains the same even after a few hours of preparing, making it ideal to pack for lunch box or travel . 

Neer dosas are served with coconut chutney , sagoo , balehannu Rasayana and for non veg lovers it is paired with some spicy curry made from egg,chicken etc .


Soaking Time - 4 to 5 hrs 
Preparation Time - 15 mins
Complexity - simple 
Makes - 15 to 16 neer dosas 

Ingredients 

2 cups normal rice (except basmati)
1/2 cup grated coconut 
Salt as needed
Water to grind 

Video recipe 


Method 

  • Wash the rice well and soak it overnight or for minimum of 5 hrs .
  • After 5 to 6 hrs , transfer the soaked rice to a blender along with the coconut and grind it to a fine paste..donot add water to grind. The water in which you have soaked the rice is sufficient to grind the batter .
  • Transfer this batter to a wide vessel and add some more water and bring it to a pouring consistency. Check the video recipe below for exact consistency.  Add salt as needed.
  • Heat a non stick tawa or a seasoned cast iron .
  • Sprinkle some water on the tava and if it sizzles immediately the tawa is ready to make dosas .
  • Pour the batter from outside to inside like how we do for rava dosa . Donot spread the batter like regular dosas.
  • Close the dosa with a lid for 30 to 40 sec and then open it up .Slowly using a spatula remove the dosa and fold it up like a wedge and serve with chutney or any other side dish of your choice. 
  • Neer dosa gets cooked only on one side. You don't have to flip over and cook . 
  • Keep adjusting the heat of the tawa as you keep making the dosas.  If the tawa is too hot then the dosas won't get cooked evenly.  

Pin me up !!


June 06, 2022

Pineapple Raita | Annanas Raita | how to make Pineapple raita at home ?


Share with friends and family 7 comments:

 Pineapples when combined with thick whisked yogurt makes a perfect accompaniment for any Indian Main course . 

The sweet and tangy flavors from the pineapple raita pair well with a spicy biryani or pulao and strikes a superb balance of taste and enhances the eating experience. 

Pineapples are a power house of nutrients and very healthy . Rich in vit C ,antioxidants and a very good anti inflammatory property due to the presence of Bromelaine, a very powerful enzyme that helps fight inflammation in the body .

Pineapple juice is very effective in treating the sinuses and eases symptoms of cold and allergies.  Bromelain in addition to help alleviate pain of osteoarthritis also helps in maintaining heart health by keeping the cholesterol levels under check .

If we want to keep up with a healthy lifestyle then fresh pineapples must be included as a part of our diet plan regularly.   Pineapple Punch Pineapple Salsa , Cuban Pineapple Salad (courtesy- sizzling tastebuds by Kalyani )are perfect choices for all age groups and can be easily made with available ingredients in our pantry . More so, these recipes are no cook recipes, hence even a beginner or a teenager can also easily rustle them up .

To make pineapple raita we can either use canned or fresh pineapples . If using canned pineapples then drain out the sugar syrup completely before chopping the pineapples .

When using fresh pineapples, please ensure the fruit is sweet and not sour.  Sour or tart pineapples when mixed with yogurt /dahi ruin the taste of the raita .

Pineapple raita is best served chilled ,hence keep it refrigerated until serving. 


Preparation Time - 10 mins
Cooking Time - nil
Complexity - simple
Serves - 2 to 3

Ingredients 
1/2 cup finely chopped pineapple 
2 cups thick yogurt /dahi 
2 tsp powdered sugar 
1 tsp salt
1/4 tsp cumin powder /jeera powder
Pinch of red chilli powder
Pinch of kala namak / black salt 
Fresh corriander chopped

Method 


  • Whisk the yogurt well until smooth and silky .
  • Add the sugar ,salt ,chilli powder,  kalanamak ,roasted jeera powder to the yogurt .
  • Lastly add the pineapple, corriander and mix well . Adjust the sugar or salt if you feel the raita needs a little more flavor.
  • Keep refrigerated until serving.  Try and consume the raita fresh on the same day and not carry forward to the next day . 

Pin me up !!


March 22, 2022

Peanut Butter Cheese Sandwich


Share with friends and family 4 comments:

Does cheese and peanut butter sound like a weird combination to you ? Well,it may feel so; but peanut butter and cheese in a sandwich is a hit combo. 

The salt from the cheese and the sweetness from the peanut butter compliment each other so well that it is a heavenly experience when we take a bite . Especially when the sandwiches are grilled or toasted ,the extra crunch from the toasted bread makes it all the more delicious. 

Instead of just grilling cheese and peanut butter ,I have prepared a cheesy filling with some chopped capsicum,grated carrots, finely chopped tomatoes with some mild spices to make it healthy and sumptuous. 

These sandwiches are a perfect choice for packing in lunch boxes for school or even as a quick morning breakfast before we head out for the day .

Boiled sweet corn, grated paneer and chopped onions can also be added to the filling. 

To make it easy to spread the peanut butter ,make sure you thaw it well in advance if you have it refrigerated or use the easy spread versions of peanut butter which are now available in the market .  I recently came across a very nice brand of peanut butter that is buttery, nutty and smooth for a seamless spread on the bread slice. 

Preparation Time - 15 mins

Grilling / Roasting  Time - 3 mins per sandwich 

Complexity - simple

Makes - 3 sandwiches 

Ingredients

6 slices of bread (any variety that you like )
Peanut butter to spread 
Butter for roasting/Grilling 
3 cheese cubes 
1 carrot grated 
1 capsicum finely chopped 
1 tomato deseeded and finely chopped
Chilli flakes as needed 
1 tsp pepper powder
1 tbsp tomato sauce 
Finely chopped corriander 

Method 


  • In a wide mixing bowl, grate the cheese . Add all the chopped vegetables, chilli flakes , pepper powder and give it a gentle toss . Mix the tomato sauce gently . Keep it refrigerated if you are going to make it after a while or if it is too hot in your city . We don't want the cheese to melt before grilling the sandwiches. 
  • Heat up the grill pan .
  • Take a slice of bread ,spread the peanut butter on it and top it with the cheese filling.  Cover using the other slice of bread.
  • Apply some butter to the pan and roast the sandwich on both sides until crisp,golden brown and crunchy .
  • Let it cool for a minute and then slice it the way you like and serve hot !


Pin me up,will you ??


March 07, 2022

Carrot Rice - Quick lunch box recipe (Vegan & GF)


Share with friends and family 7 comments:

Carrot rice is a very healthy and delicious flavored rice and perfect for carrying as a lunch option for kids as well as adults.  This rice is mildly spiced and also there is a subtle hint of sweetness from the grated carrots . We can also add cashews, groundnuts, peas or boiled sweet corn while preparing the carrot masala making it all the more tasty ,healthy and delicious. 


Carrot rice is very simple to make and gets done in less than 15 mins if we have cooked rice ready on hand . If you have to pack an early lunch, you can precook the rice previous night, prepare the carrot masala and in the morning and just mix it with rice ,viola you are lunch box is ready in a jiffy! 

Serve it with some papads and flavored dahi seasoned with some roasted jeera powder or even goes well even with Boondi Raita . To make it even more sumptuous,  you can pack some carrot fries too. (recipe courtesy- Magical Ingredients by Radha R ) 

Have you tried the delicious  

Carrot Pumpkin Soup 

Carrot Kheer (Payasam) 

Evergreen Gajar Halwa

Carrot Sambol   (Srilankan Vegan Salad)

Carrot Koshimbir  from my blog ?? 


Preparation Time - 10 mins
Cooking Time - 15 mins
Complexity - Simple 
Serves - 2 to 3

Ingredients 

1.5 cups cooked rice. 
2.5 cups grated carrots 
Handful of boiled sweet corn
Handful of green peas 
2 tbsp groundnuts 
few curry leaves 
1-2 dry red chillies 
1 tsp mustard seeds
2 tbsp vangi Baath masala 
1 tsp turmeric powder 
1/2 tsp red chilli powder
1/2 tsp rasam powder
4 tbsp oil 
Salt as needed 

Method


  • Heat the oil in a thick bottomed pan fry the ground nuts followed  by  mustard seeds ,curry leaves , red chillies and asafoetida. 
  • Add the grated carrots ,turmeric powder , red chilli powder and saute it  nicely.  Sprinkle some water and cook covered for 2 mins on medium flame. 
  • Open after 2 mins ,the carrots would have become soft and semi cooked,at this stage add the rasam powder, vangi Baath powder ,salt and mix well . Continue closed cooking for another 2 mins.
  • Open the lid ,add the boiled corn , peas and mix it nicely.  By now the carrots would have cooked well and become soft.  The masala for the Rice is ready now . 
  • Add the cooked rice and carefully mix it with the carrot masala taking care not to break the rice..adjust salt if needed at this stage . Keep the rice covered for 5 to 10 mins for the flavors to steep in well with the rice .you can also add some roasted cashews just before serving. 
  • Serve with chilled dahi and papads .

Pinned me yet ??


November 08, 2021

Kothmir Paratha | Corriander Flat Bread


Share with friends and family 5 comments:

 After all the festive binge eating we all settled for a simple yet wholesome meal for dinner . Instead of making the usual dal roti and sabji ,I prepared some flavor packed aromatic kothmir parathas and served with some thick curd and freshly ground green chutney. 

I make kothmir paratha quite often whenever I get a fresh bunch of corriander from the vegetable vendor. I donot use a chopper or blender to cut the corriander ..I prefer to roughly chop the corriander and then mix it with spices using my fingers ,this way the flavor is released well when kneaded with the wheat flour . You may add some ajwain/carom seeds to the dough ,but I prefer to keep it plain .

Parathas are the best way to feed and sneak in vegetables which are generally avoided by kids as well as elders . Pumpkin Paratha by Narmadha is a perfect treat for the Fall Season when pumpkins are available in plenty. 

Some such healthy parathas for you all to try from my blog .


Preparation Time - 10 mins
Resting Time - 10 mins
Cooking Time - 2 mins per paratha 
Complexity - medium 
Makes 8 to 10 parathas 

Ingredients
1 cup whole wheat flour
3/4 cup tightly packed roughly chopped kothmir/corriander leaves
2 tsp red chilli powder
1/2 tsp turmeric
salt
Water to knead

Method
  • Sift the flour with turmeric,salt,red chilli powder and salt.
  • Now ,add the chopped corriander and knead into a smooth soft dough. Mix the corriander with your fingers nicely by sprinkling water little by little so that the flavor seeps into the dough 
  • Add water little by little while kneading and make a soft pliable dough . Smear some oil all over the dough and cover it. 
  • Keep aside for about 10 to 15 mins.
  • Pinch out lemon sized balls and roll into rotis.
  • Heat a griddle,and cook the rotis on both sides,using a little oil. [OR]
  • Oil Free Version : Cook on both sides until brown spots appear and the rotis are cooked.
  • You can also puff the  rotis on open flame like fulkas if you want a softer version .
  • Soft Tasty Yummy parathas ready. Serve with any kind of gravy,pickle,green chutney or thick yogurt/curd.

Donot forget to pin me up !!!


September 30, 2021

Coconut Veg Pulao | Coconut Pulav - Pressure cooker method


Share with friends and family 18 comments:

 Anyone who follows my blog regularly will for sure know my love for pulaos and the many variations I have tried and posted on my blog .

You all may laugh if I say , I prefer pulao over biryani . I feel pulao is mildly spiced and does not have over powering spices and flavors as is the case with Biryani. I always prefer mild seasoning and spices as part of my meal and that is what suits my palate too .

Today's coconut veg pulao was my mom's speciality and she would make it quite frequently at home . The addition of coconut paste with corriander, mint and few other spices adds a natural creamy and sweet taste to the pulao.  Adding veggies and corn makes it a full meal and can be easily packed for lunch or pot lucks . 

This coconut veg pulao comes handy and is sumptuous to make a full meal by itself on  days when  you are pressed for time and unable to prepare a full fledged meal . I normally pair it with some Ginger Raita or Boondi Raita and some chips for the crunchy element.  

This coconut veg pulao is saatvik which means Onion and Garlic are not used in the recipe ,hence this can be prepared and served on festive days too .


This month we are exploring varities of Biryanis and Pulaos suggested by Swaty in our food group "Shhh cooking secretly challenge" . Swaty has an amazing collection of Pulaos on her blog and this Jodhpuri Pulao in particular has drawn my attention to bookmarking it to make it soon.

I was paired with the talented and super cool Shobha aunty of Shoba's food Maaza for this month theme and we exchanged our secret ingredients and came up with exotic recipes. My secret ingredients to aunty were green chillies and Biryani Masala while she gave me fresh coconut and ghee.
Aunty has prepared a yummy Chole Pulao from Sindhi Cuisine which is so  very inviting and I am waiting to try it soon.


Some more Pulao varieties on my blog for you all to try 

Moti Pulao

Masala Peas Pulao

Chutney Pulao

Aloo Mutter Pulao 

Rajma Pulao

Channa Pulao


Preparation Time - 15 mins
Cooking Time - 20 mins
Complexity - Medium
Serves - 2 to 3 

Ingredients

Assorted Vegetables chopped in to small cubes ( beans , carrot, fresh corn, peas )
2 cups rice
2 tbsp oil
2 tbsp ghee
fresh corriander for garnish
handful of cashewnuts
salt as needed
pinch of sugar
2 tsp lime juice
2 tsp biryani / pulao masala

whole spices  
small stick Cinnamon,
2 cardamoms
1 tsp jeera 
3 cloves
2 bay leaves

To grind

1/2 cup fresh grated coconut
2 green chillies
few mint leaves
handful fresh corriander
small piece of ginger
1/4 tsp saunf/fennel seeds

** skip carrot and ginger for Jain version
**skip ghee for vegan version

Method


  • Wash the rice and soak it for 10 mins in water and then drain it through a colander and keep aside.
  • Take all the ingredients mentioned under the To Grind section and grind to a fine paste with sufficient water.
  • In a pressure pan or pressure cooker, heat the oil and ghee and splutter all the whole spices one by one on very low flame until you get a fragrant aroma.
  • Saute all the chopped veggies with a little salt , turmeric and then add the ground coconut paste with 1/2 cup water along with the biryani masala and let the masala cook for 3 to 4 mins.
  • Depending on the variety of rice you have taken add the water ( If basmati then for 1 cup rice add 1.5 cups water) . I used 4.5 cups water for the quantity of rice I took . I used thin grained Sona Masuri rice for making the Pulao.
  • Let the water boil nicely , adjust salt and spices at this stage. Add the drained rice to this boiling water with pinch of sugar and 2 tsp lime juice ,mix well and pressure cook for 2 whistles on medium flame.
  • Let the pressure release naturally . Open the lid and fluff the rice with fork taking care not to break the rice .
  • Garnish with fresh corriander and roasted cashew nuts just before serving.

September 27, 2021

Bread Upma - Quick Breakfast (Bachelor's cooking)


Share with friends and family 7 comments:

Bread Upma is a quick recipe that can be put together in very less time ,to be precise just 10 to 15 mins and you will have a sumptuous and filling snack ready . 

Bread upma is the best way to use up left over bread or on days when you have no patience to cook up an elaborate breakfast,this is a perfect savior.  I would call bread upma as a bachelor friendly recipe, since this doesn't require any fancy equipment, special cooking  or cutting skills.  


As a school going kid, this used to be my favorite lunch box item after sandwiches. I am a die hard fan of bread and can eat bread for breakfast, lunch and dinner.  

You can add some veggies to this upma if you are packing it up for kids' tiffin  box . I generally add some boiled potatoes, carrots and beans to make the breakfast filling and sumptuous. 

I prefer to use a day old bread because it is easy to crumble it and there is not much moisture left in the bread that will make the upma soggy.


Preparation Time - 5 mins
Cooking Time - 15 mins
Complexity  - easy 
Serves - 2 to 3 

Ingredients 

8 to 10 slices of bread
2 green chillies
Few curry leaves 
2 tomatoes chopped
1/2 tsp turmeric 
Pinch of sugar
Salt as needed 
2 to 3 tbsp oil 
1/2 tsp mustard seeds 

Method 


  • Crumble the bread  or roughly tear up the bread slices and keep ready. 
  • Heat oil in a deep pan and splutter the mustard seeds ,curry leaves and green chillies. 
  • Add in the tomatoes little salt and turmeric powder and saute it. Cook until the tomatoes turn mushy . 
  • Add in the crumbled bread to the tomato mixture , mix it well till the bread is coated well with the tomatoes. 
  • Sprinkle some water and cook covered for 2 to 3 mins .
  • Garnish with fresh corriander and serve hot .

Pin it up