Showing posts with label Udad dhall. Show all posts

March 04, 2023

Karuppu Ulundhu Adai | Black lentil crepes (vegan)


Share with friends and family 16 comments:

 Karuppu ulundhu Adai is a very traditional breakfast made in Tamil Nadu . This is very filling and takes care of the carbs to protein ratio required  for a day.

Karuppu ulundhu is nothing but udad dhall (black lentil) with skin . The skin is actually the powerhouse of lot of nutrition.  Udad dhall /ulutham paruppu as we all know is very rich in proteins and also very good for bones. We must try and include these in our diet as much as possible . 

Unlike,regular dosa ,Karuppu Ulundhu Adai doesn't need fermentation and can be made immediately after grinding the batter . Since,  black lentils with husk are little tough we must soak them for a minimum of 6hrs before we can grind them . Pepper ,red chillies , asafoetida and  curry leaves are added for extra flavor and also for easy digestion. Tiny slivers of fresh coconut are added to the batter just before making the Adai..these tiny bits of coconut give a very nice crunch and a nice mouth feel as we bite into the Adai.

Karuppu Ulundhu Adai is also made during the Karthigai Deepam Festival celebrated in Tamil Nadu during the English Month of November/ December.  Karthigai Deepam is a festival of lights celebrated with lot of fervor and enthusiasm all over Tamil Nadu..the ladies decorate the house with earthen lamps in the evening and pray for the well being of their Brothers . 

We celebrated Protein Rich Vegetarian Breakfast theme in our Food bloggers group this month . Host for this event was the versatile blogger Renu who suggested this theme and I was paired with Anu Kollon . Anu gave me curry leaves and coconut as the secret ingredients and I shared the secret ingredients lemon juice and pepper powder using which she has made a creamy Avocado Sandwich.  If you are an avid food blogger and would like to join us then do visit our Facebook page Shh Cooking Secretly Challenge


Soaking Time - 6 to 8 hrs 

Preparation Time - 10 mins

Cooking Time - 2 to 3 mins per Adai

Complexity - Simple

Ingredients

1 cup regular rice . (No Basmati or any flavored rice) 
1/4 cup black lentil/chilke Wali udad/ karuppu ulundhu
3 to 4 red chillies
1 tsp pepper 
1/4 tsp jeera/cumin
Handful of curry leaves 
3 tbsp thinly sliced coconut slivers
Pinch of asafoetida 
Oil to roast the Adai
Salt as needed 

Method

  • Wash the rice and udad dhall multiple times till the water appears clear . Soak the rice and lentil along with red chillies ,jeera and pepper for 6 to 8 hrs or overnight..I prefer to soak it overnight so that it's easy to grind and make it for breakfast as soon as we get up in the morning. 
  • The batter should be slightly thicker than the usual dosa batter . 
  • Add finely chopped curry leaves, coconut slivers ,salt ,asafoetida to the batter and mix it well.
  • Heat a griddle/ tawa , pour a ladle full of batter and spread like dosa from inside out .let it be slightly thicker than dosa . Drizzle oil around the dosa and let it cook on medium flame ,slowly flip it over and let the underside roast well .
  • Take it off the tawa and serve hot with some fresh butter and jaggery powder.  You may also serve it with coconut chutney or Molagapudi but jaggery and butter are the classic combination. 

Pin me up


August 02, 2022

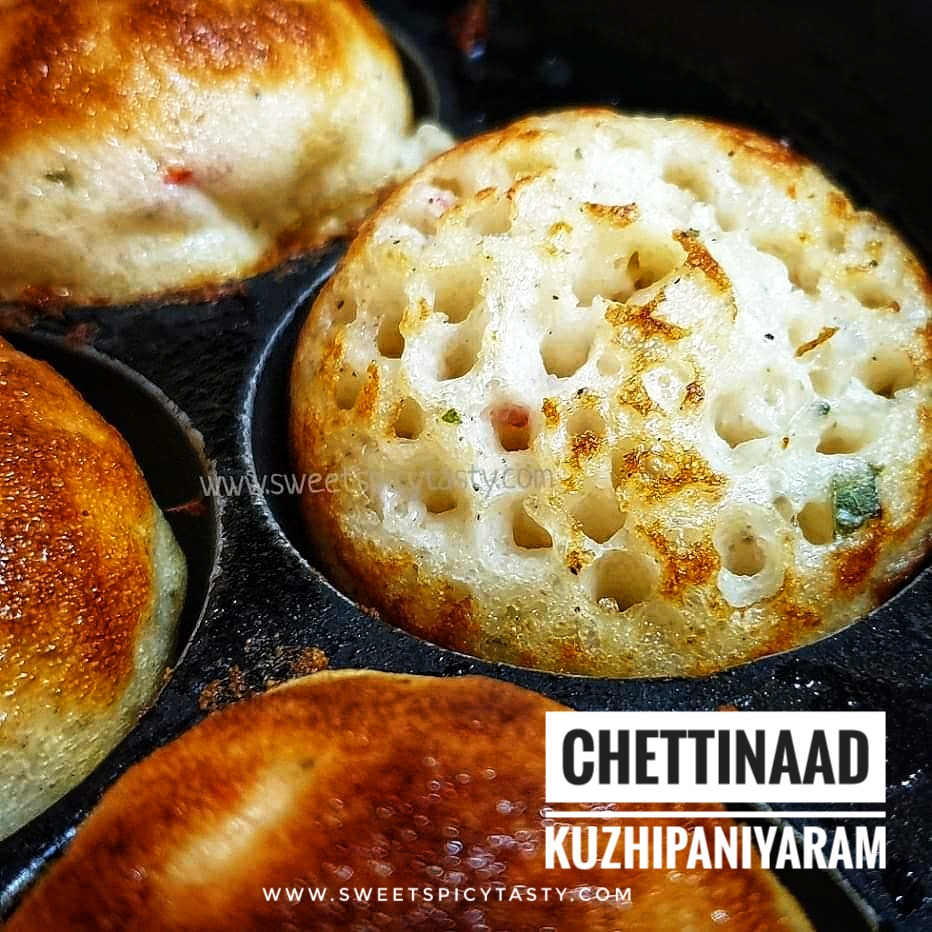
Chettinaad Kuzhipaniyaram - savory snack


Share with friends and family 10 comments:

 Kuzhipaniyaram is a very tasty and delightful savory snack which takes a very important place either for breakfast or evening snacks  in Tamil Nadu.

Kuzhi in Tamil means cavity/depression and paniyaram means snack in general . So Kuzhi paniyaram means a snack with a depression..sounds funny right ? Basically kuzhi refers to the cavity in the mould of the pan which is used to prepare this snack. 

Kuzhipaniyaram is made in a special vessel called as paniyarakal . It is the same pan which is used to make Sweet Appams ,paddu or gunthaponganalu .

I have already shared the other variant of Paniyaram made from regular Idli batter ,but this chettinaad Kuzhipaniyaram is a special recipe where the batter is ground solely for the purpose of making paniyarams.

Some classic recipes using the Paniyaram Kal / Aebelskeiwer Pan 

Jackfruit Nei Appam

Watermelon Nei Appam

Paddu/Gunthaponganalu

Kunukku Paniyaram

Chettinaad is a region in the Sivagangai district in Tamil Nadu (Southern India) . Chettinaad is known for amazing cotton sarees,Athangudi tiles and lipsmacking food with bold flavor profile especially non veg .

Chettinaad cuisine is known for its pungent and spicy flavor and variety of food ranging from main course , snacks to sweets and savories . As much as they are famous for non veg ,there are a lot of vegetarian options as well .

 Kuzhi paniyaram is served with coconut chutney and /or thakali(Tomato) chutney and some piping hot filter coffee. 

Kuzhipaniyaram also known as uppu appam should not be confused with the other chettinaad special known as Vellayappam .

Vellayappam is a totally different recipe and it has been very well explained by my co blogger Radha on her blog who is my partner this month for the Shh secretly cooking challenge ..we are celebrating Chettinaad cuisine suggested by Kalyani of Sizzling Tastebuds. Kalyani has shared a classic recipe Kaigari Mandi which is very delicious and a perfect accompaniment for main course or idli/dosas .


Soaking Time - 6 to 7 hrs
Fermentation Time - 8 hrs
Preparation Time - 30 mins
Cooking Time - 20 mins
Serves - 5 to 6

Ingredients 

1 cup raw rice (strictly no basmati rice)
1 cup idli rice 
1/4 cup whole udad dal (udad gota)
1 tsp fenugreek seeds 
Salt as needed 

For tempering 
1 tsp mustard seeds
2 to 3 green chillies finely  chopped 
Handful of curry leaves
2 tbsp grated coconut
1/4 cup oil
Fresh chopped corriander 
1/2 onion finely chopped (optional - I haven't used )

Method

  • Wash multiple times until the water is clear. Soak the rice and lentils with fenugreek in water for 5 to 6 hrs.
  • Grind the soaked rice and lentils in a blender or grinder to a fine smooth paste .Batter should be of idli batter consistency not a very runny batter . Let the batter ferment overnight or for 8 hrs . 
  • Before making the kuzhi paniyarams , we need to prepare a tempering that will be added to the batter. 
  • To prepare the tempering, heat about 2 tbsp oil in a pan and splutter the mustard seeds, followed by the green chillies,  curry leaves and fry the onions if using until they turn pink and soft . Lastly add in the coconut and give a quick stir .Add this tempering along with finely chopped corriander to the batter and mix well . 
  • Heat the paniyaram pan and add a few drops of oil in each cavity . 


  • Once the pan is well heated ,add the batter to each cavity and remember to fill only 3/4th of the cavity . The batter on cooking will raise and it needs space to swell . So if you fill it to the brim,the batter will overflow making it a mess .
  • The paniyarams will develop lot of pores as they are cooking, these pores are perfect indicator of a well fermented batter . Once the batter appears cooked on top ,carefully flip it over and cook the underside until it turns brown and crisp .Cooking has to be on medium flame throughout. 
  • Remove the appams /paniyarams from the pan and serve hot with chutney of your choice. 

Pin me up


October 14, 2021

Bonda Morkuzhambu | Festive lunch platter - Ayudha Pooja Special Thali #5


Share with friends and family 9 comments:

 Mor kuzhambu is a typical South Indian curry prepared using yogurt and coconut paste and vegetables like pumpkin,  ladies finger, chayote /chou chou.  Recipes for Poosnikaai (Ash gourd) Morkuzhambu and Vendakkai (Ladies finger) Mor Kuzhambu is already there on the blog .

Bonda Morkuzhambu  is a Tambrahm speciality and is part of wedding feast.  Bondas are small vadas made using udad dhall and then dunked into the freshly prepared Morkuzhambu. 

Bonda Morkuzhambu can be called as a close cousin of Kadhi Pakora which is a North Indian delicacy.  


Bonda Mor kozhambu comes in very handy when we are out of veggies or want a break from the usual menu .Normally at my home,we make Bonda Morkuzhambu on festive occasions or when we are having guests over for lunch or dinner . 

I learnt this bonda mor kuzhambu recipe from my amma who learnt it from my paternal grandmom  ..my dad keeps telling me that my grandmom made one of the best bonda Morkuzhambu, sadly I never got an opportunity to taste this delicacy from my Patti's kitchen.  So for me,this is one of the many heirloom recipes I cherish and treasure. 

I make the vada batter a little spicy so that when it is dunked in the yogurt gravy ,it absorbs all the flavors well and tastes good when we take a bite . 

Today being, Ayudha Pooja or Saraswathi Pooja ,I have prepared Bonda Morkuzhambu as part of my festival menu .  For lunch we are going to feast on

Bonda Morkuzhambu  (scroll down for recipe

Rasam vadai 

Kondakadalai Sundal 

Plain Vadas

Arisi Kadala Paruppu Payasam 

Rice + Ghee 


Preparation Time - 3 hrs
Cooking Time - 30 mins
Complexity - Medium 
Serves - 2 to 3 

Ingredients 

250ml thick yogurt 
100 ml water 
2 tsp oil
1 tsp mustard 
1/2 tsp methi /fenugreek seeds
2 to 3 dry red chillies 
fresh curry leaves 
pinch of turmeric 
Pinch of asafoetida 
salt

To grind

 6 to 7 tbsp  fresh grated coconut 
1/2 tsp jeera/cumin 
3 to 4 green chillies 
1 tsp channa dhall /bengal gram
2 tsp dhaniya /corriander seeds
Small piece ginger 

For the Vadas / Bondas 

1/2 cup udad dhall 
2 green chillies 
Few curry leaves 
Fresh corriander 
Salt as needed 

Method 

To make the bondas 
  • Wash and soak the udad dhall in water for 3 hrs .
  • Drain the water and add it to the blender and using very little water grind into a smooth paste .
  • Transfer it to a mixing bowl and add salt ,chopped green chillies,  curry leaves and fresh corriander. 
  • Whisk it well using a spoon or whisk for atleast 10 mins . This will make the batter fluffy and aerated. 
  • Heat oil and pinch out small roundels of this vada batter and fry on medium flame until it is crisp and golden brown. 
Preparation of Mor Kozhambu
  • Soak all the ingredients under the "to grind" section in water for 10 to 15 mins and grind into a fine paste.
  • Whisk the yogurt until is creamy and smooth. 
  • Add in the ground spice paste to the whisked yogurt along with salt and turmeric powder and mix well with water mentioned . Donot add too much water , else the mor kuzhambu will be runny and will split on boiling.  
  • Cook on medium flame until the mixture starts frothing up . 
  • Remember to turn it off at this stage..continuing to cook further will end up in splitting the yogurt..we donot want that to happen. 
  • Prepare a tempering of mustard seeds , methi  Curry leaves and dry chillies in hot oil and pour it over the mor kuzhambu.  You can use coconut oil for tempering for added taste and flavor. 
Assembling Bonda Morkuzhambu 
  • Add the fried bondas to the Mor Kozhambu and mix well .
  • Let it rest for 10 15 mins before serving so that the bondas absorb all the flavors of the mor kuzhambu nicely .
  • Make sure the mor kozhambu is hot while you add the bondas else they won't turn soft and spongy.  
  • Both bondas and the mor Morkuzhambu have to be freshly made. 
Pin me up !! 


October 05, 2021

Basic Mahalaya Amavasai Thaligai ( Samayal) & Vazhakkai Podimaas


Share with friends and family 3 comments:

 Pitru Paksha / Mahalaya Paksha is in veneration of our deceased ancestors.  In my earlier post of Payatham Paruppu Payasam, I have given an elaborate explanation regarding Pitru Paksha.

Pitru Paksha starts on a Pournami /Full Moon Day and Culminates on Amavasya / New Moon Day. This New moon day is known as Mahalaya Amavasya or Sarva Pitru Amavasya ; considered to be very auspicious as it is believed that even if we are unable to pay obeisance to our deceased fore fathers all round the year, offering our oblation on this particular day will please their souls and we shall be blessed abundantly.  

Vazhakkai Kariamudhu / Vazhakkai 
  / Vazhakkai Curry,amavasai thaligai,amavasai samayal,sarva pitru amavasya, tambrahm amavasai samayal, iyengar thaligai , mahalaya thaligai , Mahalaya amavasay samayal

This year Mahalaya Amavasya is on 6th October 2021 . Another speciality of Mahalaya Amavasya is that the Holy Festival of Navratri commences from the day after Amavasya . 

Each family has a different way of offering bhog to the ancestors depending on the family tradition and culture . 

In this post,I am going to share on how Mahalaya Bhog is prepared and offered in a Tamil Brahmin Family . There may be slight variations, but the basic menu remains the same . Almost every Amavasya ,this kind of meal is prepared in homes where elders follow the traditional practice even to this day . So we can call this a basic and simple Amavasya lunch menu .

This is the simplest bhog /samayal /thaligai one can prepare and offer to the ancestors.  You can follow this menu for all the Amavasai / New Moons that fall round the year if you have elders at home who offer Shraadh / Tharpanam on Amavasya. 

Click on the individual recipe names to follow the recipe. 


Unlike regular days ,we cannot use all vegetables and lentils for preparing an Amavasya meal . There are specifications to be followed  . Now a days it is not possible to sit and make such an elaborate spread on working days,so we can follow as much as we can to keep up our traditions rather than give up completely. 

  • Bittergourd (Pavakkai) & Vazhakkai ( Raw Banana) atleast must be included . Other vegetables that can be included are cucumber,  yam, sweet potato (sakkaraivelli kizhangu) , clustered beans(kothavarangai),  flat beans (avarakkai), taro root(arbi /seppankizhangu)
  • Moong Dhall /Payatham Paruppu and Udad dhall /Ulutham Paruppu are the only lentils that are used . 
  • Jaggery to be used for sweetening the paysam. 
  • Coconuts ,dry red chilli, green chillies ,pepper ,mustard ,ginger are to be used for seasoning and as spice agents .
  • Ghee / Nei to be served alongside rice without fail.

Vazhakkai Kariamudhu / Vazhakkai Podimaas / Vazhakkai Curry,amavasai thaligai,amavasai samayal,sarva pitru amavasya, tambrahm amavasai samayal, iyengar thaligai , mahalaya thaligai , Mahalaya amavasay samayal

In this basic Amavasya platter ,I have prepared a very simple and easy menu option which can be prepared without much stress and strain .

The 2 main mandatory vegetables bitter gourd and raw banana are part of the lunch menu.

Click on the individual recipe names to follow the recipe. 


Vazhakkai Kariamudhu / Vazhakkai Podimaas / Vazhakkai Curry 

Vazhakkai Kariamudhu / Vazhakkai Podimaas / Vazhakkai Curry,amavasai thaligai,amavasai samayal,sarva pitru amavasya, tambrahm amavasai samayal, iyengar thaligai , mahalaya thaligai , Mahalaya amavasay samayal


Preparation Time - 15 mins
Cooking Time - 8 to 10 mins
Complexity - easy
Serves - 2 to 3

Ingredients 

3 medium sized raw banana / kaccha kela / vazhakkai 
2 tsp curry powder / kariamudhu podi
Few curry leaves 
2 tbsp fresh grated coconut 
2 dry red chillies 
1 tbsp oil 
1/2 tsp mustard seeds 
Salt as needed 

Method 

  • Peel the raw bananas and roughly chop them into big cubes .
  • Take sufficient water in a pan and boil the chopped raw banana with some salt . The pieces should be well cooked but firm to touch . This may take about 6 to 7 mins.
  • Drain the water and let the bananas cool a bit.
  • In a pan heat the oil and temper the mustard seeds,curry leaves and red chillies. 
  • Add the boiled banana ,saute it well and sprinkle the curry podi over . Toss it well and lightly mash the bananas like how we do for potato curry. 
  • Close a lid and continue to cook for a minute or two . 
  • Finally garnish with fresh coconut and serve .


November 09, 2020

Medhu Vada Platter - South Indian Delicacy


Share with friends and family 18 comments:

Medhu Vada is a traditional South Indian fritter or deep fried snack prepared using Black gram / Udad dhall / Ulutham Paruppu . Uddina Vade (Kannada) , Medhu Vadai(Tamil) , Garelu(Telegu) , Uzhunu vada(Malayalam) , Urad dal Vada (Hindi) are the various other names used in different parts of India .
 
 Medhu in Tamil means Soft and Vadai means Fritters , so it translates to Soft Fritters but colloquially it is often known just as Vadas .

In a south indian home, these vadas are made during many special occassions like marriages , birthday celebrations, festivals and as prasad during Varalakshmi Pooja , Ganesh Chaturthi, Krishna Janmashtami. 


Chutney and Sambar are the perfect accompaniments for piping hot and crispy vadas . If you happen to attend any Tamil wedding, you will be treated to sumptous soft Idli , Medhu Vada, Pongal and Kesari  as breakfast along with chutney, sambar and piping hot filter coffee .

The other famous variants are 
  •  Rasam Vada - Crispy vadas are dunked in hot & tasty tomato rasam.
  •  Sambar Vada - Crispy vadas dunked in piping hot Tiffin Sambar and topped with some coconut chutney. 
  • Thayir Vada - Crispy Vadas are dunked in flavored yogurt spiced with coconut chilly mixture . The south indian style Dahi wada is slightly spicy from the North Indian Dahi Bhalla which is flavored using Sweetened yogurt alongwith variety of chutneys.


Click on individual names for detailed recipes 


Medhu Vada is a traditional South Indian fritter made using black gram/udad dhall.uddina vade, garelu,uzhunnu vada ,vadai, urad vada, how to make rasam vada , dahi vada , thayir Vadai, thayir vada ,dahi bhalla

Diwali, is round the corner and this is the most rejoiced Hindu festival and celebrations are always vibrant and colorful.  Living up to the joy and cheer , we at FMBH are celebrating Diwali for our 272 week theme . So all of you enjoy this wonderful virtual Diwali with us and stay tuned for some exciting ,innovative and classic recipes from all my blogger friends. 


How is Medhu Vada prepared? 
  • Simply put, a batter is prepared using soaked black gram / udad dhall and then the vadas are shaped and dropped into hot oil & fried until crisp and golden brown. 
  • Simple as it may sound, there are certain tips and tricks to be followed which will help you get the perfect & crisp texture of the vadas as you taste at the restaurants . 
  • The main challenge is preparing a fluffy batter using the soaked udad dhall . If the batter is ground to perfect consistency, then it is easy to shape the vadas . 
  •  In this post, I have tried to cover maximum possible tips and videos to help you prepare tasty and crunchy medhu vadas at the comfort of your home. 
Medhu Vada is a traditional South Indian fritter made using black gram/udad dhall.uddina vade, garelu,uzhunnu vada ,vadai, urad vada, how to make rasam vada , dahi vada , thayir Vadai, thayir vada ,dahi bhalla


 Ingredients 
 1 cup udad dhall (split / full )
 1 tablespoon rice
 salt as needed 
 2 to 3 green chillies
 few fresh curry leaves 
fresh corriander chopped
 pinch of asafoetida ( Skip for GF) 
Oil for frying the vadas

For Thayir vada / Dahi vada 
3 tablespoons fresh grated coconut
1 green chilli
1/2 tsp jeera/cumin 
fresh corriander 
2 cups fresh curd / yogurt 
salt as needed
1 grated carrot 

For Rasam Vada 
Piping hot tomato rasam 
Fresh corriander leaves chopped

 Method 
  • Wash the udad dal multiple times until the water appears clean . 
  • Soak the udad dhall and rice for maximum 2hours and then drain the water & grind . Donot soak for more time . It will give sour taste . 
  • When grinding batter for vadas,be it in mixie or the wet grinder,add water little by little and grind with patience. The batter will double in volume and feel very light. 
  • Take a small blob of batter and drop it in a cup of water. It should float and not settle down like a blob. That is the right consistency. 
  • When grinding in mixie use cold water as mixie jar tends to get heated up ,when you stop grinding and open the lid ,you can see the trapped air bubbles releasing one by one . This indicates good aeration.
  • Once the batter is ground,add salt and beat it well with your hands.Using hands to beat the batter induces aeration which is most important for fluffy vadas.
  • Mix finely chopped green chillies,curry leaves, corriander and asafoetida to the batter and keep in the fridge for 20 mins or until the oil is heated up well. 
Pro tips 
  • Salt should always be added only after grinding the udad dhall else the batter won't double up
  • If you are unable to grind for some reason , drain the water from the soaked udad dhall and refrigerate it . Grind it before 24hrs else it will give a foul smell . Also , rinse it nicely before grinding to remove the slimy coating.
  • Keeping the batter in the fridge, helps to hold the shape of vada while patting it .
  • Be very careful while adding water at the time of grinding . Too much water will make the batter watery and vadas can't be shaped properly. 


Pin it up for future

Medhu Vada is a traditional South Indian fritter made using black gram/udad dhall.uddina vade, garelu,uzhunnu vada ,vadai, urad vada, how to make rasam vada , dahi vada , thayir Vadai, thayir vada ,dahi bhalla


How to shape the medhu vadas like donuts? 


  • Wet your palms each time before shaping the vadas .
  • Take some batter ,bounce them , flatten it , make a hole and drop it carefully in the hot oil.
  • Donot add too many vadas in the oil, there must be space for flipping the vadas and even frying. 
  • Fry on medium flame until it turns golden brown . this way the wadas will be soft and spongy from inside but crunchy and crispy from outside. 
  • Frying on high flame will cook only from outside and the inside will remain undone and turn hard.

Thayir Vadai - South Indian style Dahi wada


                            Pin it up for future

Medhu Vada is a traditional South Indian fritter made using black gram/udad dhall.uddina vade, garelu,uzhunnu vada ,vadai, urad vada, how to make rasam vada , dahi vada , thayir Vadai, thayir vada ,dahi bhalla

  • Grind the coconut,jeera,chillies and little corriander to a fine paste .
  • Whisk the yogurt /dahi/curd well until it is smooth and silky. Add this coconut mixture to the whisked dahi and add salt as needed. 
  • In a wide bowl take some warm water and add 2 tbsp of this yogurt mixture to it and mix well .
  • Dip the fried hot vadas into this warm water mixture for 1 to 2 mins and then transfer it to the yogurt mixture and let the yogurt coat the vadas nicely .
  • Garnish with chopped corriander, grated carrots and put it in the refrigerator until serving.  You may also garnish with crisp boondis before serving .

Rasam Vadai

  •  Prepare tomato rasam and keep ready. 
  •  Dunk the freshly fried medhu vadas in piping hot tomato rasam such that the vadas are immersed well and serve hot . 
  • Rasam vada always needs to be served piping hot .
  • Incase the rasam has turned cold, remember to reheat in a microwave before you soak the vadas . 
  • Never reheat or reboil rasam on a stove top, it will lose its flavor .
  • If you do not have microwave , heat water in a wide pan and place the rasam vessel into that to get heated up . Works on the principle of double boiler .
Pin it up for future 

Medhu Vada is a traditional South Indian fritter made using black gram/udad dhall.uddina vade, garelu,uzhunnu vada ,vadai, urad vada, how to make rasam vada , dahi vada , thayir Vadai, thayir vada ,dahi bhalla


.

February 02, 2018

Supersoft Idli and Crispy Dosas - How to grind using mixie / blender? | All in 1 batter


Share with friends and family 8 comments:

All of us love to eat steaming hot idlis and super crisp dosas just like the ones we get at the restaurants.

What if I tell you ,that you can enjoy the same soft idlis and crispy dosas at the comfort of your home ?? Would you believe me ? 

Yes, you need to believe me ,because I am going to share a fool proof All in 1 batter with you that too ground in a mixie /blender. You don't even need the traditional wet grinder which is normally used to grind Idli/Dosa Batter. 

How to grind idli batter in mixie ? ,can we grind idli batter in blender , dosa batter in mixie blender , idli maav in mixie , mixi idli batter , dosa batter grinding recipe , can we grind dosa batter in mixer grinder


As against the usual notion that idlis won't turn out soft when ground in blender ,this recipe will make spongy idlis , Crispy dosas and as a bonus you could make paniyarams or even uthappams .

Some small tips to keep in mind while grinding  and you will get a well fermented batter . We will soak the ingredients separately but grind it altogether.  
An absolute boon for working ladies because it reduces a lot of cleaning effort and also the time taken to grind the idli batter in a grinder . 


How to grind idli batter in mixie ? ,can we grind idli batter in blender , dosa batter in mixie blender , idli maav in mixie , mixi idli batter , dosa batter grinding recipe , can we grind dosa batter in mixer grinder

Few pointers to keep in mind.

** place the soaked udad dhall container inside the fridge for 2hrs while the rice soaks in normal room temperature.  Keeping the udad dhall in fridge will give a fluffy yield of the batter.

** idli rice, idli rava are easily available in Indian Stores (outside India) and at all grocery stores in India.

** only raw rice will not give the softness and perfect texture to the idlis or dosas, so we must use idli rice or idli rawa in larger or equal proportion with raw rice to get the softness along with raw rice .

**never use basmati rice as it will impart its own fragrance and flavor in the batter which may ruin the taste of the idli or dosa. 


How to grind idli batter in mixie ? ,can we grind idli batter in blender , dosa batter in mixie blender , idli maav in mixie , mixi idli batter , dosa batter grinding recipe , can we grind dosa batter in mixer grinder


Proportion & Ingredients 

1.5 cups idli rice / idli rava ( cream of rice)
1.5 cups regular rice (I used sona masuri) 
1.2 cups of udad dhall / black gram dhall (deskinned) 
1 tsp methi /fenugreek seeds(optional)
Few ice cubes or chilled water.

Method
  • Take the rice and lentils in a wide mouthed container.
  • Rinse the udad dhall and rice  multiple times until the water appears clear.
  • If using idli rawa, then rinse and soak it separately for just about 1 hr before you grind the batter.
  • Soak the udad dhall and rice( idli rice as well as raw rice) for about 3-5 hours in separate containers.
  • Drain the soaked water and keep it aside . Add the rice and dhall to the mixie jar or blender ,add chilled water in small batches or 1 ice cube and grind into a  smooth batter  .
  •  Do not add too much water and make it very runny . The batter has to be thick i.e. of dropping consistency .
  • If using idli rava, add that to the blender along with raw rice and udad dhall at this stage.
  • Grind it in small batches such that the mixie does not get over heated or overloaded.
  • Transfer into wide mouthed container and mix the batter well with your hands and keep it in a warm place for fermentation. It will take about 8-12 hrs for fermentation in normal Indian weather conditions.
  • Incase ,you are in a place where the temperatures are less,then it might take even upto one day to ferment. Do not panic. 
  • Keep the batter in an oven with the light turned on for quick fermentation. 
  •  After the batter has fermented,add the required amount of salt and mix it well and make idlis as well as dosas and enjoy your favorite breakfast.
Note
  • mixing with your hands,helps in better aeration and the body warmth helps in better fermentation of the batter.

  • If you are not comfortable to use your hands ,alternatively you may use a whisk to beat the batter till it feels light and fluffy . 

Pin me up


How to grind idli batter in mixie ? ,can we grind idli batter in blender , dosa batter in mixie blender , idli maav in mixie , mixi idli batter , dosa batter grinding recipe , can we grind dosa batter in mixer grinder


Feedback from friends and well wishers
 I am including the feedback from a few members of a food group in social media who have tried this proportion and are very happy with the results.


March 16, 2017

Kanjivaram Idli | Kancheepuram Idli | Kudalai Idli


Share with friends and family 4 comments:

The name Kancheepuram/ Kanjivaram is synonymous to Pattu Saree popularly known as Kanjivaram Pattu. The handloom industry with skilled workers make the best of  Silk Sarees that are woven with beautiful and intricate designs ,styles and motifs.

Next to Sarees,the city is known for the very many temples and most importantly the famous Varadaraja Perumal Temple where this idli is offered as Prasadam to the Lord.

The authentic recipe doesn't use idli rice/parboiled rice as it is an offering/prasad ,but when making at home we can make use of idli rice.  Any  prasad /offering generally doesn't make use of idli rice or parboiled rice as per customs.


These idlis are slightly different as compared to the regular idlis as the batter is ground slightly coarse in texture and tempered with some spices like pepper,ginger and curry leaves.Also,traditionally these idlis are steamed in mandhara elai Dhonnais (eco friendly cups made out of dried leaves) .
The other name for Kancheepuram Idli is Kudalai Idli as it is steamed in the Dhonnai.

Where can you find the Dhonnais / eco friendly leaf cups ?

Go to a store where they sell items related to Pooja like mud diyas, cotton wicks , photo frames of God and Goddesses . These stores usually sell these dhonnais and also leaf plates which is used to serve prasad during any festive occasion in temples as well as homes . Ask for leaf cups and they will show you various sizes,pick the size you like . Wash it well before you steam the idlis.

Kancheepuram idlis can be served with Coconut chutney and Sambar .Many people like the combination of Tomato Khara Chutney with these idlis.We at home like to have it with Idli Molagapudi and sesame oil along with the other accompaniments  .

I am thankful to Mayuri ji for introducing me to the food group on Facebook started by Renu which focuses on redoing our old posts.  As bloggers when we began we would have clicked photos or posted about the recipe in a simple manner,but with time we would love to update either the write up or the photos of the recipe which will be more appealing for our readers.  This group Foodies_Redoingoldposts on Facebook gives us a good momentum and push to look up our old posts and update them . So inspired by this group's activity I have updated this post on Kanjivaram Idlis with new photos and write up on August 7 - 2022


Preparation Time : 10-12 hrs 
( Soaking Time : 3-4 hrs | 
Fermentation Time : 8-10 hrs)
Cooking Time : 20 mins
Serves : Makes about 16-20 idlis
Complexity : medium high


Ingredients

1 cup udad dhall
1 cup idli rice
1 cup regular raw rice ( I used Sona Masuri.,donot use basmati )

**you can also use 2 cups raw rice and skip idli rice if making for prasad /neivedhiyam

To Temper
2 tsp jeera/cumin
2 tsp ginger powder/ chukku/shunt
2 tsp pepper powder
pinch of asafoetida
finely chopped curry leaves
2 tsp gingelly oil/sessame oil/til oil

Method

Grinding the batter


Wash the rice and dhall separately until the water turns clear. Soak them separately for atleast 4 hrs. 

It is best to use wet grinder to grind the batter . Incase of using a mixie/blender ,make sure to use cold water while grinding the udad dhall. 


Grind the udad dhall first using very little water until it feels fluffy and almost doubles in volume.
Drop a small blob of the batter in a cup full of water ,the blob of batter must float and not sink.  This is the desired consistency of udad dhall batter for soft and fluffy idlis .

Take it out in a separate vessel that is wide enough. Next add the rice to the grinder and grind it well but not very smooth.let it be a little coarse. Add this to the udad dhall batter and mix it well using your hands.

Please Note,using hands to mix the batter helps in fermentation process as our body heat is transferred in the process of mixing. Leave it aside for fermentation . It will take 6-10 hrs depending on the outside temperature and season.

©Sweet Spicy Tasty©
Freshly ground batter

©Sweet Spicy Tasty©
Well fermeneted batter.


How to prepare Idlis ?

Prepare the tempering using jeera and asafoetida.Add the tempering along with the finely chopped curry leaves,dry ginger powder ,pepper powder and salt.Mix well 

©Sweet Spicy Tasty©

Grease the idli plates with a little oil and prepare the steamer/ pressure cooker by then with sufficient water. Pour the batter into the greased idli moulds and steam for 16-18 minutes or use the tooth pick test to check if the idlis are done .

If you want to steam them in the eco-friendly leaf cups (donnais) then pour the batter into those cups and place them in the steamer and steam it as always .

©Sweet Spicy Tasty©

©Sweet Spicy Tasty©
Steamed Idlis

Soft and fluffy idlis are ready to be served.

Alternatively,you can also grease a round mould and steam the batter in it and cut in desired shapes .Just like how you would do for a cake or dhoklas.

©Sweet Spicy Tasty©

Incase, you feel the batter is not risen well, you can add some eno fruit salt before steaming. Take care to add eno only to the quantity of batter to be steamed and not to the entire batch of batter.


Pin for later