Showing posts with label Winter special. Show all posts

December 18, 2024

Aloo Matar (आलू मटर) | Potato Peas curry - Winter Special


Share with friends and family 4 comments:

 Come winter, the market is flooded with fresh vegetables which are very tempting. Most of the times,I will hoard my fridge with the fresh produce and then struggle to consume it before the freshness withers away .

Winters at home means fresh green peas ,carrots,cauliflower and radish in abundance.  Of course the evergreen , doodhi aka lauki makes it presence in the menu atleast once a week . 

Aloo matar , alu mattar ,alu matar ,how to make aloo matar at home,urulai pattani masala ,urlai pattani masaal, alu matar gravy , restaurant style aloo matar

Aloo mutter is easy and simple to make,but packed with a riot of flavors. You can make with fresh peas or the frozen ones .Try and avoid the dried peas which needs to be soaked overnight . The dried peas don't blend well in to the curry is my opinion. 

In winters, I make this curry with fresh peas and during off season ,the frozen peas comes handy . We can easily make this Aloo Matar gravy for year end parties , get togethers and office pot luck.  

Aloo matar , alu mattar ,alu matar ,how to make aloo matar at home,urulai pattani masala ,urlai pattani masaal, alu matar gravy , restaurant style aloo matar

I learnt this recipe from my amma and she used just simple basic spices to make this curry and it would be served with piping hot fulkas just off the pan . I enjoy it with some thick yogurt or cucumber raita while hubby loves it with onion raita. 

Kulchas and Naan are a best combination too and if serving with rice, simple steamed basmati rice, jeera rice ,peas pulav or vegetable pulao are just the perfect pairing. 

I use the pressure cooker to make and it gets done quickly . Pressure cooker or instapot option is the best choice, if we want to make a large quantity of Aloo Matar.  

Donot forget to use lots and lots of fresh corriander as garnish.  It enhances the flavor of the gravy. Serve with some chopped onions and a wedge of lime.

Aloo matar , alu mattar ,alu matar ,how to make aloo matar at home,urulai pattani masala ,urlai pattani masaal, alu matar gravy , restaurant style aloo matar

Preparation Time - 10 mins
Cooking Time - 30 mins
Complexity- easy
Serves - 2 to 3 

Ingredients
3 to 4 medium sized potatoes  peeled & cut into big cubes 
1 medium onion chopped roughly 
2 tomatoes roughly chopped 
1 cup green peas
2 green chillies finely chopped 
Lots of fresh corriander
1 tsp ginger garlic paste
1 tsp Kashmiri chilli powder
1/2 tsp turmeric/haldi
1/2 tsp kasuri methi /dehydrated fenugreek leaves
3 tsp oil
Salt as needed 
Whole spices
 1tsp jeera /cumin
small piece  cinnamon /dalchini 
3 cloves /lavang
 2 cardamom / elaichi
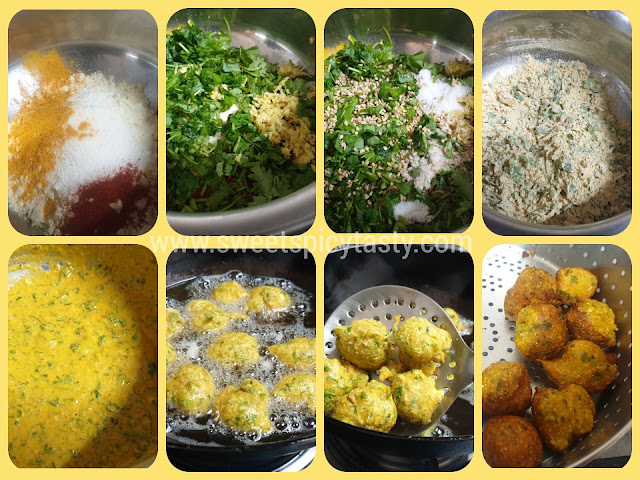


Method

  • Heat oil in a pressure cooker .
  • Crackle the cumin seeds ,followed by the whole spices until you get a nice aroma of fried spices .Take care to roast over low flame,that is the key to bring out the essence from the whole spices. 
  • Add in the onions and green chillies ,saute till the onions turn pinkish .
  • Add in the tomatoes , turmeric powder, chilli powder, salt and cook until the tomatoes turn mushy and soft. 
  • Once,the tomatoes become soft, add the ginger garlic paste and cook till the raw flavor is lost.
  • Slowly ,add in the potato cubes ,green peas and mix it well.Adjust salt if needed and pour 3/4 cup water. 
  • Pressure cook on medium flame for 4 whistles .
  • Let the pressure release naturally.  Open the lid and gently mix the gravy while you roughly mash a few potatoes here and there.
  • Mashing of potatoes will give a nice volume to the gravy.If you find the gravy thick,you can add some hot water and adjust the consistency.
  • Lastly add the kasuri methi and fresh corriander.  Serve hot with rotis ,naan, steamed rice etc.

Some winter special recipes which you must try

Aloo Gobhi 

Lauki Channa Dal (video)

Palak Paneer 

Sabz Hariyali (video)
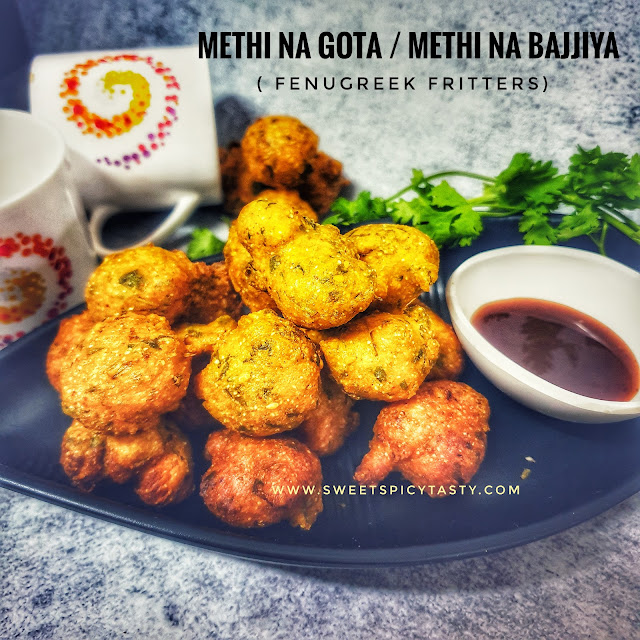
Gajar Halwa

Doodhi Halwa 

Gajar Mooli sabji 

Corn peas pulao 


Pin me up 

https://pin.it/36dUF7yJa


November 18, 2024

Carrot Radish Stir fry | Mullangi Carrot Poriyal | गाजर मूली सब्जी


Share with friends and family 8 comments:

 Carrots and radish ,both are delicious and healthy vegetables .I am a huge fan of both these and can have it all round the year without a fuss .

To be honest,combination of radish and carrots is a very new thing for me.  I use carrots in combination with many other veggies for making poriyal ,but never attempted to use with radish as I always felt that the smell and taste of radish will be over powering in the poriyal.

Carrot Mullangi curry , carrot radish poriyal,  radish poriyal , mullangi carrot curry , mulangi poriyal , mulangi carrot curry , gajar mooli sabji , mooli gajar , radish carrots stir fry

Radish always gets made into sambar ,popularly called as mullangi sambar or as mooli paratha . As I write this post ,I realized I haven't blogged Mullangi Sambar and am setting reminder to myself, that I must blog it very soon. 

Well,now coming back to Carrot Radish curry,this was purely dear hubby's idea and as always I wasn't very convinced but he assured me that it will taste yummy . As I wasn't very comfortable with the combo,I told him to make this poriyal and that I would only taste it when it is done.  As opposed to the usual diced chopping ,hubby grated the carrots and radish for making this delightful stir fry.

Carrot Mullangi curry , carrot radish poriyal,  radish poriyal , mullangi carrot curry , mulangi poriyal , mulangi carrot curry , gajar mooli sabji , mooli gajar , radish carrots stir fry

So ,this poriyal is made by him and photography is by me . The recipe that I am penning below is just as he told me what he did . When I was asked to taste after he prepared the curry, I was totally floored . It was a riot of flavor explosion. Subtle sweetness from the carrots and mild pungent flavor from the radish was a perfect match with the occasional crunch from the green peas . The garnish from fresh corriander is an added flavor booster . Do not compromise on the use of freshly chopped coriander ,it adds up to the taste to the Nth level. Pair it with any sambar or Vethakolambu or even have it as a plain salad.

Winter is slowly setting in and now is the best time to enjoy fresh and tender carrots, radish, cauliflower , fresh green peas .

Piping hot Gajar halwa, Aloo Gobhi sabji and fulkas will be an absolute treat to the taste buds on a chill winter night. Do check out all those recipes on my blog. 


Check out the Winter Special Veg Hariyali video on my You tube channel .


Pinterest Link

https://pin.it/3AME6ZKyY


Preparation Time- 15 mins
Cooking Time - 20 mins
Complexity - simple 
Serves  - 3 to 4

Ingredients 
2 medium sized radish grated
2 medium sized carrots grated 
Handful of green peas 
1 medium onion chopped
2 to 3 green chillies chopped
2 tsp oil 
Mustard seeds + curry leaves 
Pinch of asafoetida 
Salt as needed 
Fresh corriander 

Method 

  • Squeeze out the water from the grated radish . After grating the carrots and radish don't let the vegetables sit for a long time,else they will become soggy. 
  • In a thick bottomed kadai,heat oil and crackle the mustard seeds, curry leaves, green chillies .
  • Saute the onions until transparent .
  • Stir in the carrots, radish and green peas and season with salt.  
  • Mix well and cook covered for 4 to 5 mins until the radish and carrots are well cooked .
  • Garnish with fresh corriander and serve hot.

Pin me up


February 28, 2022

Peerthangai (peerkangai) thogayal | Ridgegourd (Thurai) Chutney


Share with friends and family 5 comments:

 Peerthangai thogayal /thuvayal is a very popular side dish in Tamil Nadu . Though there are various ways to use Peerthangai/Thurai ,in Tamil Nadu making it as thogayal is the most preferred form . Thogayal pairs well with sambar ,kootu or rasam rice .

 I personally love to have peerthangai thuvayal with thurai moong ki dal. Though both have the same vegetable in  common their tastes are completely opposite and it compliments one another really well.

Peerkangai thogayal tastes good with chapati and dosa too but with idli I prefer the coconut chutney and have never tried with this thuvayal . If you happen to try please let me know how did u like it with idlis in my comment section below. 


Peerthangai thogayal has a spicy as well as tangy taste and the flavors are well balanced by adding a pinch of jaggery while grinding.  

Since we use roasted dhalls for grinding thuvayal, the same can be stored under refrigeration for 2 or 3 days . Donot keep for long as the taste tends to change and also using refrigerated food for long isn't good for health .

Priya's Zucchini Thogayal has caught my attention and is soon going to be on my menu.

Some more interesting vegetable based thogayal for you to try from my blog

Maanga (raw mango) Thogayal 

Senai (yam) thogayal 

Vazhakkai thol (Raw Banana peel)  Thogayal 

 .


Preparation Time - 10 mins

Roasting Time - 3 to 4 mins

Complexity - simple 

Serves - 2 to 3 

Ingredients 

1 medium size ridge gourd 
3 tbsp udad dhall 
3 tbsp fresh grated coconut 
3 to 4 dried red chillies 
1 tsp pepper corns 
Few curry leaves 
Small piece of tamarind 
Salt to taste
1 tsp jaggery powder 
Pinch of asafoetida 

Method


  • Peel the ridge gourd and cut into medium pieces and cook it using 1/4 cup until soft and tender . In the same water add the tamarind to soften .
  • In a pan heat 1 tsp oil and fry the mustard seeds until crisp and golden brown .
  • Next add the pepper, curry leaves,  red chillies and roast till the chillies turn crisp.  Take care not to burn the chillies or udad dhall . If using a heavy bottom pan ,then you can turn off the stove after frying the udad dal and roast the chillies as the pan will retain heat for long time . 
  • Add the grated coconut to this pan and give it a quick stir . Let the ingredients cool.
  • In a blender jar ,add the roasted ingredients, asafoetida and salt and give a quick pulse .
  • Add the boiled ridge gourd /Peerthangai, jaggery ,tamarind and little water to grind to a chutney consistency. Adjust salt if needed .
  • Remove into a dry container using a dry spoon and store it properly. 


January 24, 2022

Avarekaalu Mixture | Hyacinth Bean Crispies


Share with friends and family 5 comments:

 Avarekaalu Mixture is a speciality of Karnataka prepared by deep frying fresh hyacinth beans /avarekaalu . This tea time snack is very  very addictive and pairs well with piping hot filter coffee or Masala Tea .  

Fresh Avarekaalu is a delicacy and people's favorite in karnataka and is widely used in many recipes during the winter season.  I have tasted this yummy mixture in many occasions and from then it has been on my mind to try it at home .

Avarekaalu Akki roti , Avarekaalu Uppit are 2 of my favorites made from fresh hyacinth beans which are a must have in the season atleast couple of times .

This time around I got some really fresh and tender hyacinth beans and the weather was also just perfect to prepare and munch on.

There is no particular or hard and fast recipe to prepare this mixture, its purely eye ball measures and ingredients of your choice.  

Only one thing we need to take care is to soak the fresh avarekaalu for about 3 to 4 hrs in water and peel the outer skin before making the mixture. This is called Hithkidha Avarekaalu .


How to prepare Hithkidha Avarekaalu /Hithkidha Avarebele ? 

Soak the freshly peeled avarekaalu from the pods in a wide bowl containing water for 4 t 5 hours. Drain the water and press the beans between your fingers lightly and viola,the skin just comes off . Discard the skin and spread the peeled beans on a wide tray or on a cotton muslin cloth for the moisture to be absorbed before making the mixture. 


Preparation Time - 4 to 5 hrs

Frying time - 20 mins

Complexity - medium 

Ingredients 

1.5 cups hithkidha avarebele
1/4 cup groundnuts
3 to 4 tbsp roasted gram /hurigadle/pottu kadlai
1/2 cup thick poha /avlakki/aval 
1 cup raw corn flakes /makai poha 
Fresh curry leaves 
1/2 tsp turmeric
1 tsp red chilli powder
1/2 tsp powdered sugar 
Salt as needed
Pinch of asafoetida 
Oil to deep fry

Method 


  • Heat oil a deep kadai /wok .
  • First add the hithikdha avarebele and fry until it turns crisp and moisture free. Initially while frying ,it will remain at the bottom of the kadai and as the frying continues the avarebele will start floating on top . Once all the avarebele start floating on top,the oil will stop hissing and sizzling.  This indicates that the avarebele are fried well ..drain the slowly onto a colander .
  • Next fry the peanuts until crisp and golden brown followed by the roasted gram and curry leaves .
  • Fry the makai poha till they turn crisp and fluffy. 
  • Lastly fry the avlakki and drain it out .
  • In a wide mixing bowl,gently toss all these fried ingredients along with turmeric, chilli powder, salt,asafoetida, powdered sugar .
  • Delicious avarebele mixture is ready to be enjoyed !

Some more mixture varieties on my blog 

Cornflakes chiwda

Poha Chiwda

Sabudana Faraaali Chiwda

Diwali Spl Mixture (Madras Mixture)


Pinned me yet ? 


January 10, 2022

Methi Thepla | Fresh fenugreek flat bread


Share with friends and family 7 comments:

A typical gujurati breakfast on a winter morning will comprise of piping hot thin methi theplas served with spicy mango pickle, curd and aromatic steaming hot masala chaai .

I am sure this description is making you drool right away ! I had already posted a recipe of Kasuri Methi theplas which are made from sun dried fenugreek leaves during off season when fresh fenugreek isn't available. Today we shall see how to make the tastiest and perfect methi theplas using fresh fenugreek leaves .

Methi theplas make a very frequent appearance in my home during winters.We love to have hot hot theplas for dinner alongside some simple gravy or even plain dal but the best combo for theplas is potato curry if you are having it for dinner or packing it for a picnic lunch .

Separating the tender methi leaves from the stem is the only time taking part which we need to do very patiently.  If the stem is tender and thin,then I chop that also finely along with the leaves but make sure you discard the stem of they are too thick . Thick stems will make it difficult while rolling out the theplas and the theplas will tear which we don't want.  


Preparation Time : 10 -15 mins
Resting Time : 15 mins
Cooking Time : 2 mins per thepla
Makes : 13-14 theplas
Complexity  : Medium

Ingredients
2 cups whole wheat flour
2 tbsp curd
2 tbsp besan / gram flour
1/2 tsp ajwain/carom seeds 
1 tsp haldi / turmeric
1 tsp red chilli powder
1 cup packed - finely chopped fresh methi 
Salt as needed
Oil to fry the theplas

Method


  • In a wide mixing bowl add in the haldi powder , red chilli powder ,ajwain and salt to the chopped methi and mix it well with your fingers to release the flavor and essence of methi .
  • Add  wheat flour,gramflour, 1 tablespoon oil,curd to the methi and knead a soft but pliable dough by adding water at intervals . 
  • Methi when mixed with salt and spices will release some water ,so be careful while you add water to knead the dough. Just sprinkle water little by little and knead.
  • Coat it with some oil and knead again and keep covered with a tight lid or a muslin cloth and set aside for 15 mins. 

  • Pinch out small balls from the dough , dust it with some dry wheat flour and roll it into thin rotis using a rolling pin.
  • Heat a tawa or griddle and put the rolled out thepla on the hot tawa .
  • Cook on one side with a little oil and flip over.  Do it on low flame. 
  • Drizzle some more oil and cook the under side until it is well cooked.
  • Use oil little generously if you want to keep the theplas for 3 or 4 days . The oil will ensure the theplas won't get spoilt. 
  • Take it off the pan and store it in a dry container or wrap in aluminum foil .

Some more lipsmacking delicacies using Fresh Methi 

Methi na Gota (pakoras)

Cabbage Methi Pakoras 

Methi Puri 

Methi Dal 

Aloo Methi Sabji


Donot forget to pin me up :-) 


December 20, 2021

Methi na Gota | Methi Pakora | Fenugreek Fritters - Gujurati cuisine


Share with friends and family 14 comments:

 Methi na Gota / Methi Bajjiya or methi na pakora is a classic winter delicacy and a popular Street food in Gujurat and Bombay. Even though fresh fenugreek is now available all round the year, there is always a special place for the tender and fresh methi available during winters.

Methi na gota doesn't require any fancy ingredients or preparations as we will invariably have the ingredients in our pantry supply . The main ingredients are gram flour/besan and sooji/semolina with added spices and fresh fenugreek leaves .

I have had these amazingly tasty and delicious pakoras many a times since my childhood.  Come winters,  these methi gotas are always a part of the meal or as tea time snack in most gujju homes .  Carrot halwa and methi na gota are inseparable delicacies during winter. 

Crispy from outside and spongy from inside,these fenugreek Fritters are a perfect treat  on chill evenings and makes it an awesome appetiser or party pleaser option for all kinds of parties and holiday get togethers .

You may serve them with Dates Tamarind Chutney and Green chutney or even a cup of piping hot masala tea makes it an enjoyable experience with friends and family .


Preparation Time -15 mins
Frying Time- 20 mins
Complexity - Simple 
Serves - 3 to 4

Ingredients 
1 cup gram flour/ besan
1/4 cup semolina/rava
1/2 cup finely chopped methi Leaves
1/4 cup finely chopped corriander 
1 tsp grated ginger
1/2 tsp turmeric 
1 tsp red chilli powder 
1 tsp white sesame seeds 
1/4 tsp jeera/cumin
1/2 tsp sugar
Juice of 1/2 lemon
Salt as needed 
1/4 tsp cooking soda 
Water to make the batter 
Oil to deep fry 

Method 


  • In a wide mixing bowl,mix the gram flour,salt,semolina, turmeric and red chilli powder. 
  • To this add the freshly chopped corriander, methi ,ginger and sesame seeds .
  • Mix it well with a spoon and make a batter of dropping consistency by adding water little by little .whisk it well to form a lump free batter.
  • Let the batter rest for 10 mins while you heat up the oil for frying.
  • Just before frying add the lemon juice,  soda and sugar . Whisk the batter quickly and drop small balls of batter in the hot oil . Donot over crowd the frying pan.  Fry on medium flame until they turn crispy and golden brown.
  • Drain the pakoras carefully and serve hot with chutney and tea.  

Some more must have winter delicacies 

Gajar Halwa / Carrot Halwa 

Doodhi (bottle gourd) Halwa 

Doodhi Muthiyas (steamed)

Cabbage Methi Pakoras 

Methi Pooris 

Methi Dal 

November 30, 2020

Cabbage Methi Pakoras | Cabbage fenugreek fritters - Vegan


Share with friends and family 9 comments:

 Winters and fresh vegetables are always a treat to eyes and taste buds . Last few days have been pretty cold in my city and we also experienced mild showers owing to a cyclonic depression.  Cold weather coupled with rains definitely calls for some crispy bites and is it not a pleasure to indulge into some fried snacks keeping the guilt aside for a day?

Deep fried snack prepared by mixing fenugreek, cabbage with gram flour and spices.  Pakoras are a winter or rainy special snack loved by all.

I had some fresh cabbage and methi /fenugreek leaves in my fridge and this time I prepared pakoras or Fritters using them . This was the first time, I combined the two veggies and made pakoras . Generally I make either only cabbage pakoras or methi pakoras, but this mix veg pakoras were just out of the world and it just flew out of the pan soon after I made them. You can add some chopped capsicum also to this .

By now you all must be aware about our weekly themes in Foodie Monday Bloghop and this time we are celebrating Winter vegetables as suggested by Sasmita for the 274th week.  The next soup on my mind is Beetroot Carrot Soup which Sas has on her blog "First timer cook" .


Preparation Time- 15 mins

Frying time - 20 mins

Serves- 3 to 4

Complexity- medium


Video recipe of Pakoras on my channel 


Ingredients 

1 cup finely chopped cabbage 
1/2 cup finely chopped methi /fenugreek leaves
2 to 3 green chillies finely chopped 
2 cups besan/gram flour 
1/2 cup rice flour 
2 tsp red chilli powder
1 tsp ajwain /carom seeds 
Finely chopped corriander 
Salt as needed 
Asafoetida as needed  
Oil for frying 

Method 

  • In a wide mixing bowl, take the cabbage , methi Leaves , corriander, salt , red chilli powder , ajwain,chillies ,asafoetida and mix it well with your fingers . Let it sit for 5 to 10 mins for the veggies and spices release their flavor. 
  • Add the gram flour and rice flour and mix it with the vegetable mixture.  Rub it well with your fingers such that you get a crumbly texture.  The salt and spices would have released water which will be enough to mix the dough for pakora . Incase you find it dry , sprinkle water little by little and make a tight but moist dough. 
  • Heat oil and drop little bits of the dough into hot oil and fry them on medium flame until the hissing sound of the oil stops and the pakoras feel crispy and golden brown .
  • Repeat this step until the dough is over . Always fry in small batches so that the pakoras are evenly fried and turn crisp .

Pin it for future 

Deep fried snack prepared by mixing fenugreek, cabbage with gram flour and spices.  Pakoras are a winter or rainy special snack loved by all.

Some more deep fried nibbles  on my blog which will interest you 


February 24, 2017

Aloo Methi Sabji | Alu Methi | आलू मेथी की सब्जी (No Onion No Garlic Version)


Share with friends and family 5 comments:

Fresh methi and peas are inseparable in winter and it shows itself in various recipes until the stocks last.

Growing up, aloo methi was one of my favorite curries and this was one which I learnt to make during my early days of cooking.

As I have mentioned in many of my posts, amma would dish out hot fulkas and serve me and dad this delicious aloo methi ,fulkas and thick yogurt /dahi .

Aloo Methi Sabji | Alu Methi | आलू मेथी की सब्जी  (No Onion No Garlic Version), winter special methi potato curry , fenugreek and potato curry ,methi alu , methi aloo , menthya aloo gadde palya , aloo gadde menthya palya

This aloo methi recipe is very very simple and even beginners can easily make it with just the basic spices available in the pantry.
There are just a few tips and tricks to keep in mind so that the curry doesn't turn very bitter. Cooking the methi for a long times steeps in the bitterness into the curry. So the key is we cook the potatoes ,tomatoes,peas along with the spices and once they are well cooked ,add in these chopped methi leaves to the curry and cook for just a few minutes till the raw flavor is lost and there you are with a lip smacking Aloo Methi Mutter .
The wonderful taste and aroma of sauteed methi leaves with cumin seeds takes the entire dish to a whole new level. People who dislike methi for its bitterness will start loving methi if you prepare it this way.

Aloo Methi Sabji | Alu Methi | आलू मेथी की सब्जी  (No Onion No Garlic Version), winter special methi potato curry , fenugreek and potato curry ,methi alu , methi aloo , menthya aloo gadde palya , aloo gadde menthya palya

As the recipe does not use any over powering masalas ,even the elderly who refrain from masala based gravies due to age and digestion issues can enjoy this simple and humble sabji with hot fulkas. You can also pair it with Methi Theplas or Jeera Rice or the ever loved Dal Rice .If making for a diabetic patient, you can skip the potatoes and use only peas, tomatoes and fenugreek leaves .

This is a No Onion No Garlic recipe, so you can even make it for lunch/dinner get togethers during any kind of Pooja or Satsang.

If you like this fresh fenugreek /methi recipe ,here is a list of some delicious winter recipes with methi

Originally ,I had posted this recipe in 2017 ,now after almost 8 years (June 2025) ,I have given the Alu methi recipe a makeover with some new recipe links ,photos and some minor changes to the recipe which I mastered over the years. 

Pin it up 


Preparation Time : 10 mins
Cooking Time : 20-25 mins
Serves : 2-3
Complexity : Medium

Ingredients

2 medium sized potatoes
2 cups packed finely chopped methi leaves
2 medium tomatoes chopped
1/2 cup peas ( frozen / fresh)
1 tsp jeera
2 cloves
1 small stick cinnamon
1 tsp finely chopped ginger
1 tsp red chilli powder
2 tsp dhania/coriander powder
1/2 tsp haldi / turmeric  powder
1 tsp garam masala powder
2 tsp oil
salt to taste


Method

  • Peel the potatoes and cut them into medium sized cubes soak in water for 10 mins. Drain and keep aside.
  • In a kadai ,pressure pan or IP ,heat the oil, splutter the jeera, cinnamon and cloves.
  • Add  the tomatoes and sauté it with some salt.
  • Add the haldi ,red chili and dhania powders to the tomatoes and cook until tomatoes turn soft and mushy .
  • Add the chopped potatoes, peas & half cup water ,mix well. Cook until the potatoes turn soft and tender , alternatively you can pressure cook for 2 whistles if using pressure pan/cooker or IP.
  • Once the potatoes are cooked add the chopped methi leaves and mix it with the garam masala.
  • Adjust the salt if needed , add 1 tsp of sugar cook for a few minutes till the raw flavor of methi is lost.
  • Turn off and garnish with fresh coriander and a small blob of butter . The butter adds a lot of taste and flavor to the gravy.
  • Serve hot with your choice of roti , fulkas ,jeera rice .


February 17, 2017

Baafela Dudhi/Lauki Na Mutiya | Steamed Bottlegourd dumplings


Share with friends and family 9 comments:

Muthiya is a famous tea time snack from the land of food lovers..yes you guessed it right !! GUJARAT  !! 


Muthiya is a traditional snack made using vegetables like doodhi/lauki/bottle gourd,cabbage, methi/fenugreek leaves ,palak/spinach .Muthiyas are either steamed or deep fried. The deep fried ones are very tasty while the steamed ones are a healthy option and will be a guilt free indulgence. 

The deep fried muthiyas have a longer shelf life and can be used in various gravies like undhiya or tamatar muthiya nu saak etc. The steamed ones are a good choice for starters or tea time snack with green chutney and sauce.

There is not much complexity involved in making these yummy snacks and can be put together in less than 30 mins. You can easily prepare a huge batch ahead of any get togethers and just warm them up before serving.

Pro Tip
While making Dudhi muthiyas we have to remember that Bottlegourd/dudhi is a water vegetable and has high water content,hence we donot need to add extra water while kneading the dough .

Preparation Time : 10 mins
Cooking Time : 25 min ( Steaming - 20 mins | Shallow frying - 5 mins )
Serves : 3-4 people (Makes about 20-30 muthiyas)
Complexity : Medium


Muthiya is a traditional snack made using vegetables like doodhi/lauki/bottle gourd,cabbage, methi/fenugreek leaves ,palak/spinach .Muthiyas are either steamed or deep fried. The deep fried ones are very tasty while the steamed ones are a healthy option and will be a guilt free indulgence.

Pin it up if you liked this recipe 

February 16, 2017

Avarekaalu Kootu | Mochakottai Kootu | Surti Papdi Gravy


Share with friends and family No comments:

Avarekaalu (Kannada) / Mochakottai (Tamil) /Surti Papdi -Lilva (Hindi/Gujrati) is a winter vegetable and is available in plenty in the markets. Fresh and green its very very tempting to buy.

Every year during this season there is an Avarekaalu Mela hosted in Bangalore,Karntaka wherein recipes using this beans are show cased extensively and innovatively.

Traditionally it is used in Upma/Uppitu,Nippatu(flat disc fried snack),Saaru(rasam),Akki Roti(flat bread made of rice),Huli/Sambar,Sagu (mix veg gravy),Kootu ,Pulao .
People in Karnataka buy this in Kgs and very patiently de pod them and relish them.Click here to  know more about the Avarekaalu Mela 

The Gujratis and Maharashtrians also use this widely in their cuisine,Undhiyo being the most popular one in Gujarat.

I personally love these beans and use it extensively in my cooking in the winter season. My favorite being Avarekaalu Upma and Akki Roti.

Today's recipe is a typical south indian gravy which is made frequently at my home using various vegetables in different combinations. In this particular recipe I have used avarekaalu,potato and carrot.
Mix the kootu with steamed rice and spoon of ghee and have it with some crunchy appalam/papads or vadams/fryums...I am sure you will be transported to a different world of taste !!!

Preparation Time : 10mins
Cooking Time : 20 mins
Serves : 3-4
Complexity : Medium

©Sweet Spicy Tasty©


February 13, 2017

Methi Puri | Methi Poori


Share with friends and family No comments:

Poori /Puri is a deep fried  Indian flat Bread made from whole wheat flour. Methi Puri is made by kneading the whole wheat flour with finely chopped methi/fenugreek leaves with some spices and salt.
Winter is a very good time to consume fenugreek /methi because it is available abundantly and helps increase immunity and produces body heat naturally to combat the harsh winters.

Preparation Time : 15-20 min
Cooking Time : 30 mins
Serves : 3-4 (Makes about 20 puris)
Complexity : Medium High

©Sweet Spicy Tasty©


January 27, 2017

Doodhi ka halwa / Lauki halwa


Share with friends and family 4 comments:

Doodhi ka halwa is another favorite at home with us after Gajar ka halwa. Always use fresh and tender bottle gourds so that there will not be many seeds and the bottle gourd will have a mild sweetness adding to the taste of the halwa.  I also add some home made fresh badam powder while making the halwa,it gives so much creaminess and beautiful color due to saffron and turmeric. That is why you see it is on the greener side .No added colors used to get the green color ,it is purely  natural. 


At times ,bottle gourd may turn bitter,so remember to taste a small bit of the doodhi before making halwa.If it feels bitter,then discard it immediately. 
After grating the bottle gourd ,don't leave it for a long time as it will turn brown due to oxidation and the halwa may not look very appealing.
Sharing an easy way to grate the veggies without making the working area messy. Hope you all like this tip . Ofcourse, the food choppers and food processors makes life easy, but this tip is ,if we are using the traditional hand grater for grating .


 The best way to celebrate the come back of my blog is to share a sweet recipe with all of you.
After a long break of almost 4 years due to some personal set backs, I am restarting in 2017 with support of my hubby and dad and lot of nudging and coaxing from my cousin too . So this sweet is for you all for making me move out of my inertia.
With the mild chillnes still lingering in the atmosphere,fresh winter vegetables are a feast to the eyes in the market and make me want to cook something interesting  .
I picked up the bottle gourds which were very inviting and prepared this Halwa instantly.

Every year I unfailingly make Doodhi ka halwa ,but it is only in Nov 2024 I made some changes to the write up and added a few new pictures but leaving the below picture unchanged as it is my fond memory of come back into the world of blogging . The recipe remains unchanged as it is very close to my heart being my mom's recipe .

Copyright https://sweetspicytasty.blogspot.in


Cooking time : 45 mins
Cooking level : Medium
Serves : 2-3 people

Ingredients
2 medium sized bottle gourd
100 gms khoa (unsweetened)
1 cup milk
1/2 cup sugar
2 -3 tsp ghee/clarified butter
2-3 cardamoms/elaichi powdered
8-10 Cashews finely chopped
10-12 raisins/kishmish
Chopped pistas and badam 

Method
copyright of https://sweetspicytasty.blogspot.in
  • Wash and peel the bottle gourds and remove the seeds if there any
  • Grate them well using a grater or food processor.
  • Grate or crumble the khoa as well and set aside.
  • Heat a thick bottomed kadai with 1tsp ghee and fry the grated bottle gourd in it for about a minute.
  • Add the cup of milk and mix well and allow the bottle gourd to cook nicely. The doodhi will become soft and loose its crunch.
  • Keep stirring in between to avoid sticking and burning.
  • This takes about 10 to 15 mins on medium flame.
  • Add the khoa,sugar and elaichi powder and stir well and keep the flame low now.
  • Allow the mixture to cook well until you see all the milk,khoa and sugar being incorporated well into the bottle gourd and feel and amazing aroma wafting in your kitchen.
  • Turn off at this stage and add the chopped cashews to it and mix well.
  • You can roast the cashews in ghee or add it just like that.
  • You can also add lots of chopped dryfruits too before serving. 
  • Transfer in a bowl and keep it refrigerated for an hour or serve it warm .
Notes

  1. Squeeze the grated bottle gourd well with both your hands before frying them in ghee. This step ensures that there is no extra water content and prevents the halwa from getting soggy.
  2. If using sweet khoa instead of unsweetened adjust the sugar level accordingly.


February 22, 2013

Gajar Halwa / Carrot Halwa - Microwave method


Share with friends and family 8 comments:

My mom had magic in her hands when she made gajar ka halwa. I try to make like her and have succeeded to a great extent.Amma always made carrot  halwa the traditional way where the carrots are cooked in milk until all the milk is absorbed and then simmered further with ghee and sugar . The traditional recipe is on my YouTube Channel and you can get the recipe here .

I customized the traditional recipe of slow cooking to make it in the microwave oven so that busy office goers or even bachelors can easily make it at home and enjoy the delicious halwa .
Taste wise I did not make out any difference between the two methods,just that the microwave method  gave me the Gajar Halwa quickly to please my Taste buds. 


Gajar halwa is mainly made in winters as the availability of Delhi carrots popularly known as Laal gajar or red carrots is abundant. But ,you can also make gajar halwa with the Ooty carrots or Orange carrots and they also taste yummy .In my home, Hubby is a fan on ooty carrot halwa while I relish both equally . I personally haven't found any stark differences between the two varieties of carrots used for preparing the halwa ,think its all personal preference and acquired taste.
I love to have warm gajar halwa with a scoop of vanilla icecream. This combination was introduced by my maternal grandpa who was a die hard sweet lover . Needless to say ,me being a fan of icecream as well as gajar halwa, this combo was a super hit with me .


This recipe was posted way back in 2013 on the occasion of V's birthday and after so many years it saw the light again today (13/1/2023) by way of which the photos and write up was updated for our fortnightly activity of Redoing Old posts ,an initiative by my fellow blogger Renu. This is the 92nd edition of Redoing old posts . I am hoping to be consistent with this activity so that many of my old posts get their desired face lift :-) 


Preparation Time : 15 mins
Cooking Time : 20-25 mins
Serves : 2-3

Ingredients
250 gms carrot grated
1 cup milk
2 cups sugar
3tbsp ghee
cardamom powder

For Garnishing

cashews - 4/5 pieces
almonds - 4/5 pieces
raisins  - 3/4 pieces
Unsalted pistachios 

Method
  • Peel and wash the carrots.
  • Grate them using a grater .Grate them just before you start making the halwa.
  • Take a microwave safe container,add the grated carrots,milk and cook in the oven for 15 mins.
  • After about  7-8 mins,take the container out of the oven,stir the mixture and place it back for the remaining time.
  • Once the carrots are cooked,add the ghee and sugar and place it again for another 10 mins.
  • Stir again, once after 5-6 mins and add the garnishing items and cardamom powder to the mixture and place it in the oven for balance time. 
  • After adding the sugar don't cook for a long time as there is a tendency for the halwa to turn hard and rubbery.  Incase due to oversight such a mishap happens,add some milk and mix well .This will help salvage the halwa .
  • The halwa starts leaving the sides of the container and you can see the ghee on top of the mixture. Yummy halwa is ready !!!
  • Serve hot or cold..Both taste yummy !

Note :
  • If the carrots are too juicy,squeeze out the juice with your hands before you put them for cooking.
  • In case you feel the carrots are not cooked in the first 15 mins,you can increase the time and check at intervals until the carrot is completely cooked. 

Serving Suggestions :

A scoop of vanilla ice cream with the halwa is an excellent combination.

Pin me up !!


February 15, 2013

Mattar Paneer | Paneer Matar | मटर पनीर - winter special


Share with friends and family 4 comments:

Mattar Paneer or Matar Paneer or mutter paneer (मटर पनीर)  is a North Indian curry and a popular item on any restaurant menu . It is a gravy prepared using fresh or frozen peas,paneer (Indian cottage cheese) simmered in a tomato onion curry and flavored with traditional Indian spice powders .
Matar Paneer is mildly spicy and pairs well with rotis, naans , jeera rice and even puris .


I have loved Matar Paneer since my childhood and mom would make it very frequently at home especially during winters when fresh peas are available in plenty in the markets .
If you don't get fresh peas ,you can also use frozen peas ,it tastes equally good .

Some people use soaked and cooked dried peas ,but I personally don't like the flavor and texture hence I avoid, but you can use that too if you like the taste of dried peas .


Matar Paneer can easily be customized to a Jain variant or a no Onion No garlic variant without compromising on the taste and flavors.  The Jain version of Matar Paneer is on my blog . You may click here for the recipe.

Just like my Palak Paneer recipe, this recipe of Matar Paneer has been a huge favorite among our friend circle.Our friends love to enjoy the Matar Paneer made by me and literally the serving bowl is polished off clean.

Each time I make Matar Paneer, I think of clicking some decent pictures for the blog,but somehow I used to miss doing that .So ,today (17 Jan 2025) I decided to click photos for my blog as I started making Matar Paneer and Jeera rice for lunch.  The post has been refreshed with stepwise photos of making the recipe and a few othe pictures too as well as the blog post . Also,I have uploaded the complete recipe making video on my YouTube Channel. 


Preparation Time : 10 mins
Cooking Time : 30 mins
Serves : 2 to 3
Complexity - medium 

Ingredients

3 ripe tomatoes 
1 medium sized onion - cut into big cubes
7-10 cashews 
250 gms fresh/frozen green peas.
200 gms paneer
3-4 green chillies
1 tsp ginger garlic paste
1 tsps red chilli powder
1 tsp dhania / corriander powder
1/4 tsp haldi / turmeric powder
1 tsp garam masala
1 stick of cinnamon
2 cloves 
1 tbsp cooking oil
1 tbsp ghee 
1 tsp sugar
salt to taste.

Method


  • Blanch the tomatoes, onions,green chillies ,cashews in microwave or stove top . If blanching in microwave ,set the timer to 5 mins until the tomatoes turn soft.
  • Allow this to cool and then grind this in the blender into a smooth paste with ginger garlic paste 
  • Cut the paneer into small cubes and slightly fry them in oil till they turn  light brown.
  • Blanch the green peas with some salt until peas turn soft .
  • Add the fried paneer to this warm water .This process keeps the paneer soft and moist.
  • Heat the kadai with some oil and fry the whole spices 
  • Add the tomato paste ,salt , dhania powder,red chilli powder ,turmeric and garam masala and cook the paste until the oil separates and the gravy is well cooked.
  • Cook on medium flame and stir occasionally so that the gravy doesn't burn and stick to the pan.
  • Now,add the blanched peas and paneer  to this mixture.
  • Simmer and cook for 3 to 4 mins .
  • Add salt if needed and adjust the gravy consistency as per your liking.
  • Add some kasuri methi in the end .
  • Garnish with corriander leaves and serve hot with any flavored rice,chapathi,poori ,naan etc.