Showing posts with label International. Show all posts

December 07, 2022

Veg Pizza - Stove Top version


Share with friends and family 9 comments:

 Pizza is the most loved quick bite that's enjoyed by all ..Be it kids or adults ,there is something in Pizza that makes it everyone's favorite. 

Kids find the long string of hot melted cheese  while they take a bite as an attraction while elders love the various toppings that are used on the Pizza to make it tasty and enjoyable .

As much as many consider pizza as a junk food or a overload of fat due to cheese,I would say we can make it really healthy by using the whole wheat or multi grain pizza base , loads of vegetables and very minimal cheese or no cheese at all . 

One of the best ways to get the kids eat as much as veggies as possible.  I keep trying various toppings and this time I used even some grated carrots and it was a very nice welcome change.  

Nowadays markets are flooded with a variety of ready made pizza base breads and I was super impressed with the thin crust multigrain base which I have used in the recipe. Though we can bake our own pizza bread at home, for sudden pizza cravings I pick up the pizza base from the nearby organic store. 

Cheese was used very minimally and a mix of cheddar and mozzarella from my favorite brand Amul . Amul is a very famous brand which is widely used in India and known for its superior quality of diary products ,ice creams and chocolates.

This flavor packed and tasty pizza was  prepared for the World Street Food Theme on our food group Shhh Cooking Secretly Challenge.  I was partnered with the amazing blogger Preethi who was also the host for this month's theme. She gave me the secret ingredients Oregano and Tofu while I gave her Yeast and icing sugar with which she has made delicious Firi Firi


Preparation Time - 15 - 20 mins
Cooking Time - 5 to 10 mins
Complexity - easy 
Serves - 2 to 3

Ingredients 

2 multigrain pizza base bread 
1/2 cup finely chopped assorted bell peppers 
1/4 cup boiled sweet corn 
1 medium onion chopped 
100 gms tofu /paneer diced into cubes 
1 medium carrot finely grated
Chilli flakes 
Oregano flakes 
1/4 cup tomato sauce / pizza sauce
50 gms grated mozzarella cheese
50 gms grated cheddar cheese 

Method 

  • Take a pizza base , spread some sauce over and layer it with some cheese. 
  • Add the toppings one by one as you wish .
  • Sprinkle Chilli flakes and Oregano all over the toppings .
  • Spread some more cheese as you like.
  • Place the pizza base on a heated tava/griddle ,and roast on slow flame until the cheese on top melts .
  • Cut into wedges and serve hot .


October 03, 2022

Khimchi - Asian Cuisine


Share with friends and family 16 comments:

 If you are a Chinese food lover, then Khimchi is not a new item.  I was introduced to khimchi when I first dined at Mainland China years ago. Mainland China is one of the most popular Asian Fine Dine restaurant in India that serves many authentic Asian dishes .

For the uninformed, Khimchi is a way of preserving veggies like a pickle and is served alongside the main course meal . Mostly when fresh veggies aren't available either due to weather or any other factor, then this Khimchi comes to the rescue. 

 I had Googled many recipes on how-to make Khimchi at home and had been wanting to try from a long time.  Finally I narrowed down on a recipe from a popular food channel and prepared using that recipe . I was quite happy with the outcome as it was just like the one I have tasted. I made it using cabbage but there are many variants where you can add carrots, daikons etc as well.

This month in our food bloggers' group Shhh cooking secretly Preethi Tandon suggested we explore jams,chutneys ,jellies or preserves from non Indian Cuisine and viola it was the best time to make and enjoy this yummy Khimchi which was a long over due to present itself on the blog.

My partner for this month is the enthusiastic blogger Seema who gave me the versatile ingredients soy sauce and sugar while I gave her  Cumin and lemon as the secret ingredients. with Seema has made a lipsmacking Quince Chutney.. If only I could lay my hands on that chutney now,I would be in the 7th heaven relishing it :-) 


Preparation Time - 3 to 4 hrs
Cooking Time - Nil
Complexity - simple

Ingredients 

3 cups finely chopped Cabbage
1/4 cup Dark soy sauce 
1/4 cup Vinegar 
2tbsp Chili flakes
Salt as needed 
1 tbsp Sugar 
2 tsp Little garlic powder 
1 tbsp Finely  grated ginger
Sesame oil while serving 

Method


  • In a wide mixing bowl , take the cabbage and mix it with salt and some chilli flakes . Let this rest for 3 to 4 hrs 
  • After 3 to 4 hrs the cabbage will appear wilted and soggy.Squeeze out  as much juice you can from the cabbage and transfer it to another bowl.
  • In this bowl,now add in all the ingredients except the oil and mix it well.
  • Store it in sterilized glass jar,cover it properly and let it ferment for 24hrs .this step is very important to get the perfect taste and texture. 
  • Refrigerate after 24hrs and always use a dry spoon while scooping out from the jar.
  • Drizzle some sesame  oil over the khimchi just before you serve.

Pin it up


June 25, 2022

Corn Capsicum Quesedilla


Share with friends and family 7 comments:

Corn capsicum Quesedillas are perfect to serve as quick after school snack or for an early dinner.  The gooey cheese and the crunch from the sweet corn and capsicums make every bite delectable. 

Make sure that these Quesedillas are served hot as soon as you prepare so that the filling and the tortillas don't loose the crispness and the texture

Mexican flavors are very close to our Indian spices and flavoring agents, so ideally you don't even need to hunt for special ingredients to make these melt in mouth Corn Quesedillas. 

There are ready made tortillas available in the market these days which can be used to make these Quesedillas or even the Indian Flat bread (Fulkas) can also be used as the base for making. 

You  can experiment with various flavors when preparing the filling and try to make it as healthy as you want. The amount of cheese can also be as per your preference. In today's corn capsicum Quesedilla I have kept the filling very simple and have used diced mozzarella cheese to get the gooey effect . 

Today's recipe makes use of ready made multigrain tortillas and for the filling I have used sweet corn , green bell pepper (capsicum) and red bell pepper. 

If you like Mexican flavors then you must try the following recipes from my blog

Mexican Bean Rice 

Bean Quesedillas 

Mango Salsa

Pineapple Salsa


Preparation time - 10 mins
Cooking Time - 3 mins per Quesedilla
Complexity - simple 
Makes - 4 Quesedillas
 

Ingredients 

4 multigrain/flour tortillas 
1 medium green bell pepper (capsicum)
1 medium red bell pepper
1/2 onion finely chopped (skip for jain /satvik
1.5 cups boiled corn
1.5 cup diced /grated mozzarella cheese 
Finely chopped corriander 
1 green chilli finely chopped
Chilli flakes as needed
Salt as needed 

Method 


  • Finely dice the green and red bell pepper into small cubes .
  • Take 1/2 cup boiled corn in a blender and crush it coarsely. 
  • In a wide mixing bowl, take the finely chopped capsicum ,red pepper, crushed corn ,boiled sweet corn and onions if using and give a quick mix.
  • Add in the chilli flakes ,salt,  corriander ,green chilli ,2 tbsp diced cheese and mix it nicely. The stuffing is now ready. 
  • Take one tortilla and lightly roast it on open flame or microwave it for 10 seconds. 
  • Place the tortilla on a flat surface ,place the filling on one half of the tortilla ,spread as much cheese as you want and fold it.
  • Place this tortilla on a hot tawa and roast it on both sides until it turns  crispy and the cheese melts inside . If using a convection oven or OTG ,preheat the oven to 400F and bake the tortillas for 3 mins .
  • Using a sharp knife or pizza cutter , cut the Quesedilla into wedges and serve it hot .
  • Repeat the same process for the remaining tortillas.
Pin it up


September 20, 2021

Carrot Sambol | Easy Carrot Salad - Vegan Srilankan Recipe


Share with friends and family 9 comments:

 Carrots are my favorite vegetable when it comes to eating raw . I love adding carrots to my meal as a salad or as raita . The subtle sweetness from the carrot and crispness ,gives the salad a nice crunch .

Gajar Koshimbir / Carrot Kosambri  is the Indian version of carrot salad where grated carrots are seasoned with tempered mustard seeds, udad dhall , red chillies and garnished with fresh coconut . Likewise, Carrot Sambol from Srilanka is a close cousin of the Indian Kosambari . 

In Srilanka, carrot sambol is served as a part of breakfast with Sevai /String hoppers and some stew . Many a times, lunch also has this healthy sambol as part of the menu .  

Carrot Sambol is very easy to make and can be prepared in a jiffy . Except for pepper powder and chopped green chillies ,there is no other spice element . The overall salad is crunchy and mildly spiced garnished with fresh coconut and mixed with tomatoes and onions.  While I was reading up about Srilankan cuisine, I found out another variant of Carrot Sambol ,prepared in the Jaffna region of Lanka. In that version, some amount of yogurt is added to the salad which resembles the Carrot Raita from Indian Cuisine.

Carrot Sambol/Sambal is a vegan salad from Srilankan Cuisine . Flavorful and healthy served during breakfast and lunch. Sambol,Sambal , carrot Sambol, simple recipe from Srilankan cuisine, can we make sambol without onions? , what is carrot sambol? is carrot sambal and carrot sambol one and the same?

Carrots are a powerhouse of nutrients and there will seldom be anyone who would hate carrots . From the childhood we have been told that , carrots are a good source of vit A and regular consumption of carrots help in preventing the deficiency of vit A . The orange color of carrot is got from Beta Carotene which is metabolised into Vit A . It addition to vitamin A , carrot is also a rich source of vit K and Vit B complex which are very much essential for our overall growth and health.

Carrots are widely used across cuisine all over the globe . Indian and Asian cuisine also make use of carrots widely in many recipes like stir fries, salads, fried rice , desserts , soups etc .  

Come winters;Gajar Halwa & Carrot Kheer are the most popular never to miss seasonal desserts that every household will dish out and serve . The warm serving of Halwa or kheer is perfect for the chill winter days.

Thai Style Carrot Salad is another lipsmacking and refreshing salad option I have bookmarked from Priya's blog "the world through my eyes" .

Carrot Sambol/Sambal is a vegan salad from Srilankan Cuisine . Flavorful and healthy served during breakfast and lunch. Sambol,Sambal , carrot Sambol, simple recipe from Srilankan cuisine, can we make sambol without onions? , what is carrot sambol? is carrot sambal and carrot sambol one and the same?

Preparation Time : 10 mins
Cooking Time : Nil
Complexity - easy
Serves : 2 to 3

Ingredients

3 - 4 orange carrots
2 green chillies
2 tsp pepper powder
3 to 4 tbsp fresh coconut
salt to taste
2 medium sized tomatoes 
1 small onion 
1/2 fresh lemon

**Can be made as a saatvik / No onion No garlic version by skipping the Onions.

Method

  • Peel the carrots and grate them using a grater or food processor.
  • De seed the tomatoes and chop them into small cubes
  • Chop the onions.
  • Mix the carrots,onion and tomato in a wide mixing bowl along with coconut,pepper powder and green chillies .
  • Add the lemon juice and salt just before serving. Toss it lightly and serve immediately.

Tip : Never add the salt and lime juice before hand in any salad, as it will tend to release the juices and the salad will turn soggy and lose the crunch.


Pin it up for later

Carrot Sambol/Sambal is a vegan salad from Srilankan Cuisine . Flavorful and healthy served during breakfast and lunch. Sambol,Sambal , carrot Sambol, simple recipe from Srilankan cuisine, can we make sambol without onions? , what is carrot sambol? is carrot sambal and carrot sambol one and the same?


June 28, 2021

Cheesy Pasta | Cheesy Penne Pasta


Share with friends and family 16 comments:

 Cheesy Pasta is a very easy and quick recipe and can be put together without much effort . It can be a very good after school snack for the kids or also a part of starter in any children's parties. 

Why only kids,even with elders the cheesy pasta is always a big hit and no one can ever say No to a second serving .  Load it with as much cheese as you want and relish the gooey and creamy pasta ! This cheesy pasta is certainly not for the weight watchers or the health freaks . 


I have used Penne pasta for this recipe but you can use macaroni,  spiral , fuesli or any pasta of your choice.  The most important part in getting the pasta right is to cook the pasta properly until it is al dente which means just soft enough to bite into at the same time hold shape and not turn mushy or disintegrate.  

If you have any doubt in cooking the pasta ,follow the instructions on the back of the pasta packet to get it right.  

I always run the cooked pasta under cold tap water in a colander, this helps remove extra starch and also stops the cooking process making it perfect to add on to the sauce.  This cooked pasta can be cooled and then refrigerated for later use as well.

If you like some spicy variant of Pasta , then do try the Pav Bhaji Pasta and Classic Pasta in Red Sauce on my blog.


Linking this recipe to our weekly food theme event Foodie Monday Bloghop.  Priya Iyer is the hostess for the 303rd week and our theme is Pasta Delicacies.  Stay tuned for some yummy Pasta recipes from my blogger friends.  If you love pesto ,check out Priya's easy peasy recipe of Basil peanut pesto. 


Preparation Time - 20 mins
Cooking Time -  15 mins
Serves - 2 to 3
Complexity- medium

Ingredients 
2 tbsp butter 
2 tbsp all purpose flour /maida
1/4 cup processed cheese grated
1/4 cup mozzarella cheese grated 
2 cups milk 
1 tsp red chilli flakes 
1 tsp mixed herbs 
2 cups of boiled pasta 

Method
  • In a pan heat the butter and roast the flour until you get a nice aroma. 
  • Slowly pour the milk and whisk it well to keep it lump free and cook it for 3 to 4 mins.
  • Now add in the processed cheese and mozzarella cheese with the chilli flakes and mixed herbs  and mix it well until the cheese melts.
  • Now add the cooked penne and toss it well till the sauce combines well with the pasta .
  • Transfer to a serving bowl and serve it hot.

Serving suggestions 
  • You can add some boiled corn or vegetables to the pasta along with the white sauce .
  • You may also add some grated cheese on top of the pasta and microwave it for 2 mins to get a more gooey and creamy pasta .
Pin it  up for future 


November 02, 2020

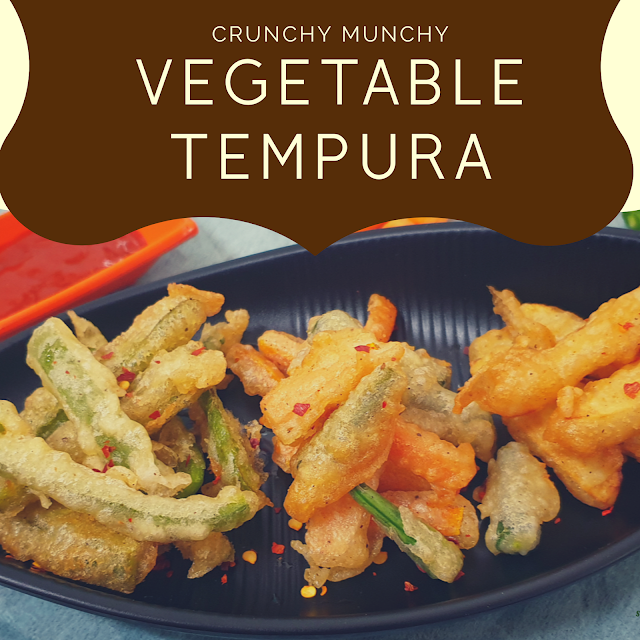
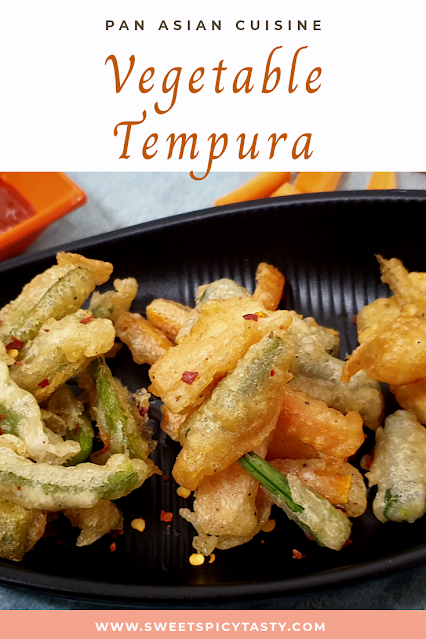
Vegetable Tempura - Japanese fritters


Share with friends and family 15 comments:

 I was craving for some crunchy vegetarian starter on a cold winter night and that is when the waitress at a Thai Restaurant suggested I try the tempura as that is the only thing they could customize to a vegetarian option . She got the chef to make it with the veggies of my choice and I really loved it . My  reaction after taking the first bite was "Hey they taste almost like our veg bajjiya/pakora " - hubby and me had a hearty laugh over the tempura platter. 

That is how I was introduced to the crunchy munchy Japanese spl Tempura at a Thai Restaurant in the USA ... Global Spirit in the true sense . 😃😃. I am told this is a popular street food in many East Asian countries like Japan,Philippines,  Thailand and likewise . 

Perfect tempura batter at home , is tempura vegetarian? , can we make tempura at home ? , what are the vegetables to be used in tempura , jain tempura, tempuras, japanese special tempuras


  • Tempura is a classic Japanese dish that dates back to 16th century.  Yes , you read it right... it is a recipe that is almost 500yrs old approximately.  (Source : Wikipedia) 
  • It is also mentioned in Wiki that it was the Portuguese residing in Nagasaki who introduced this recipe to the Japanese. 
  • Tempura is made using meat, vegetables and sea food which have been coated in a batter and deep fried . 
  • There are certain techniques to be followed in preparation of the batter which will give us crispy tempuras.
  • The batter uses all purpose flour,eggs , baking soda and cold water which helps retain the fluffiness , also the most important point is to mix the batter in small batches so that the gluten from the flour doesn't over react and turn into a lumpy mass which will make the tempura soggy and over coated with batter . Eggs can be easily omitted for the vegan/vegetarian variant as I have done in my recipe today. 
  • The batter can be mildly spiced using pepper powder or chilli flakes . 
  • Traditionally sesame oil (til oil/nalla ennai) was used to fry the tempuras but now any cooking oil like canola or vegetable oil which can withstand good heating point are used to fry. 
  • Almost all vegetables like okra, green beans, carrots, yam, potato, bell peppers, sweet potato,onion, broccoli,egg plant ,bamboo shoots can be used in the preparation of tempuras . Mushrooms and tofu are also used in the vegetarian version of tempura. 

Some fun facts

  • What we call as Choora while frying our Bajjiya, pakodas or bonda, the bits of tempura batter dropped in oil is called Tenkasu. Interesting name isn't it ?
  • These tenkasu bits are used as topping over some other recipes for the crunchy bite just as we use the choora to make a spicy chutney to go with the vada pav .

Perfect tempura batter at home , is tempura vegetarian? , can we make tempura at home ? , what are the vegetables to be used in tempura , jain tempura, tempuras, japanese special tempuras

This week Priya suggested we explore the Asian Cuisine for the 271st Foodie Monday bloghop weekly theme challenge. It indeed was a nice theme where she wanted us to explore something beyond the Indian, Chinese & Indo Chinese range of recipes which are most popular in Asian Cuisine . Priya's love for Pan Asian Cuisine is reflected in her recent recipe of Nasi Kuning- an Indonesian special.

Week 271  - #AsianFoodDelights 

Preparation Time - 15 mins
Frying Time - 20 mins
Complexity - Medium 
Serves - 2 to 3

Ingredients 

1/4 cup APF / maida 
1/4 cup rice flour 
1 cup chilled water 
Pinch of baking soda 
Salt as needed 
1/2 tsp pepper powder 
1/2  tsp chilli powder / chilli flakes 
Oil to deep fry
Assorted vegetables of your choice .

(**refer the tips below for the vegetables to use in jain version)

Method 
Cut the vegetables length wise . Don't make them as thin stripes . They need to be a little thick so that the batter coats them and they retain the crunch after frying.  If using cauliflower or broccoli ,parboil them in hot water and then use . I have used green bell pepper , potato, carrots & French beans.  


To prepare the tempura batter, sift the APF , rice flour ,baking soda and salt into a mixing bowl . 
Take a small batch of this flour mix and add chilled water to make a batter of dropping consistency just thick enough to lightly coat the vegetables when dipped .  Watch the video below to know the consistency.  
It shouldn't be very thick like the Pakoda or bonda batter . )


Dip the chopped vegetables one by one into the tempura batter , lightly coat it and deep fry them in hot oil until they appear crisp and golden brown . Fry them on medium flame once the oil has been heated well else the batter will get cooked first and the vegetable will remain uncooked . We do not want that . So adjust the oil temperature as you keep frying .


 Tips to help 

  •  Donot make a huge batch of tempura batter in the first instance, make small batches as and when needed else the tempuras will turn out soggy and lumpy when dipped in batter .
  • Use only chilled water to prepare the batter .
  • Keep the chopped vegetables also in the fridge until you make the tempuras. This helps it turn out crispier.
  • In one batch of batter I mixed pepper powder for spice while in the next batch I used red chilli flakes .You can see the difference in the fried tempuras.
  • For the jain version  - use bell peppers , cauliflower,brinjal/egg plant , French beans , tofu/paneer,okra /bhindi ,broccoli,cucumber , any squash variety 


⬇️ Pin 📌 it up for future ⬇️ 

https://pin.it/1VcrvnBkW


Perfect tempura batter at home , is tempura vegetarian? , can we make tempura at home ? , what are the vegetables to be used in tempura , jain tempura, tempuras, japanese special tempuras


September 30, 2020

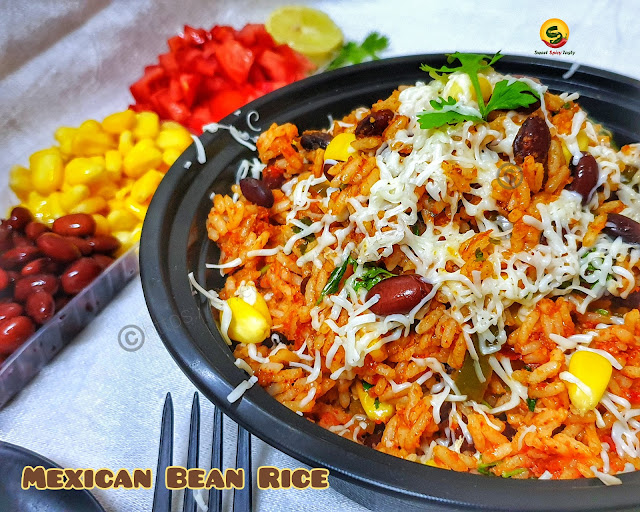
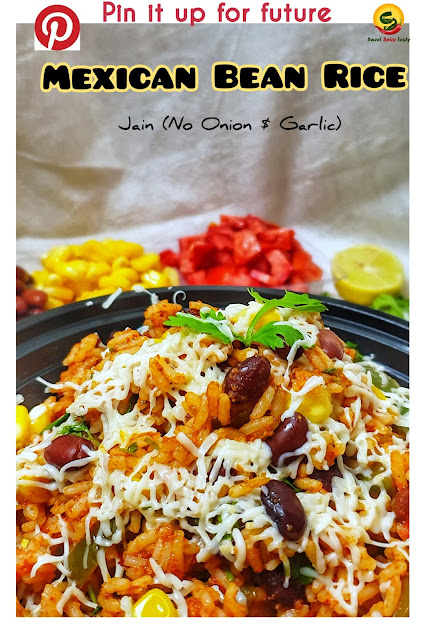
Mexican Bean Rice ( Vegan & No O n G)


Share with friends and family 24 comments:

I can almost say I had "love at first bite" with Mexican food at Chipotle in the US almost 10 yrs back . It was a weekend and our friend took us to this famous Mexican chain and said you will like the food as it is very close to Indian Cuisine and is definitely spicy and flavorful.

As usual with a double mind I stepped into the restaurant along with hubby and that friend and felt like a lost kid in fair not knowing what to order . There were tacos, quesadillas, burritos, nachos, rice bowl etc etc not knowing what to order .  Hubby very happily settled in for his rice bowl, an ardent rice lover that he is and he suggested I should try the burrito as it is close to the Desi Frankie or Kathi rolls which I love a lot . So I got myself a burrito loaded with some cilantro rice , black beans , veggies , salsa , hot sauce, sour cream and took a bite with full reluctance as to how it would taste ...but I was blown away by the flavors and texture of every element that went into it and thus began my love affair with Mexican food and later on it used to be a regular visit to Chipotle and I enjoyed every single vegetarian option on their menu . Back in India , California Burrito outlets helped satisfy the Mexican cravings though I still miss Chipotle a lot .

Mexican rice , mexican bean rice , no onion no garlic bean rice , mexican rajma rice , mexican rice using rajma,how to make mexican rice at home, home made mexican burrito rice bowl , burrito rice bowl,.burrito bowl

Ohh I got carried away as I began writing and got nostalgic.So, if you are wondering what has this love for Mexican food got to do with this post ? Then you guessed it right..this month for our Shhh secret cooking challenge in our FB group , Narmadha who blogs at Nam's Corner  suggested we dish out Mexican recipes and I was paired with the most talented person Mayuri ji, who is nothing short of an encyclopedia in the field of cooking & baking . If you visit her blog Mayuri's Jikoni you will definitely agree to what I have said . 

Narmadha's blog Nam's corner is another chest of recipes( veg and non veg)  and she has certain special recipes which are authentic and famous from various regions of Tamil Nadu.  The famous Veg Biryani prepared using Seeraga Samba variety of rice is one you must try and if you are a non veg lover , go through her blog for exotic Chettinaad Cuisine known for fiery nonveg preparations. 

Mayuri ji's Saffron Tapioca Pudding is a healthy sweet indulgence and this recipe is a must try for all health freaks as it is loaded with fresh fruits and honey with absolutely no Sugar involved.

Mayuri ji gave me Rajma/ kidney beans and Paprika as secret ingredients to dish out a recipe while I gave her sweet corn and tomatoes and as usual Mayuri ji has raised the bar by preparing the authentic and traditional Mexican Mollete

With the 2 secret ingredients, I dished out a delicious and lipsmacking Mexican Bean Rice with freshly ground Mexican spice powder . Let's head to the recipe to see how to prepare this flavorful rice . The recipe may look a little lengthy , but with proper pre preparation and planning we can actually put this together in less than 30 mins .

Mexican rice , mexican bean rice , no onion no garlic bean rice , mexican rajma rice , mexican rice using rajma,how to make mexican rice at home, home made mexican burrito rice bowl , burrito rice bowl,.burrito bowl

Preparation Time - 8 to 10 hrs 

Cooking Time - 20 to 30mins

Serves - 3 to 4 

Complexity - Medium 

**can be vegan by skipping the use of cheese 

Ingredients 

Mexican spice mix

2 tbsp dhaniya /corriander seeds
1tbsp jeera/cumin
1 tbsp paprika flakes /kshmiri chilli/byadgi chillies 
2 tsp oregano flakes 

For the rice
2 cups cooked rice (grainy and fluffy)
1 big capsicum cut into long stripes 
1 cup of boiled sweet corn 
100gms Rajma/ kidney bean
3 to 4 tomatoes 
1 tsp red chilli powder
1 bayleaf/ tejpatta
2 cloves /lavang 
2 pods garlic finely chopped (optional)
1 medium onion cut length wise (optional) 
2 tbsp cooking oil
Salt as needed 
Pinch of sugar 
Lots of freshly chopped corriander 
Grated cheese as needed (optional/ skip for vegan)
1 tbsp lemon juice 


Mexican rice , mexican bean rice , no onion no garlic bean rice , mexican rajma rice , mexican rice using rajma,how to make mexican rice at home, home made mexican burrito rice bowl , burrito rice bowl,.burrito bowl


Method 

  • Dry roast the dhaniya and cumin in a pan until crisp and set aside.  Let it cool for a few mins. In a blender add these roasted ingredients, paprika flakes , oregano and pinch of salt and grind to a fine powder . Store in an air tight bottle free from moisture . 
  • If using dry kashmiri chilli or byadgi chilli then roast it along with the cumin and corriander and then make the spice mix .


  • Soak the rajma for 8 to 10hrs and pressure cook along with bayleaf, salt and cloves until soft and well cooked.  
  • Puree the tomatoes in a blender .
  • Pressure cook the rice well in advance;atleast 4 to 5 hrs and store it in the fridge. This helps the cooked rice retain its texture and the mexican rice won't turn mushy or soft .


  • In a pan heat 2 tbsp oil , first saute the garlic followed by the onions until the onions turn pink .Donot let the onions turn brown.
  • If not using onion & garlic skip the previous step and directly saute the chopped capsicum till it turns a little soft followed by the corn and rajma .
  • Add 2 tablespoon of the fresh spice mix and saute it well such that the spice mixture gets coated well .
  • Add in the tomato puree, required amount of salt  ,pinch of sugar and cook well till the raw flavor of the tomato is lost.
  • You may also use different colored bell peppers .


  • The puree on cooking with the vegetables and beans will begin to thicken and you can feel a nice aroma waft through. Now add a little red chili powder and mix well. Adjust salt if needed and at this stage you can even add some more spice mix if you need it spicier. 
  • Stir in the cooked rice with this puree and careful mix it without breaking the rice . 
  • The tomato bean curry/masala must get mixed with the rice properly. Close with a lid and cook for 2 to 3  mins on a low flame . 
  • Lastly ,add the lime juice and freshly chopped corriander and mix well .
  • Let the rice stand for 15 to 20 mins before serving so that all the flavors are absorbed well into the rice .
  • Add some grated cheese, chopped tomatoes, boiled corn over the rice before serving and serve it along with some crispy nachos if you like them.


Though we love Mexican cuisine a lot , I realised that there aren't many recipes on my blog and soon I need to add them on . Meanwhile you can try out my 2 other favorite recipes (click the images for recipes) from the Mexican cuisine and share your feedback with me :-) 


September 21, 2020

Chai Karak - Emirati spiced Tea


Share with friends and family 10 comments:

 Kalyani of Sizzling Tastebuds made us take a virtual food tour of UAE / Middle East and explore their cuisine by suggesting #EmiratiEats as the theme for the 265th week of Foodie Monday Bloghop weekly activity.  

She was liberal enough and allowed us to stretch beyond the boundaries of UAE and even explore Middle Eastern cuisine if we weren't comfortable just with options from the countries of United Arab Emirates (Abu Dhabi , AjmanDubaiFujairahRas Al KhaimahSharjah and Umm Al Quwain.)

Initially, I was a little doubtful if I would be able to pull through this challenge because of paucity of time to procure certain ingredients which were not available easily at the local stores and the online delivery dint have an immediate delivery slot. So, I continued reading and researching further on the various vegetarian recipes prepared in the Middle East / UAE to zero down on something which can be prepared with what is available at home.

While doing so , I found that there is quite a lot of similarity in the Indian Cuisine and the Middle Eastern cuisine especially in sweets and hot beverages. It was nice to read about the usage of various spices in their cuisine. 

The Arabs love their spices and no recipe is complete without the addition of the exotic spices. Rose water , cardamom and saffron occupy the top place in their recipes.Needless to say , I too love the flavors of cardamom and saffron which I widely used in Indian Desserts too.

I found 3 recipes which were very interesting of which I finalised Chai Karak / Karak Chai - I too love my tea with exotic flavors just like the Emiratis so this really caught my attention.  

The other two recipes Khabeesa and Laban / Leben were equally intriguing to try which I am sure to do soon.  

  • Khabeesa is a close cousin of the Indian Sheera / sooji / aate ka halwa but made using date sugar and flavored with rose water.  Some recipes use wheat flour as main ingredient while some call for sooji/semolina/ Farina .

  • Laban or Leben is plain buttermilk which is obtained after churning the yogurt to extract butter from it .

Chai Karak 

Sources from the internet quote that Tea /coffee culture has been a part of the Emirati Hospitality since time in memorial and every guest is treated with a cup of coffee or tea along with some dates . The Arabian Coffee is served as Black Coffee while the Tea is generally brewed with milk and some spices.  

Karak/kadak in hindi means "Strong".

Karak Chai means the tea prepared has a stronger brew . The tea concoction is simmered along with the spices until all the flavors are infused into the decoction.

The traditional Emiratis or older generation love their tea spcied with cardamom and saffron and sweetened using sugar . Other spices like cinnamon, ginger etc are added depending upon personal preferences. 

 I could sense the emotional connect between the Desi Cutting Chai and the Emirati Karak Chaai.

Just as we Indians love to sip on our tea at the " Chaai Tapris/ Tea kadai "  the Nationals of UAE also have a special love for tea and the tea shacks are open 24 hrs along the highways where people throng to catch a cuppa of nice hot tea flavored with spices as they drive along. 

Some recipes call for the using of Evaporated milk in the preparation of Karak Chai but it tastes equally good with regular milk too . If you follow Vegan diet , you may substitute with Almond or Soy Milk. 


Preparation Time - 5 mins
Brewing Time  - 15 to 20 min
Serves - 2 
Complexity - Easy 

Ingredients 
2.5 tsp good quality tea leaves 
1.25 cups water 
1 cup milk 
2 tbsp condensed milk (optional) 
2 tsp sugar ( + or - as per your taste)
3 to 4 green cardamom coarsely powdered 
7 to 8 strands saffron / kesar

Method
  • Take the water in a sauce pan and add in the tea leaves and bring it to a simmering boil .
  • Once it begins to boil, add in the cardamom powder and saffron strands and continue simmering on low flame .
  • When you feel the aroma of saffron , cardamom and tea waft through, add in the sugar . 
  • By this time , the tea decoction would have brewed in well .  Remember to keep the flame low at all time else the tea leaves on excess boiling will bring in a bitter taste and we don't want that.
  • Lastly , add in the warm milk and condensed milk , stir well and bring to a boil.
  • Strain this tea and serve while hot . You can add on a few strands of saffron while serving for added flavor and taste.
Tips
  1. Condensed milk already has sugar , so adjust sugar keeping that in mind. 
  2. Coarsely ground cardamom powder gives a nice flavor to the tea rather than finely ground cardamom powder.
  3. The slow simmering is the technique to get the Karak Chai right , so donot lose patience and increase the flame to brew the tea. 1.25 cups of water must reduce to 1 cup by way of simmering. 
Some lipsmacking Middle Eastern/ Emirati recipes from my fellow bloggers 

Minty Lentil & Walnut Pilaf  ;a delicacy from Oman by Kalyani 

Lavaash / Lavaas by Archana ; a flat bread variety from Middle East 

Mint Almond Hummus by Sujata  is a delectable hummus with a flavor of mint.

Shorbat Adas by Mayuri ji is a lentil based shorba/ soup popularly made during Ramadan for breaking the Fast / Roza.

Spicy Carrot Hummus by Swaty is absolutely colorful and spiced up using Sriracha sauce. 

Baba Ghanoush by Poonam is a lipsmacking dip made using roasted Brinjals and flavored with tahini sauce. 


Linking this Karak Chai to week #265 - EmiratiEats of FMBH


August 09, 2020

Orange Granita - Vegan Dessert


Share with friends and family 15 comments:

 Granita is a frozen fruit based dessert made using fresh fruit juice and a sweetening agent like honey or sugar and then freezing it . Granita has its origin somewhere in Italy and is popular all over Italy and relished in various flavors . 

Granita is also known as Granita Sciciliana as it was originally made in Sicily . 

To  me this Granita personally reminded of the Indian ice slush delicacy "Gola" ,"Chuski" or "Ice Gola"  where flavored syrup is poured over slushed /crushed ice and topped with some spices like chat masala. When I took a bite of this Orange Granita , I was transported to my childhood where we would occassionally get to indulge into a Gola and my favorite was Kala Khatta or Orange Gola.

I donot mind calling Granita as "Desi Gola Videshi Andaaaz mein"  

If you are wondering, why am I posting this Italian Dessert out of the blue especially when it is chill and raining in many cities in India , well you guessed it right ! It is Monday and time for our weekly post on Foodie Monday bloghop . This week it was Archana's turn to suggest and majority of us opted for Fruit Based Dessert and that is how Orange Granita was born in my kitchen. Archana has some delectable recipes on her blog "The Mad Scientist's kitchen" and true to the name she definitely experiments a lot like a Scientist with her ingredients and recipes. Some of her recipes on my To Do list are Ice Cream Loaf Cake , Samosa Chat . Do check out her space for some really delicious bakes and desserts. 

How does a Granita look like ?

Granita has a crystalline texture and resembles more like crushed ice .

How do we achieve the texture ? 

We must not let the fruit juice freeze completely. In intervals of 30 to 45 mins we must take it out of the freezer and scrape off the slushy mixture and this must be done till the entire mixture appears like crushed ice .

How long does it take to set the granita?

Minimum setting is around 3 hrs. It may take longer depending on the freezer's temperature control.

What is the shelf life ?

Granita stays fresh upto a week when kept properly stored in the freezer.

What are the main ingredients in a Granita?

There are just 3 main ingredients fruit juice , water and sweetener . Sweetener can either be sugar or  honey . Any kind of fresh fruit juice or even flavored fruit juice can be used . The quantity of sugar or honey to be used depends on the sweetness of the fruit juice. We can adjust the level of sweetness accordingly.

How is granita served ?

It is served more like a slush based drink in either small cups or little bowls with a spoon or straw.  Keep the granita frozen  until you serve.

Ingredients

300ml fresh orange juice. 

**you can also used canned orange juice if you donot have fresh oranges. 

1 tbsp lemon juice

2 to 3 tbsp sugar 

Method

Melt the sugar in 1/2 cup water  and boil until it melts. Let the sugar syrup cool for a while.

Now stir in the orange juice and lemon juice into the sugar syrup and mix it well.

Transfer it to a freezer safe container , cover it with a lid or cling film and place it in the freezer.

After 45 mins, take it out of the freezer and you can see that it has set partly and appears semi frozen. Take a fork or spoon and break all the semi frozen crystals and put it back into the freezer. The mixture will appear like a slush now. Donot worry about it.

After the next 45 mins take it out again and break the crystals . This time it would have frozen a little more than the last time. 

Repeat this process of breaking the crystals until the entire juice now appears like crushed ice and has a granular teaxture . Keep it frozen until you serve.


To serve, take a scoop and scrape out a mixture of the granita and place it a dessert bowl or small cups and serve. You can drizzle some honey for extra sweetness or garnish with some cherries or mint as well. 


Some delicious and unique fruit based desserts from my blogger friends that will surely interest you all -

Lip smacking Mango & Passion fruit paletas by Mayuri ji of Mayuri's Jikoni 

Innovative Watermelon Pizza by Poonam who blogs at Annapurna

Evergreen Mango Mastani by Kalyani of Sizzling Tastebuds 

Healthy watermelon berry smoothie by Swaty who owns Foodtrails25

Refreshing Lemon icecream by Priya of Photowali

Granita is being linked to week 259 - Fruity Bites

June 22, 2020

Jain Falafel - Video recipe


Share with friends and family 9 comments:

Falafel is a middle eastern/Lebanese delicacy made using chick peas/ kabuli channa/ kondakadalai .
These are deep fried balls or patty made by grinding the soaked chickpeas with lots of spices which are commonly used even in Indian cuisine. You can call falafel as a close cousin of our Dal Vada /Aam vadai /paruppu vada.

Falafels traditionally are served stuffed in  Pita Bread ;which is a pocket type bread with some pickled salad and dips like Tahini and Hummus ;which are also a Lebanese delicacy. 

The first time I had these falafel was at a restaurant in Mumbai called Srinathji which specializes in serving delectable multi cuisine menu without using Onion and Garlic . I liked the taste and crunchy Falafels but soon forgot about it until I tasted it again at a proper Middle eastern restaurant during my stay in the US .

This time for our foodie blog hop Monday event  week #252 ,the theme was  Chana Time by Mayuri  and we had a choice of brown channa or chick peas to select as our main ingredient.  The moment she suggested these two , I jumped with joy and decided then and there that Falafel it is . I have tried to make the Jain version sans Onion and garlic but I shall give the method to prepare the regular Falafel also.  Check the notes section for the details .

Donot forget to check Mango Sriracha Hummus on Mayuri's blog which can be a perfect accompaniment for these falafels. 
Also, don't miss out some lipsmacking recipes from my blog made using chickpeas .


Chickpeas Vathakuzhambu (south Indian delicacy) 


Srinathji's have outlets in major cities, so do try visiting them once the lockdown is over and restrictions have been lifted .
For those in  Bangalore , you can try Srinathji's at Indiranagar on Krishna temple street .
 (Not a sponsored post )

Soaking Time - 8 to 10hrs 
Preparation Time - 15 mins
Cooking Time - 30 to 40 mins
Makes 15 to 20 Falafels 


Ingredients 
250 gms white chick peas/kabuli channa
1/2 bunch finely chopped coriander
1/4 bunch finely chopped parsley (optional)
15-20 mint leaves 
2 tsp pepper powder 
2 tsp roasted jeera powder 
3 to 4 green chillies 
Salt as needed 
Juice from 1/2 lemon

Method 

Check the video recipe on my YouTube channel given below and donot forget to subscribe to my channel.


  • Wash and soak the chickpeas for 8hrs or overnight in sufficient water. 
  • Drain the water and wash it once again .
  • In a blender add all the ingredients and grind into a fine paste . Add water little by little and grind . Donot add too much water else the batter will become runny.
  • We need a thick batter so that we can make balls easily.
  • Transfer this ground mixture to a mixing bowl and add 1 tablespoons white sesame seeds and mix it well.
  • Refrigerate it for 20 mins before frying .By doing this we can make balls easily and the  balls wont disintegrate while frying.
  • Heat the oil and make small balls and drop the balls in hot oil and fry on medium flame until they turn crisp and golden brown.
  • Serve with hummus or any dip of your choice. 
Notes 
  1. You can add 1 finely chopped onion and 2 to 3 garlic cloves while grinding for making the non satvik version .
  2. Instead of balls you can shape them as bullets or cylindrical  shape and fry. 


Linking it to foodie Monday blog hop week #252 channa Time