Showing posts with label jain. Show all posts

February 08, 2025

Avarakkai Kootu | Broad beans lentil curry


Share with friends and family 15 comments:

 Avarakkai kootu is a popular side dish from the Tambrahm cuisine made from just moong dhall (yellow split gram) , fresh coconut paste and a Sizzling tempering of mustard seeds ,curry leaves in coconut oil.

Avarakkai(tamil),Avrekkai(Kannada), chikkidkaay (Telugu) is a native Indian vegetable and used extensively across cuisines in India . In the Maharashtra and Gujarat it is called as Vaal papdi or papdi and Sem in Hindi .

Avrakkai is a diabetic friendly vegetable and also rich in protein, dietary fibre,vitamin A ,potassium and folates. Consuming avarekkai is a good source of plant protein and apt for vegetarians to meet their dietary requirements of protein intake. The fibre present in the Indian flat broad beans helps to manage cholesterol in the body.

Since, Avarekkai is a native vegetable, it is used during the Mahalaya Paksha , Amavasya cooking and also for cooking during Shraadh or Devasam. During Shraadh , Amavasai or Mahalaya paksha avrekkai is mostly used in the form of kootu but some families also make a simple stir fry known as Thenga pota curry . 

I shall share the recipe of the simple yet flavorful curry very soon. You may refer to Mildly Indian Seema's Kothavarangai Poriyal and in the same way you can make avarekkai poriyal .

Amavasya Lunch Menu

Avrekkai kootu can be mixed with rice or can also be served as an accompaniment to sambar ,vethakuzhambu, milagu kuzhambu along with some toasted papads and a simple paruppu Thogayal or pudina Thogayal. 

If making kootu to mix with rice, make it a little runny else we can have a thicker consistency. 

Avrakkai kootu is purely Saatvik and Vegan making it No Onion No garlic and Jain friendly .


You may also want to try some lip smacking healthy and delicious kootu recipes from my blog

Chou chou (Chayote) kadalai paruppu Kootu 

Cabbage Kootu 

Thiruvadhirai Kootu 

Poosanikkai (Ashgourd) Pulippu Kootu 

Vellarikaai(Cucumber) Kootu 

Keerai (Spinach) Kootu


Pin it up

https://pin.it/627Wo5jJs


Preparation Time - 10 mins
Cooking Time - 25mins 
Complexity - Simple
Serves - 2 to 3

Ingredients 

150 gms Indian broad beans /avarekkai 
1 cup moong dhall
1/2 cup fresh grated coconut 
1 tsp jeera/cumin
8 to 10 pepper corns
2 dried red chillies 
Few curry leaves 
Pinch of turmeric 
Salt as needed 
1 tsp coconut oil
1/2 tsp mustard seeds 
Pinch of asafoetida 

Method 

  • Wash the broad beans and trim the head and tail. Bundle them up and chop into medium cuts.
  • Wash the moong dhall under running water 3 to 4 times.
  • Add the washed moong dhall,chopped avrakkai ,turmeric , 2 cups water and pressure cook for 3 whistles. Let the pressure release naturally. 
  • Grind the coconut, cumin,red chillies ,pepper with water to a fine paste .
  • Once ,the pressure cools down,lightly mash and mix the lentil and add the ground coconut paste to this along with required amount of salt. 
  • If too thick,add 1/4 cup water and bring it to a quick boil with occasional stirring. Coconut paste has a tendency to stick to the bottom and the kootu will get burnt. 
  • Turn off the stove when the kootu thickens and the raw flavor from the coconut paste is gone.
  • Prepare a tempering of mustard seeds,fresh curry leaves,asafoetida in hot coconut oil and pour it over the delicious kootu.
  • Averakkai kootu is now ready to be served.


June 28, 2022

Paneer Tomato Grilled Sandwiches


Share with friends and family 5 comments:

 Paneer Tomato grilled sandwiches are a perfect choice for packing in kids' lunch box or even for adults when you want to carry something filling at the same time  not messy to eat on the desk .

You can also serve this as an after school snack or even makes for a perfect light dinner when paired with some warm Italian style Tomato soup . (Recipe source - Priya Iyer's blog)

Paneer takes care of the protein quotient for the day and the tomatoes keep the sandwiches moist and don't let it get too dry and stuffy.  Adding some mozzarella chees gives a nice gooey and melt in mouth texture. 


I love to work with different fillings that go into the sandwich and this is yet another successful attempt as my family loved the flavor and the crisp grilled bread. 

For the spice, I have used only red chilli powder and 1 small green chilli chopped.  Some boiled corn was added for the crunch and tomatoes used were firm and deseeded to prevent the sandwiches from getting soggy .

Some sandwich varieties from my blog that you must definitely try 

Classic Veg Cheese Grill Sandwich 

Peanut Butter Cheese Sandwich 

Paneer Cheese Corn Grill Sandwich 

Chutney Cheese Sandwich 

Mumbai Special Toast Sandwich 


Preparation Time - 10 mins
Grilling Time - 3 to 4 mins per sandwich 
Complexity - simple 
Makes 3 sandwiches 

Ingredients 

6 slices of bread 
100 gms paneer 
2 medium firm tomatoes
3/4th cup boiled sweet corn
1 tsp Chilli powder /chilli flakes
Salt as needed 
Fresh corriander chopped 
1 green chilli
Grated mozzarella cheese as needed 
Butter to apply on bread 

Method 


  • Firstly grate the paneer, crush 3 tbsp of corn kernels with green chilli in a blender and de seed the tomatoes and dice into small cubes. 
  • In a mixing bowl mix the Tomatoes, crushed corn , paneer, boiled corn ,chilli powder ,salt, chopped corriander and mix it all well . Let it rest for 5 to 10mins . Our filling is ready .
  • Donot let the filling sit for extra time because the tomatoes will release water when mixed with salt and the filling will become soggy .we don't want that 
  • Heat the grilling pan,  apply butter on one side of the bread , place some filling on it ,spread grated mozzarella cheese as per your wish ..close using the other slice of bread . 
  • Apply some butter to the grilling pan and grill the sandwich on both sides until crisp and golden brown .
  • Cut the sandwich into wedges and enjoy .
  • If packing for lunch, then place foil paper in the inside of the lunch box ,place the cut sandwiches once they have cooled down .this will prevent the sandwiches from getting soggy .

Pin up for later 


December 13, 2021

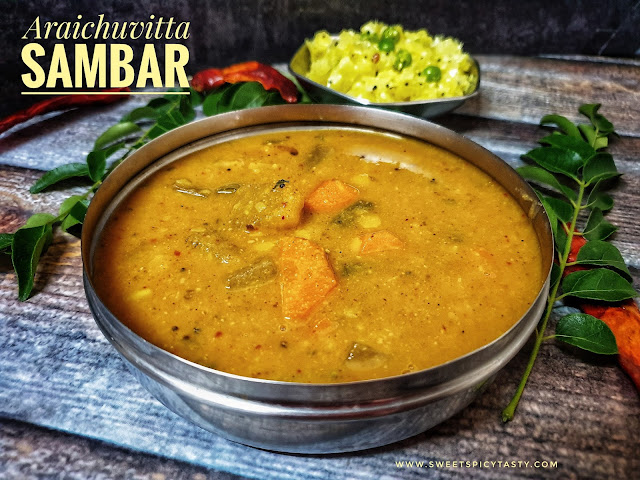
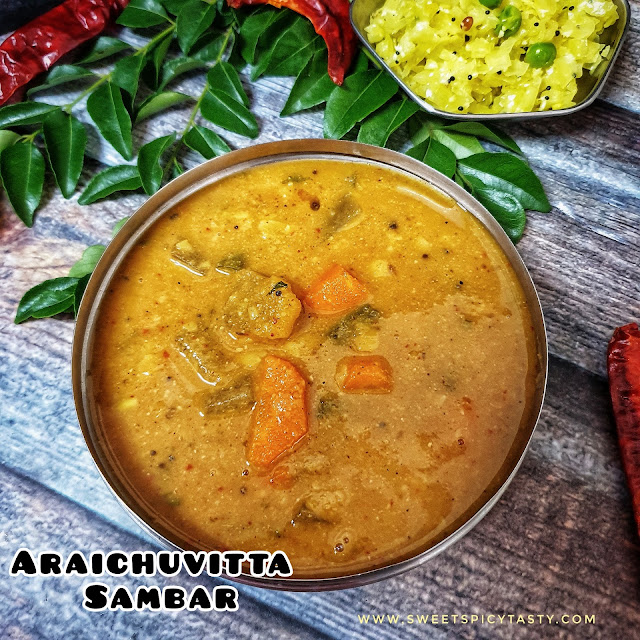
Araichuvitta Sambar - Tamil Nadu special


Share with friends and family 5 comments:

 Sambar is a quintessential item on the daily menu . There are varities of sambar we make on a day to day basis and the recipe slightly varies in each home to match the taste and liking of the family. 

Every home will have a stock of the staple sambar masala or sambar podi as we call in Tamil in the pantry . This is the most essential ingredient to make a delicious sambar .

Araichuvitta Sambar is a typical and traditional recipe from Tamil Nadu.  We prepare a fresh spice mix and grind it with coconut and make sambar using this aromatic and flavorful spice mix.  Araichivitta sambar is made on special occasions like festivals or functions and even marriages.  

Araikardhu in Tamil means grinding..since we grind a fresh masala ,this sambar is known as Araichuvitta Sambar . 

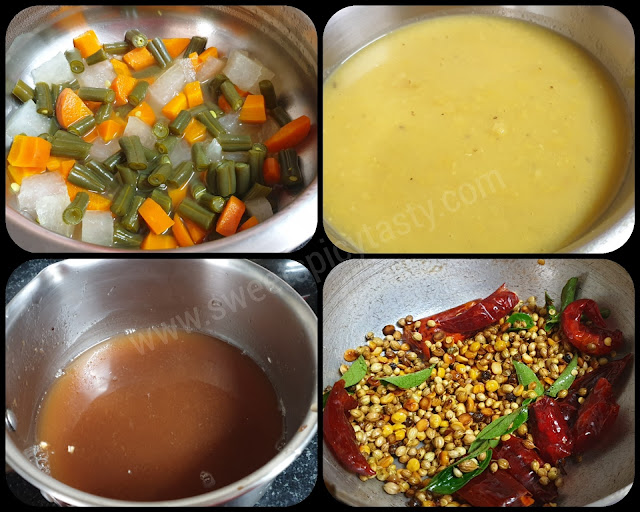
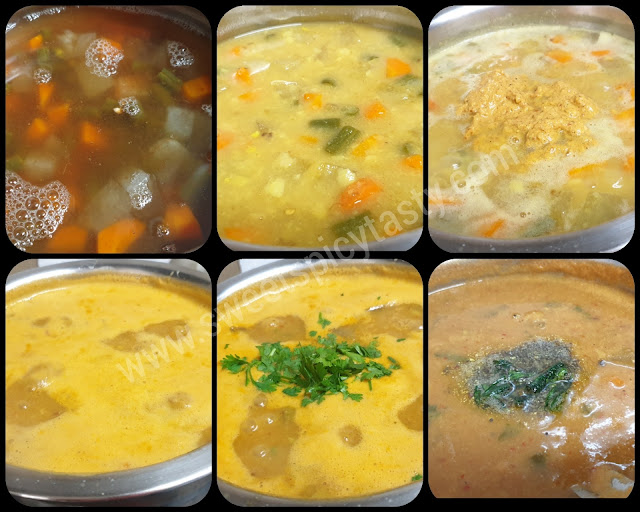
For araichuvitta sambar , we roast the dry spices until crisp and aromatic.  This is then ground along with fresh coconut to a fine paste.  Mixed vegetables are par boiled and then simmered in tamarind water until the raw flavor is lost to which is added the boiled thoor dhall and the coconut paste . The entire mixture is simmered until the dal and coconut mix blend well and you can experience a wonder aroma envelope your kitchen.  Lastly ,freshly prepared tempering of mustard seeds and asafoetida is poured over the piping hot sambar.  Serve it with hot rice and a nice stir fry of your choice . 


Preparation Time - 15 mins 
Cooking Time - 20 mins
Serves - 3 to 4
Complexity - medium 

Ingredients 

To roast & grind
2 tbsp dhaniya /corriander seeds 
1 tbsp channa dal 
1/4 tsp pepper corns 
Few fenugreek seeds 
4 to 5 dry red  chillies 
Few curry leaves 
3 tbsp fresh coconut 

For the sambar 
Chopped mixed vegetables (beans, carrot, ash gourd , capsicum , potato)
1 cup tamarind extract 
1/2 cup thoor dhall 
Salt as needed
Pinch of jaggery 
1tsp mustard seeds 
Pinch of asafoetida 

Method 


  • Par boil the chopped vegetables in 1 cup water with a little salt .
  • Pressure cook the thoor dhall with turmeric. The dhall must be mushy and soft . Adjust water accordingly. I normally use 2 cups of water for 1/2 cup thoor dhall and pressure cook for 3 whistles on medium flame .
  • Roast all the ingredients in 1tsp oil ( under the roast & grind ) except the coconut. Start with the channa dhall followed by the dhaniya,  curry leaves,  fenugreek seeds ,pepper and then red chillies. let it cool , then add the fresh coconut and grind it to a fine paste with sufficient water.


  • Add the tamarind extract to the par boiled vegetables and boil until the tamarind loses it raw flavor . 
  • While the tamarind is simmering ,add the mashed thoor dhall ,adjust salt and bring to a rolling boil .
  • Add the coconut masala paste, quickly stir to mix it well .continue cooking until you see the sambar frothing . Be very attentive and keep stirring else the coconut paste has a tendency to stick to the bottom and burn giving a very bad taste.  Cook on low flame .
  • Once you see the sambar frothing and bubbling add the jaggery and fresh chopped corriander and turn off. 
  • Prepare a tempering of mustard seeds in hot oil with asafoetida and fresh curry leaves and pour it over the araichuvitta sambar .
  • Serve hot with rice,  ghee , vegetable stir fry and some papads.  I served Cabbage Peas stir fry alongside the araichuvitta sambar. 


July 20, 2020

Basic Kadai/Kadhai Gravy| कड़ाही मसाला - Vegan


Share with friends and family 8 comments:

Kadhai Paneer , Mix Veg Kadhai , Kadhai Mattar , Kadhai Mushroom ..... aren't these some of the delicious gravies that are on your order list during luncheons or Dineins at your favorite restaurant? 

 I know I am must have gotten you all salivating as you read this and most of you may be rebuking me for reminding you off these yummy items when we cannot even think of going out to dine considering the present scenario...

Well, don't fret ..what if I told you that you  can make these tasty gravies at home and enjoy with your family ?

All you have to do is prepare the base gravy and keep it ready .Now, to it you can add your favorite veggies or sautéed mushrooms, boiled peas or sautéed paneer and capsicums and viola your favorite kadai gravy is ready. 


I must thank Preethi of Preethi's cuisine who came up with this idea of blogging Basic Curry /gravy recipes used in Indian Cuisine for our Foodie Monday Bloghop this week . Preethi has some amazing recipes on her blog and if you are a beetroot lover you must visit  her blog to see the varieties she tries  with beetroot.  What fascinated me the most,is her Jujubees made using Dragon Fruit. The color is simply stunning and I could keep looking at it rather than pop into my mouth.

How did I think of Kadhai/Kadai gravy ?

Theme for week 256 was finalized as "Desi Base Curries" and soon I started racking my brains and started looking up cook books  and some age old hand written recipes written by Amma and while doing so I suddenly recollected a recipe which Amma had told me verbally.  I had a fair idea of all the ingredients and masala that go into it ,but little did I know that it was the basic Kadhai masala until I saw a few Kadhai recipes in my fav Tarla Dalal's cook book and concluded that mom's recipe is perfect for this theme.  It is always the Mom who comes to the rescue ..don't you all agree ?
You can make this gravy in advance and freeze it for future use .

You may also want to try my basic gravy for making Veg Makhanwala , Mutter Paneer , Kosta curry etc which are mildly spiced and slightly sweet as it makes use of Tomatoes and cashews in the making of the curry .


How to use the frozen Masala gravy ? 
  • Bring down the container to the refrigerator section from the freezer  atleast 2 to 3 hrs before use, then remove the desired quantity and let it thaw while you can refreeze the balance.  
  • However try to utilize it quickly as thawing and freezing time and again isn't good .
  • The other option is pack them into 2 or 3 separate containers wherein the contents of 1 container can be used for single time 

What did I make using this Kadhai Masala?

I prepared a lip-smacking Kadhai Mutter (peas) gravy and paired it with hot phulkas for dinner.
Next time I plan to make hubby's fav Kadhai paneer with tri colored bell peppers .


Preparation Time : 10 mins
Cooking Time: 20 mins
Complexity: medium
Serves : 3 to 4

Ingredients 
4 medium sized tomatoes 
2 tsp finely chopped garlic (optional)
7 to 8 kahsmiri chillies or byadgi  chillies 
1 tbsp dhaniya /coriander seeds 
1 tsp jeera /cumin
1 tsp kasuri methi 
1/2 tsp haldi 
1/2 tsp red chilli powder
1/2 tsp garam masala
2 tablespoon oil 
Salt as needed 
2 to 3 green chillies 

Method
Dry roast the chillies , dhaniya and jeera in a hot pan and blend it to a fine powder after cooling the roasted ingredients. 


Blend 2 tomatoes into a fine puree in a blender and the other 2 tomatoes needs to be chopped finely . Chop the green chillies as well. Adjust the quantity of green chillies to suit your spice level.


Heat oil in a pan and add the chopped tomatoes and chillies along with haldi powder , red chilli powder and garam masala.Let it cook until mushy . If you plan to freeze this gravy for future use , then add some extra oil which will act as preservative .

Note : If  using garlic, then fry the garlic in oil first and then add the chopped tomatoes 

Never use onion in the base gravy if you are going to freeze it .The onions tend to spoil the gravy or give a foul smell after a few days .


Once ,the tomatoes turn mushy and soft, add in the tomato puree and continue cooking till the raw flavor of the tomato is lost .Add 3 tsps of  freshly ground masala powder , kasuri methi and salt and continue cooking till the oil separates from the gravy and forms a nice layer .
Keep stirring in between to prevent the gravy from sticking to the pan and cook on medium flame .
Now , your basic gravy is ready . It is best when consumed fresh, but incase you plan to freeze it, then let it cool completely, use a dry and clean spoon to pack into a food grade container and then freeze it .

How to make Kadhai Mutter/कड़ाही मटर?

  • Boil about 1.5 cups or 100gms of frozen peas or fresh peas and add it to this gravy .
  • Let it simmer for 5 to 6 minutes until the peas absorbs the flavors of the masala.
  • Transfer it to a serving bowl, garnish with fresh corriander and serve it hot with rice or rotis.
  • You can heat a little oil , saute the onions until pink and add it to the gravy along with the boiled peas . 

Linking this to week #256 - Desi Base curries 


June 04, 2020

Pav Bhaji - easy version


Share with friends and family 1 comment:

Pav Bhaji basically needs no introduction.  It is one of the most liked and favorite street food for many . Though it is loaded with vegetables which are healthy the downside is the oodles of butter that goes into the making of this lipsmacking street food . In my opinion, if you have to eat it right and you are diet conscious or a health freak keep this for your CHEAT DAY and enjoy it the way it is to be eaten ....yea you got it right...buttery bhaji with butter toasted paav .. aah am drooling even as I am writing this .


I already have 2 versions of pav bhaji mentioned in my blog which you can check 
Pav Bhaji (regular)
Pav Bhaji (half Jain- sans Onion and Garlic)

Today's version was shared by my good friend Priyadarshini .As we were casually chatting, she said she prepared pav bhaji using layering technique to cook the veggies and then finally roasted the pavbhaji masala in butter to which the mashed veggies are added and viola we have yummy lipsmacking pavbhaji in less than 30 mins. 

Preparation Time - 10 mins
Cooking Time - 25 to 35 mins
Serves  - 2 to 3
Complexity- easy 


Ingredients
2 to 3 medium sized potatoes 
1 medium sized capsicum 
1 cup fresh or frozen peas 
3 to 4 medium sized tomatoes 
10-15 Cauliflower florets 
1 small onion
1 lemon
1.5 tsp ginger garlic paste (optional)
Or
1 tsp ginger paste 
Salt as needed 
1 tsp turmeric powder 
2 tablespoon pav bhaji masala 
2 tsp red chilli powder 
1 tsp dhaniya powder 
1/2 tsp jeera 
100 gms salted butter 
Pinch of sugar 

Method 
  • Peel the potatoes and cut them into medium sized cubes .
  • Chop the  onion,tomatoes and capsicum into cubes 
  • In a cooker,start layering the vegetables 
  • Layer the bottom with onions , garlic paste followed by tomatoes over it and then the peas , capsicum, cauliflower and lastly the potatoes. 
  • Sprinkle some salt and haldi powder . You can sprinkle some water and then close the lid and pressure cook for 4 to 5 whistles and let the pressure settle down.
  • Open the cooker and finely mash the vegetables with a masher or electric blender .
  • In a pan , melt about 2  to 3 tablespoons of butter and fry the jeera , followed by the dry spice powders and carefully fry them on slow flame without burning it . 
  • Now , add the mashed veggies to this flavored butter  with a pinch of sugar , mix it well and let it cook till the butter starts oozing out . 
  • Roast the paav in butter and serve the bhaaji with a garnish of fresh corriander , half a lime and freshly chopped onions .


Notes
If you want to make it sans onion and garlic, skip those two ingredients and follow the process as is. 

If making Jain version, skip the onion, garlic , ginger and use raw banana instead of potato . Process remains the same .

If you have a cast iron wok/kadai , use that for the traditional touch . It gives a very nice flavor to the pav bhaji .


May 27, 2020

Majjige Huli - Udupi style


Share with friends and family 22 comments:

Curd based gravy is  very popular all across Indian Cuisine,known by various names each region has it's own special recipe and method to prepare a lipsmacking curd based curry or gravy. 
Majjige Huli(kannada) , Morekuzhambu (Tamil), Majjiga Pulusu(Telugu),Pulissery, kaalan,MoreKootan (malayalam) are all delicacies prepared in the South of India with curd as the main ingredient . The next main ingredient which is part of the masala or spices mix to be prepared is fresh coconut and green /red chillies.  
Kadhi is a north Indian variant and is comparatively easy and quick to make as it doesn't involve any grinding or roasting but uses the basic ingredients in our pantry. 
You can try the recipe of Gujarati Kadi and Fajeto (Aam/Mango kadi) featured on my blog.


I love these curd based curry especially during summers as it light on the stomach and also cools the body system.
As  already mentioned, each region has a slightly different method of preparation and today we shall see how to prepare the Udupi style Majjige Huli. 
This month as a part of our Secret ingredient challenge in our Facebook group we were given the theme as Udupi Cuisine by our fellow blogger Jayshree Trao who has some amazing recipes on her blog and her latest lipsmacking recipe is Watermelon Rind Smoothie which you can try.
I was paired with Poonam Bachav who prepared the traditional prasad Hayagreeva Maddi with the secret ingredients Jaggery and ghee given to her by me and she gave me Mustard and curry leaves. 

Udupi is a town in Karnataka in southern India which is famous for the Udupi Shri Krishna Temple , serene beaches and lots of other temples and Mathas.  
Primarily the Udupi cuisine is a saatvik cuisine meaning there is no use of Onion and Garlic in the traditional recipes as they were all part of the offering made to Shri Krishna in the Krishna Temple 
This Udupi cuisine was developed by the Shivalli Madhwa Brahmins who were in charge of cooking prasad for the temple and then the same is served to the thousands of devotees who throng the temple for darshan. 

Preparation Time - 20 mins 
Cooking Time -15 mins
Serves- 3-4 
Complexity  - simple 


Ingredients 
300 gms ash gourd / white pumpkin/boodhu kumbalkkai /safed bhopla/pooshnikai
1 tablespoon rice soaked in water for 20 mins
1 cup freshly grated coconut 
4 to 5 green chillies 
300 ml thick and slightly sour yogurt/dahi
Few curry leaves/kadipatha
1 tsp mustard seeds
1/4 tsp methi /fenugreek
2 tsp edible coconut oil 
Salt as needed

Method
  • Peel the skin of the ash gourd , discard the seed portion and cut them into medium sized cubes.
  • Take about 150ml water in a vessel and  boil the ash gourd with a little salt until it is 3/4th done.
  • Excess cooking will make it mushy and lose the crunch. 
  • In a blender ,grind the rice, coconut and green chillies with about 2 tablespoons of curd to a fine paste and keep it ready . The rice will give thickness to the gravy.
  • Whisk the curd with 100 ml water and set aside .
  • Once the ash gourd is cooked , add the coconut paste , some salt as needed  and mix well . Bring it to a quick rolling boil .
  • Now, slowly add the whisked curd to this coconut-ashgourd mixture and cook on medium flame till you see the curd mixture frothing up.
  • At this stage turn off the stove and donot over cook because the curd will curdle and the entire texture and taste will be lost .
  • You have to be very vigilant after adding the curd as it will froth up in about 3 to 4 mins max .
  • Prepare a tempering of mustard , methi seeds and curry leaves using coconut oil and pour it over the Majjige Huli .
  • Use of coconut oil is what gives it the authentic flavor and taste so pls donot skip using coconut oil .
  • Serve hot with some rice and enjoy your meal.


Notes 
In place of ash gourd we can use Mangalore cucumber , chayote squash (chou chou) , cucumber or even ladies finger.

Use slightly sour curd to get the tangy flavor .

1-2 dry red chillies can also be added along with tempering .


May 20, 2020

Cheesy Masala Papad


Share with friends and family No comments:

Papad is an integral part of any Indian meal . Papads are crunchy sun dried fritters served either fried or roasted along with the meal . 
Papads can even be microwaved or even air fried . 

What is papad or pappadum or appalam ?
Papads are prepared out of rolling a dough made using udad dhall flour , moong dhall flour or rice flour along with some spices . The dough is kneaded tightly and then rolled into thin discs like chapati/rotis and sun dried which are then stored for year around . This is mostly a summer activity undertaken by the ladies of the home. 
Now a days we have ladies wing and many small scale home industries which prepare and sell these papads across stores under various  brands with the  necessary hygiene and safety certifications .

What is masala papad ? 
Masala papad is a quick starter or an appetizer served just before the actual meal . A spicy tangy salad type mixture of finely chopped tomatoes, onions , cucumbers, lots of coriander with right amount of salt, red chilli powder , chat masala is spread over the roasted or fried papad and eaten with soups or cocktails/mocktails. 


Preparation Time - 10 mins
Cooking Time - nil 
Complexity- easy 


Ingredients
3-4 Roasted or fried papads 
2 medium sized tomatoes finely chopped 
1 cucumber peeled and finely chopped
1 onion finely chopped (optional - I haven't used).
2 green chillies finely chopped 
2 cheese cubes grated 
Finely chopped coriander 
Pinch of salt 
1/2 tsp red chilli powder
1/4 tsp black salt 
1/4 tsp chat masala 

Jain version- skip the onions 

Vegan version - skip the cheese 

Method 
  • In a wide mixing bowl , mix the tomatoes, cucumber, onions with salt, red chilli powder , green chillies, black salt and chat masala and toss it well. 
  • Add in the fresh corriander and lightly mix it .
  • Lay the papads on a plate , generously spread this salad mixture on the papads, top it with some grated  cheese and some crunchy sev.
  • You can also add a few drops of khatta meeta chutney or green chutney too for extra flavor and zing. 
  • Yummy masala papad ready. 
Do try the yummy street style Bhelpuri and 
Pani puri also on my blog .


Notes
  1. Spread the mixture on the papads just before serving else they will turn soggy and wont taste good .
  2. If you are preparing the masala papad for some party , prepare the mixture without adding salt , black salt and chaat masala. Add these and mix just before making the masala papad .
  3. Adding salt before hand will tend to release water from the veggies and the salad will be all watery and will be difficult to spread on the papads.
  4. I have used udad dhall pepper flavored papad. You can use moong dhall papad or even rice Pappad called khichiiya.


May 19, 2020

Masala Peas Pulao (pulav) / Masaledar Matar Pulav (pulao) - can be vegan !!


Share with friends and family 5 comments:

Pulao is the most desired recipe in my home and is also my go to choice when I run out of dinner or lunch ideas . Pulaos are an easy one pot meal which when served with a simple raita takes care of your hunger pangs and the tummy will bless you .


This masala Peas pulav can be packed for lunch box and is also a very good pot luck party choice of menu. Bulk quantity of masala Peas Pulao can be easily made by proportionately doubling or tripling the ingredients.  It will be an instant hit with kids as well as adults.

Making Masala matar pulao ,doesn't need any fancy ingredients or pre preparations, you can whip this up in about 30-40 mins inclusive of preparation and cooking time


 So ironical, that an almost regular meal in my household was not blogged..I really dint know whether to laugh or feel bad about myself. 

Well,better late than never and here comes this yummy recipe in my style as it was on our dinner menu last night.

 I served masala matar pulao with some chilled Boondi tomato raita and a glass of chilled buttermilk to beat the heat . You may serve it with a choice of your gravy as well. Gujrati style Kadhi pairs really well with this masala pulao. 

To make Jain version of this pulao , skip the Ginger .

To make Vegan Version , skip the ghee.

Preparation Time - 15 mins
Cooking Time - 20 mins
Complexity - Simple
Serves : 2-3


Ingredients
1.5 cups rice  preferably Basmati Rice 
3/4 cup fresh peas or frozen peas
2 green chillies finely chopped
1 tsp jeera
1 tsp ginger paste / finely grated ginger
2 bay leaves / tej patta
small stick of cinnamon/ dalchini
2 -3 cloves / lavang
1-2 cardamom / elaichi
1 tsp garam masala
1/2 tsp turmeric powder
fresh corriander and pudina 
2 tsbp oil
1 tbsp ghee (skip if vegan) 
salt as needed

Method
  • Wash the rice well and soak it in water for about 15 mins and then drain .
  • Keep water ready . If using basmati rice use 2.25 cups water and if using regular cooking rice then use 3 cups water . 
  • In a pressure cooker , heat the oil and splutter the jeera followed by the bay leaves , cloves , cinnamon, cardamom and saute on slow flame till you get a nice aroma.
  • Now , add in the green chillies and ginger and fry it well.
  • Add the peas, garam masala, haldi , salt and give a quick toss.
  • Pour the water and let it boil . Adjust salt at this stage if required. The water has to taste a little salty so that when we add the rice the salt will get absorbed into the rice and the taste will be perfect.
  • As soon as the water boil, add the drained rice and mix well and close the cooker lid.
  • Pressure cook for 2 whistles on medium flame and turn off. Let the pressure release normally.
  • Slowly , open the cooker , fluff it with a fork and add the ghee and let it permeate into the rice.
  • Add finely chopped corriander and mint just before serving and serve it hot .

Pin it up 


February 13, 2017

Thakkali / Tomato Chutney (No Onion No Garlic version)


Share with friends and family No comments:

Tomato Chutney is a spicy tangy chutney/dip made out of ripe tomatoes .

A perfect accompaniment for any south indian breakfast or even curd rice. You can pair this chutney with theplas or parathas and will be ideal for packing in lunch boxes .

A good alternative to coconut chutney when you have run out of fresh coconut or want to reduce the usage of coconut due to health reasons. 

There are various ways in which we can prepare tomato chutney,this is a No Onion No garlic version of preparation.

Don't miss to try out some flavorful Phalli Chutney (groundnut chutney) which is also a coconut less chutney from Andhra Pradesh published on my blog.

Preparation Time : 5 mins
Cooking Time : 10 mins
Serves : 3-4
Complexity: Simple


Ingredients

3-4 medium ripe tomatoes
2-3 green chillies
small piece of ginger (skip for jain version)
few curry leaves
pinch of asafoetida
pinch of turmeric
salt to taste
1/2 tsp mustard seeds
1 tsp oil
1 tsp jaggery powder 

To temper /Thadka
1 tsp oil 
1/2 tsp mustard seeds 
1/2 tsp channa dhall
1/2 tsp udad dhall


Method

  • Roughly chop the tomatoes.
  • In a kadai,heat oil and temper the mustard seeds.
  • Add the green chillies,ginger,curry leaves,asafoetida,haldi and saute well.
  • Add the chopped tomatoes and saute well till the tomatoes become mushy and cooked well.
  • Let the tomatoes cool ,add jaggery,salt and grind it well into chutney consistency.
  • Prepare a tempering using mustard ,channa dhal,udad dhall and pour it over the chutney. 
  • Relish it with idlis, dosas or chilled curd rice. Goes well with upma and pongal too.


©Sweet Spicy Tasty©

January 30, 2017

Palak Keerai Sambar /( Spinach) Greens Sambar


Share with friends and family 5 comments:

Keerai / Greens are very rich in nutrients and a very good source of iron and potassium.Inclusion in daily diet is recommended. There are different varieties of greens available in the market depending on your region . In Northern India Palak(spinach), Sarson (mustard leaves) and Methi (fenugreek) are in abundance and used widely  while in Western and Southern parts of India greens like Dill , Moringa , Red and Green Amaranth along with methi and palak are used. 

Keerai sambar uses palak /spinach as the main ingredient. Sambar,keerai,spinach,kuzhambu, palak keerai sambar, pasala keera Sambar,  keerai kolambu

Care must be taken to wash and clean the greens very well. Make sure you wash and drain the greens before you cut them. Run them under running water and wash well until the leaves look clean and green. Here is a quick video on how to clean and wash the greens posted on my YouTube Channel..If you still haven't subscribed to my channel, pls do it right away . 

How to clean and wash  Green Leafy Vegetables? 


Palak Sambar or Keerai Sambar has been my favorite since childhood ..I love to eat keerai sambar with rice, roti, dosas and even idlis .The best combination with palak Sambar is Raagi Mudde . Ragi mudde is a delicacy in Karnataka made from finger Millet/Nachni.  Popularly known as mudde and soppu saaru/huli. Soppu means Green Leafy vegetables in Kannada .

Keerai Sambar can be made with or without onions .If you are making during some special days like Amavasya , Pithru Paksh , Ekadashi then skip the onions and follow the rest of the recipe as is.  I make this sambar both ways depending on the mood,time and the occasion.
 

Keerai sambar uses palak /spinach as the main ingredient. Sambar,keerai,spinach,kuzhambu, palak keerai sambar, pasala keera Sambar,  keerai kolambu

This recipe of keerai sambar uses palak /spinach as the main ingredient.  Alternatively, one can use moringa leaves,  Amaranth leaves and also methi leaves to make Sambar.  I shall upload those recipes too as and when I make them . Until then you may try Keerai Masiyal and Keerai Kootu ,both traditional recipes from Tamil Nadu which are simple to make at the same time you will literally be licking your fingers wanting for some more .

The entire post and write up except the recipe has been updated with new  and better pictures which will help in better SEO . This recipe was one of my earliest posts way  back in 2012 - 2013 .I hope you all like this recipe and enjoy making it for your family .

Keerai sambar uses palak /spinach as the main ingredient. Sambar,keerai,spinach,kuzhambu, palak keerai sambar, pasala keera Sambar,  keerai kolambu


Preparation Time : 20 mins
Cooking Time : 30 mins
Serves : 2-3

Ingredients

1 bunch Palak  (roughly 300 gms).
1/2 cup thoor dhall / pigeon peas /thuvaram paruppu
small sized tamarind ball
1 medium sized onion chopped (optional)
1 medium tomato chopped 
2-3 tbsp Sambar Powder
2-3 tsp fresh grated coconut
1 tsp grated jaggery
pinch of turmeric
Tempering
Mustard seeds.
pinch of asafoetida
1 tsp ghee/clarified butter (skip for vegan)
Or 
2 tsp cooking oil 

Method
  • Pressure cook the thoor dhall with a pinch of turmeric until soft and mushy.
  • Wash and chop the greens finely.
  • Soak the tamarind in warm water and extract the juice.
  • Grind the sambar powder and coconut into a fine paste with a little water.
  • Heat a  little oil in a kadai,and saute the onions until light pink. (Skip this step if not using onions and jump to next step)
  • Put the greens ,chopped tomatoes and saute.
  • Pour the tamarind water,add a cup of water,salt,jaggery and bring to a boil until the raw flavor of spinach and tamarind is lost .
  • Slowly,add the masala paste and boil till the  raw smell of the coconut is gone .Takes hardly 1 minute.Donot boil the coconut mixture more as it may start to disintegrate and will spoil the texture of Sambar. 
  • Finally,add the boiled thoor dhall ,lower the flame and bring to a rolling boil.
  • Prepare the seasoning using ghee or oil and mustard seeds and pour it all over.
  • Serve hot with steamed rice and a little ghee and some fried/roasted fritters /papad. I normally pair this with Potato Stir fry . It is a super hit combination. 

Pin it up 


April 27, 2013

Aam Ras | Aapus Aamras | How to make Aamras at home


Share with friends and family 6 comments:

Aam (Mango) ; Ras (Juice /Pulp) is the extract of the ripe mango fruit consumed in the western states of India like Maharashtra,Gujarat ,Rajasthan.
Aamras is a very typical and traditional dessert of the Indian Subcontinent and a summer season special.

 Traditionally the pulp would be extracted by softening the ripe mango and squeezing the fruit with hands.But now a days the juice is extracted using blenders to make the process hassle free and mess free.

In Karnataka ,aam ras is known as Seekarne ,Rasayana or Maavina Hannu Sihikarne . In place of milk, some people add coconut milk which makes it vegan friendly. 

I prefer Mango mastani while hubby loves Mango Lassi .So whenever I make ras at home , hubby gets his share of mango lassi while I reserve some to make mango mastani for me 


Alphonso / Aapus variety of the mango is generally used,but any sweet ripe mango can be used. Apart from Aapus,I have tried making aam ras using Raspuri  ,Badami and Mallika varieties which are very popular in  south India. 

Aam ras and Puri is a very favorite combo relished by most people in summer.  If you have spent a few years of your life in Bombay, Gujarat you can feel and experience the unconditional love for Aam ras puri that people have in this season.  


Preparation Time : 10 mins
Cooking Time : Nil
Makes about 2-3 servings.

Ingredients

3-4 Fresh ripe mangoes  (preferably Alphonso / any ripe variety)
Sugar as needed
2-3 strands of saffron
1/4 cup milk or coconut milk (optional)

Before making aamras make sure the mangoes are ripe and  sweet and not tart .Even one tart mango can change the taste of the aamras and hence ruin the total experience. 

Method
  • Wash and peel the skin of the mangoes and cut them into cubes.
  • Add the mango pieces,saffron,milk and blend into a smooth puree in a blender.
  • If you feel the juice needs a little more sweet,add in the sugar and blend again or you can add some powdered sugar as well.
  • Traditionally some dried ginger powder is sprinkled over the aam ras just before serving. This helps in easy digestion and also prevents bloating or gas .
  • Serve chilled or with hot hot puris or fulkas .
Serving suggestions

Almond slivers can be added just before serving.

Freshly powdered cardamom can also be added for extra flavor .

To know how to make soft and tasty fulka ,click this link below